This time we used the following libraries:
Compared with the U8G2 library, this library has a lot less functions, and the relative RAM and ROM occupancy is also less. The drawing progress bar is very bright
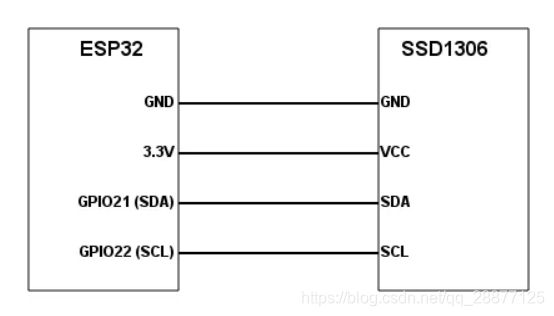
Still connected to the hardware IIC SCL: 22 SDA: 21
1. How to use the library
- Import library (mine is IIC interface)
#include "SSD1306Wire.h"- Instantiate an SSD1306Wire object
SSD1306Wire display(0x3c, 21, 22);- Initialization screen
display.init();- Display and clear
display.clear();
display.display();
2. Related API
1. Clear the screen, clear the display buf area, display.clear
void OLEDDisplay::clear()display.clear();2. Clear a point display.clearPixel
void OLEDDisplay::clearPixel(int16_t x, int16_t y)display.clearPixel(0,0);3. Display, display the content of the buf area display.display
void SSD1306Wire::display()display.display();4. Turn off the display display.displayOff();
5. Turn on the display display.displayOn();
6. Restore display.allocateBuffer() after deep sleep;
//Use it to resume after deep sleep without resetting the display (what init() will do).
//If the connection with the display has been established and the buffer has been allocated, it returns true, otherwise it returns false.
display.allocateBuffer();7. Close the OLED, clear the object and cache display.end();
void OLEDDisplay::end()8. Flip the screen vertically display.flipScreenVertically();
display.flipScreenVertically();9. Screen mirroring display display.mirrorScreen();
display.mirrorScreen();10. Invert Display display.invertDisplay();
display.invertDisplay();11. Return to normal display display.normalDisplay();
display.normalDisplay();12. Reinitialize display.resetDisplay();
display.resetDisplay();13. Reset the display orientation display.resetOrientation();
display.resetOrientation();14. Set the display brightness display.setBrightness();
void OLEDDisplay::setBrightness(uint8_t)15. Set the contrast display.setContrast()
void OLEDDisplay::setContrast(uint8_t contrast, uint8_t precharge = (uint8_t)'�', uint8_t comdetect = (uint8_t)'@')Set display contrast
For example: extremely low brightness and contrast: contrast = 10, precharge = 5, comdetect = 0
Normal brightness and contrast: Contrast = 100
3. Drawing related API
1. Set a point display.setPixel
This is the basis of all drawing methods
void OLEDDisplay::setPixel(int16_t x, int16_t y)2. Draw a hollow circle display.drawCircle
void OLEDDisplay::drawCircle(int16_t x, int16_t y, int16_t radius)display.drawCircle(64,32,20);3. Draw a filled circle display.fillCircle
void OLEDDisplay::fillCircle(int16_t x, int16_t y, int16_t radius)4. Draw 1/4 arc display.drawCircleQuads
void OLEDDisplay::drawCircleQuads(int16_t x0, int16_t y0, int16_t radius, uint8_t quads)display.drawCircleQuads(32,32,20,1);Where: quads is the angle
| quads | Upper left | Upper right | Lower left | Lower right |
|---|---|---|---|---|
| 0 | ||||
| 1 | ||||
| 2 | ||||
| 3 | ||||
| 4 | ||||
| 5 | ||||
| 6 | ||||
| 7 | ||||
| 8 | ||||
| 9 | ||||
| 10 | ||||
| 11 | ||||
| 12 | ||||
| 13 | ||||
| 14 | ||||
| 15 |
5. Draw a horizontal line display.drawHorizontalLine
void OLEDDisplay::drawHorizontalLine(int16_t x, int16_t y, int16_t length)display.drawHorizontalLine(0,20,100);6. Draw a vertical line display.drawVerticalLine
void OLEDDisplay::drawVerticalLine(int16_t x, int16_t y, int16_t length)7. Draw a line display.drawLine
void OLEDDisplay::drawLine(int16_t x0, int16_t y0, int16_t x1, int16_t y1)8. Draw a hollow rectangle display.drawRect
void OLEDDisplay::drawRect(int16_t x, int16_t y, int16_t width, int16_t height)9. Draw a solid rectangle display.fillRect
void OLEDDisplay::fillRect(int16_t x, int16_t y, int16_t width, int16_t height)10. Draw progress bar display.drawProgressBar
void OLEDDisplay::drawProgressBar(uint16_t x, uint16_t y, uint16_t width, uint16_t height, uint8_t progress)Progress value is 0~100
4. Text related API
1. Set the font display.setFont
void OLEDDisplay::setFont(const uint8_t *fontData)| Built-in fonts | Character height | Word width | Contains characters |
|---|---|---|---|
| ArialMT_Plain_10 | 13 | 10 | 224 characters |
| ArialMT_Plain_16 | 19 | 16 | 224 characters |
| ArialMT_Plain_24 | 28 | 24 | 224 characters |
2. Set the text alignment method display.setTextAlignment()
void OLEDDisplay::setTextAlignment(OLEDDISPLAY_TEXT_ALIGNMENT textAlignment)The alignment methods are:
| Alignment method | description |
|---|---|
| TEXT_ALIGN_LEFT | Align left |
| TEXT_ALIGN_RIGHT | Align right |
| TEXT_ALIGN_CENTER | Align center |
| TEXT_ALIGN_CENTER_BOTH | Align up, down, left and right |
3. Draw String display.drawString
Draw string with default or set font
void OLEDDisplay::drawString(int16_t x, int16_t y, String text)display.setFont(ArialMT_Plain_16);
display.clear();
display.drawString(0,0,"hello");
display.display();4. Draw string (with maximum width) display.drawStringMaxWidth
Reach the maximum width and return to the line feed display
5. Image related API
1. Display 16*16 icon display.drawIco16x16
void OLEDDisplay::drawIco16x16(int16_t x, int16_t y, const char *ico, bool inverse = false)The drawing method I use: Use PCtoLCD
Then soul drawing
Then set the output format:
Finally generate the font
Finally written in the program:
#include "SSD1306Wire.h"

SSD1306Wire display(0x3c, 21, 22);

const char image[] = {
    0x00, 0x00, 0x00, 0x00, 0x00, 0x00, 0xC0, 0x01, 0x70, 0x03, 0x18, 0x06, 0x08, 0x04, 0x08, 0x04,
    0x00, 0x06, 0x80, 0x03, 0xE0, 0x00, 0xC0, 0x01, 0x00, 0x01, 0x00, 0x0C, 0x00, 0x0C, 0x00, 0x00, /*"Unnamed file",0*/
};

void setup()
{
  Serial.begin(115200);
  display.init();
  display.flipScreenVertically();
  display.clear();
  display.drawIco16x16(0, 0, image, 0);
  display.display();
}

void loop()
{
}
2. Display the XBM image display.drawXbm
void OLEDDisplay::drawXbm(int16_t x, int16_t y, int16_t width, int16_t height, const uint8_t *xbm)I used an online converter for xbm images:https://convertio.co/zh/
3. Display BMP bitmap image display.drawFastImage (not experimented)
void OLEDDisplay::drawFastImage(int16_t x, int16_t y, int16_t width, int16_t height, const uint8_t *image)