EAST: An Efficient and Accurate Scene Text Detector
Questyle's works at CVPR2017
Advantage:
Provides direction information, can detect text in various directions
Disadvantages:
The detection effect is not good for long text, and the feeling field is not long enough
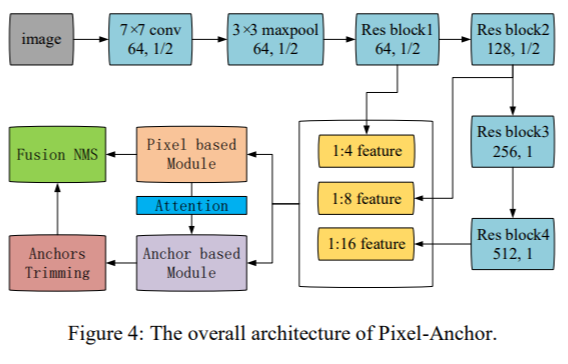
Network structure:

The overall network structure is divided into 3 parts
(1) Feature extraction layer:
The basic network structure used is PVANet, which extracts features from stage1, stage2, stage3, and stage4 respectively, a kind of FPN (feature pyramid network) idea.
(2) Feature fusion layer:
The feature layer extracted in the first step is upsampled from back to front, and then concat
(3) Output layer:
Output a score map and 4 regression boxes + 1 angle information, or output, a score map and 8 coordinate information.
Because the basic network used by the program is not the pvanet network, but the resnet50-v1.
In the resnet50 implementation of the caffe version, there are only pooling behind the first convolution and gloabl pooling in the last layer. See reference for the detailed structure. The network achieves a similar pooling effect through the stride=2 operation of the convolutional layer.
The resnet50 in the slim used in this program contains 5 poolings.
Resnet50 structure, the last featuremap essentially reduces the input image by 16 times (4 pooling), and the last gloabl pooling is similar to the full connection in vgg. gloabl pooling is a patent of googlenet and Resnet.
The network structure of this article mainly takes the featuremap of pool2, pool3, pool4, pool5, and then performs uppooling, concat, and conv operations to obtain the final featuremap, and then performs convolution to output F_score with channel=1
, Geo_map with channel=4, angle_map with channel=1.
Label generation process:

(a) The yellow one is the manually labeled box, and the green one is the box after the yellow box is scaled by 0.3 times the side length. This can further remove the manual labeling error and get more accurate label information.
(b) is the label information generated according to the green box in (a)
In (c), first generate a minimum external moment of the white area in (b), and then calculate the distance from each white point in (b) to the top, bottom, left, and right sides of the pink minimum external moment, that is, generate (d), and then generate pink The angle between the rectangle and the horizontal direction, that is, the angle information (e) is generated. The angle information of all gray parts in e is the same, and they are all the same angle.
Loss function:
Overall loss:
Category loss:

The realization of classification loss does not use the class balanced cross-entrop loss in the paper, but uses dice_loss.
def dice_coefficient(y_true_cls, y_pred_cls,training_mask):
    '''
    dice loss
    :param y_true_cls:
    :param y_pred_cls:
    :param training_mask:
    :return:
    '''
    eps = 1e-5
    intersection = tf.reduce_sum(y_true_cls * y_pred_cls * training_mask)
    union = tf.reduce_sum(y_true_cls * training_mask) + tf.reduce_sum(y_pred_cls * training_mask) + eps
    loss = 1. - (2 * intersection / union)
    tf.summary.scalar('classification_dice_loss', loss)
    return loss
First need to explaintraining_mask,
if min(poly_h, poly_w) < FLAGS.min_text_size:
cv2.fillPoly(training_mask,poly.astype(np.int32)[np.newaxis, :, :], 0)training_maskIt is to treat the boxes whose length or width is less than a certain threshold as hard-example. These samples are too difficult to train, so these samples need to be removed. Therefore, make the box containing these samples black. Just the opposite of the value of score_map, so it is removed.
The implementation of dice_loss is the cross-to-combination ratio. Since the loss needs to be continuously reduced, the 1-operation is used.
Seeing if you can think of anything here, do you feel that the dice_loss and F1_score values are similar.
dice_loss =(2*y_true_cls * y_pred_cls)/(y_true_cls+ y_pred_cls)
F1_score=(2*precision*recall)/(precision+recall)
Return to loss:


def loss(y_true_cls, y_pred_cls,
y_true_geo, y_pred_geo,
training_mask):
'''
define the loss used for training, contraning two part,
the first part we use dice loss instead of weighted logloss,
the second part is the iou loss defined in the paper
:param y_true_cls: ground truth of text
:param y_pred_cls: prediction os text
:param y_true_geo: ground truth of geometry
:param y_pred_geo: prediction of geometry
:param training_mask: mask used in training, to ignore some text annotated by ###
:return:
'''
classification_loss = dice_coefficient(y_true_cls, y_pred_cls, training_mask)
# scale classification loss to match the iou loss part
classification_loss *= 0.01
# d1 -> top, d2->right, d3->bottom, d4->left
d1_gt, d2_gt, d3_gt, d4_gt, theta_gt = tf.split(value=y_true_geo, num_or_size_splits=5, axis=3)
d1_pred, d2_pred, d3_pred, d4_pred, theta_pred = tf.split(value=y_pred_geo, num_or_size_splits=5, axis=3)
area_gt = (d1_gt + d3_gt) * (d2_gt + d4_gt)
area_pred = (d1_pred + d3_pred) * (d2_pred + d4_pred)
w_union = tf.minimum(d2_gt, d2_pred) + tf.minimum(d4_gt, d4_pred)
h_union = tf.minimum(d1_gt, d1_pred) + tf.minimum(d3_gt, d3_pred)
area_intersect = w_union * h_union
area_union = area_gt + area_pred - area_intersect
L_AABB = -tf.log((area_intersect + 1.0)/(area_union + 1.0))
L_theta = 1 - tf.cos(theta_pred - theta_gt)
tf.summary.scalar('geometry_AABB', tf.reduce_mean(L_AABB * y_true_cls * training_mask))
tf.summary.scalar('geometry_theta', tf.reduce_mean(L_theta * y_true_cls * training_mask))
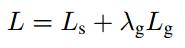
L_g = L_AABB + 20 * L_theta
return tf.reduce_mean(L_g * y_true_cls * training_mask) + classification_lossThere are 2 losses in the regression, which respectively return the upper, lower, left, and right distances of the borderL_AABB, And the angle between the frame and the horizontal directionL_theta。
among them,
L_AABB=-log(area_intersect/area_union),
L_theta = 1 - tf.cos(theta_pred - theta_gt)
among them,
d1_pred, d2_pred, d3_pred, d4_predThey are the predicted distances from the top, right, bottom, left, and borders.
d1 -> top, d2->right, d3->bottom, d4->leftThey are the distances from the top, right, bottom, left, and border labels.
theta_predIs the angle of prediction.
theta_gtIs the angle of the label.
Input_image(512*512),y_true_cls(128*128),y_pred_cls(128*128),y_true_geo(128*128),y_pred_geo(128*128),training_mask(128*128) The visualization of these feature maps is as follows:
training_maskThe black line in the outer circle is added for display needs (white frame is displayed on the white background), but it is not.

Locality-Aware NMS:

locality_aware_nms adds weighted_merge to the standard nms. The so-called weighted_merge is to merge 2 IOUs higher than a certain threshold in the output box based on the score. The coordinate value of the merged output box is between the two merged input boxes. It feels like this operation can use all the coordinate information of the returned box, which helps to reduce the position error, rather than the traditional nms. , Take the one with the highest score directly.
The detailed process is as follows:
def weighted_merge(g, p):
    g[:8] = (g[8] * g[:8] + p[8] * p[:8])/(g[8] + p[8])
    g[8] = (g[8] + p[8])
    return g
Seeing this, there is a feeling that it is similar to the inequality of the convex function.
Suppose, 2 points g and p, assuming their scores are k1, k2,
The above program expression is the formula:
weighted_merge(g, p)=(k1*g+k2*p)/(k1+k2)
The formula for the properties of the convex function is, (k1*f(x1)+k2*f(x2))/(k1+k2)>=f((k1*x1+k2*x2)/2)
Examples are as follows:
Among them, g and p are 2 output boxes, assuming that they are both 1*9 in size, the first 8 are (x, y) with 4 coordinates, and the last is the confidence score of the box.
g=[ 114.08222961 , 29.94154549 , 270.02160645 , 28.1983242 ,
270.58172607, 78.30197144 , 114.64233398 , 80.04519653 , 0.87047273]
P=[ 110.07213085 , 29.98007349 , 267.0800416 , 27.57254931 ,
267.85499947 , 78.08751085 , 110.84708252 , 80.49503197 , 7.11734003]
weighted_merge(g,p)=[110.50913178 , 29.9758749 , 267.40059893 , 27.64074319 , 268.15214478 , 78.11088172 , 111.26067044 , 80.4460111 , 7.98781276]
The author's program provides two implementations: python and c++. Among them, the locality_aware_nms implemented by c++ is nearly 120 times faster than the python implementation.
Training matters:
Only the RBOX method is implemented in the program implementation, but the QUAD method is not implemented.
You can use ICDAR2013, ICDAR2015, ICDAR2017 for training. Among them, 2013 and 2015 were English and 2017 was Chinese.
ICDAR2013 label format: xmin, ymin, xmax, ymax, text
Among them, xmin, ymin are the coordinates of the upper left corner, and xmax, ymax are the coordinates of the lower right corner
eg:38, 43, 920, 215, "Tiredness"
ICDAR2015 label format: x1,y1,x2,y2,x3,y3,x4,y4,text
Among them, x1, y1 are the upper left corner coordinates, x2, y2 are the upper right corner coordinates, x3, y3 are the lower right corner coordinates, and x4, y4 are the lower left corner coordinates. ‘###’ means the text is illegible.
eg:377,117,463,117,465,130,378,130,Genaxis Theatre
eg:374,155,409,155,409,170,374,170,###
ICDAR2018 label format: x1,y1,x2,y2,x3,y3,x4,y4,difficult,text
x1, y1 are the upper left corner coordinates, x2, y2 are the upper right corner coordinates, x3, y3 are the lower right corner coordinates, x4, y4 are the lower left corner coordinates. Difficult is 1 means that the text is difficult to recognize, and 0 means that it is easy to recognize.
eg: 390,902,1856,902,1856,1225,390,1225,0, "King's glasses"
Among them, the label of ICDAR2013 has only the upper left and lower right coordinates. You need to make the label yourself and change it to the label interface of this article.
ICDAR2015 and ICDAR2017 can be used directly, butMany labels in ICDAR2017 are not labeled in a clockwise direction, but the program needs to strictly require that the label coordinates must be clockwise.. Of course, the author's program will automatically be corrected.
againstEASTSome improvement attempts with inaccurate boundaries:
Improve thinking1:
Take the box predicted by the program directly4Vertex coordinates, and then the long side of the frame60%The length is the side length, do4Rectangles, re-forecast4The coordinates of the vertices. It stems from the improved idea of advanced EAST, but it is consistent but different.
effect:no work
Reason: If the frame predicted by the author for the first time is inaccurate, the correction this time will also be inaccurate because of the inaccuracy the first time.
#original
boxes, timer = detect(score_map=score, geo_map=geometry, timer=timer)
height_score,width_score=score.shape[1:3]
height_score-=1
width_score-=1
coor_mask=np.zeros_like(score)
for box in boxes:
    x1,y1,x2,y2,x3,y3,x4,y4=np.asarray(box[:8],np.int32)//4
    radius=max(int(min(x2-x1,x3-x4,y3-y2,y4-y1)*2.0),2)
    coor_mask[:,max(0,y1-radius):min(height_score,y1+radius),max(0,x1-radius):min(width_score,x1+radius),:]=1
    coor_mask[:,max(0,y2-radius):min(height_score,y2+radius),max(0,x2-radius):min(width_score,x2+radius),:]=1
    coor_mask[:,max(0,y3-radius):min(height_score,y3+radius),max(0,x3-radius):min(width_score,x3+radius),:]=1
    coor_mask[:,max(0,y4-radius):min(height_score,y4+radius),max(0,x4-radius):min(width_score,x4+radius),:]=1
    print(ratio_w,ratio_h)

#4_coor
boxes, timer = detect(score_map=score*coor_mask, geo_map=geometry, timer=timer,score_map_thresh=0.8,box_thresh=0.01)
Improve thinking2:
Correctscore_mapConnect the area and find the circumscribed rectangle. The idea of pixelLink.
effect:no work
Reason: the essential reason isscore_mapIt is not accurate, so the frame obtained is not accurate.
def dilate_image(img, kernel_size=(3, 3), iter_size=5):
    kernel = cv2.getStructuringElement(cv2.MORPH_RECT, kernel_size)
    img_erode = cv2.dilate(img, kernel, iter_size)
    return img_erode

def findContours_func(input_image):
    gray=np.asarray(input_image*255,np.uint8)
    ret, imgbw = cv2.threshold(gray, 240, 255, cv2.THRESH_BINARY)
    img_dilate = dilate_image(np.asarray(imgbw))
    img, contours, hierarchy = cv2.findContours(
        img_dilate, cv2.RETR_EXTERNAL, cv2.CHAIN_APPROX_SIMPLE)

    boxes_array=np.zeros([len(contours),9])
    for i,cnt in enumerate(contours):
        x, y, w, h = cv2.boundingRect(cnt)
        boxes_array[i,:8]=(4*x,4*y,4*(x+w),4*y,4*(x+w),4*(y+h),4*x,4*(y+h))

    return boxes_array

boxes=findContours_func(score.reshape(score.shape[1],score.shape[2]))
Improve thinking3:
The last layer of the network pluslstm,willscore_mapBrighten and spread evenly. The idea of CTPN.
effect: work
def horizontal_vertical_lstm_together(input_data, rnn_size, scope_n="layer1"):
    with tf.variable_scope("MultiDimensionalLSTMCell-horizontal-" + scope_n):
        # input is (b, h, w, c)
        #horizontal
        _, _, _, c_h = input_data.get_shape().as_list()
        shape_h=tf.shape(input_data)
        b_h, h_h, w_h= shape_h[0],shape_h[1],shape_h[2]
        # transpose = swap h and w.
        new_input_data_h = tf.reshape(input_data, (b_h*h_h, w_h, c_h))  # horizontal.
        # Forward
        lstm_fw_cell = tf.contrib.rnn.LSTMCell(rnn_size//4)
        lstm_fw_cell = tf.contrib.rnn.DropoutWrapper(lstm_fw_cell, output_keep_prob=0.5)
        # Backward
        lstm_bw_cell = tf.contrib.rnn.LSTMCell(rnn_size//4)
        lstm_bw_cell = tf.contrib.rnn.DropoutWrapper(lstm_bw_cell, output_keep_prob=0.5)


        rnn_out_h, _ = tf.nn.bidirectional_dynamic_rnn(
                lstm_fw_cell,
                lstm_bw_cell,
                inputs=new_input_data_h,
                dtype=tf.float32,
                time_major=False)
        rnn_out_h=tf.concat(rnn_out_h, 2)
        rnn_out_h = tf.reshape(rnn_out_h, (-1, h_h, w_h, rnn_size//2))
        #vertical
    with tf.variable_scope("MultiDimensionalLSTMCell-vertical-" + scope_n):
        new_input_data_v=tf.transpose(input_data,(0,2,1,3))
        _, _, _, c_v = new_input_data_v.get_shape().as_list()
        shape_v=tf.shape(new_input_data_v)
        b_v, h_v, w_v = shape_v[0],shape_v[1],shape_v[2]
        new_input_data_v = tf.reshape(new_input_data_v, (b_v*h_v, w_v, c_v))
        # Forward
        lstm_fw_cell = tf.contrib.rnn.LSTMCell(rnn_size//4)
        lstm_fw_cell = tf.contrib.rnn.DropoutWrapper(lstm_fw_cell, output_keep_prob=0.5)
        # Backward
        lstm_bw_cell = tf.contrib.rnn.LSTMCell(rnn_size//4)
        lstm_bw_cell = tf.contrib.rnn.DropoutWrapper(lstm_bw_cell, output_keep_prob=0.5)


        rnn_out_v, _ = tf.nn.bidirectional_dynamic_rnn(
                lstm_fw_cell,
                lstm_bw_cell,
                inputs=new_input_data_v,
                dtype=tf.float32,
                time_major=False)
        rnn_out_v=tf.concat(rnn_out_v, 2)

        rnn_out_v = tf.reshape(rnn_out_v, (-1, h_v, w_v, rnn_size//2))
        rnn_out_v=tf.transpose(rnn_out_v,(0,2,1,3))
        rnn_out=tf.concat([rnn_out_h,rnn_out_v],axis=3)
        #rnn_out=tf.add(rnn_out_h,rnn_out_v)
        return rnn_out

g[3]=horizontal_vertical_lstm_together(g[3], 128, scope_n="layer1")
Improve thinking4:
Will be classifieddice_losschange intocross_entropAnd based onUNetThe idea of adding the distance between the point and the frame for learning, making the centerlossRelatively low, marginallossRelatively improve. No division is implementeddistanceOperation, because doing so will makelossExplode, but use multiplication (1-distance) Operation.
effect: work
def distance_balanced_sigmoid_crossentrop(y_true_cls, y_pred_cls,y_true_geo,
                     training_mask):
    eps = 1e-5
    labels=y_true_cls*training_mask
    logits=tf.nn.sigmoid(y_pred_cls*training_mask)
    min_distance=tf.abs(tf.minimum(tf.minimum(y_true_geo[:,:,:,0],y_true_geo[:,:,:,1]),tf.minimum(y_true_geo[:,:,:,2],y_true_geo[:,:,:,3])))
    min_distance=tf.expand_dims(min_distance,3)
    beta = 1 - tf.reduce_mean(labels)
    loss = -1*tf.reduce_mean(tf.div(beta * labels * tf.log(logits + eps),min_distance) +(1 - beta) * (1 - labels) * tf.log(1 - logits + eps))
    tf.summary.scalar('classification_distance_balanced_sigmoid_crossentrop_loss', loss)
return loss
References:
https://github.com/argman/EAST
https://github.com/KaimingHe/deep-residual-networks/tree/master/prototxt
https://github.com/huoyijie/AdvancedEAST
Intelligent Recommendation
EAST text detector application
EAST text detector application Introduction Primary introduction Model application Environmental preparation Basic parameters Text detection function application effect Introduction Recently, a projec...
Introduction to the text detector paper --- Scene Text Detector Overview
Introduction to the text detector paper --- Scene Text Detector Overview Overview Methods Summary Pixel based (segmentation) Anchor based Fusion I have recently begun to explore the algorithm of text ...

Text detection actual combat: use OpenCV to implement text detection (EAST text detector)
In this tutorial, you will learn how to use OpenCV to use the East text detector to detect the text in the image. East text detector requires us to run OpenCV 3.4.2 or OpenCV 4 on our system. Thesis o...

Overview of natural scene text detection techniques (CTPN, SegLink, EAST)
The article is reproduced from: Foreword Text recognition is divided into two specific steps: the detection of text and the recognition of text, both of which are indispensable, especially text detect...

Python+opencv+EAST to do natural scene text detection (transfer)
Mark, thank the author for sharing! English original link:https://www.pyimagesearch.com/2018/08/20/opencv-text-detection-east-text-detector/ Reminder: Author's implementation of Python's text detectio...
More Recommendation

[Learning] paper Feature Pyramid Based Scene Text Detector
Feature Pyramid Based Scene Text Detector Publications: ICDAR 2017 Author: MengYi En, Beijing University of Technology Content: OCR, text detection in multi-scale scene Abstract Question: CNN network ...

"TextBoxes++: A Single-Shot Oriented Scene Text Detector" paper notes
1 Overview The method given in this article is to solve the problem of rotating text detection. Therefore, the method TextBoxes++ of the article can detect slanted text. The method of detecting text i...
MOST: A Multi-Oriented Scene Text Detector with Localization Refinement
1 Introduction Modern text detectors are capable of capturing text in a variety of different challenging scenarios. However, they may still fail to detect text instances when dealing with extreme aspe...

Efficient and Accurate Arbitrary-Shaped Text Detection with Pixel Aggregation Network(PANNET)
Basic Information Source: AAAI2019 Author: wenhai wang, enze Xie ... Tags: text detection; ocr; segment; curve text Paper address:arxiv Detailed Core task Aware of oneHigh efficiency (fps = 84.2) And ...

PAN++: Towards Efficient and Accurate End-to-End Spotting of Arbitrarily-Shaped Text
PAN++: Towards Efficient and Accurate End-to-End Spotting of Arbitrarily-Shaped Text Basic Information Source: TPAMI Author: Wenhai Wang, Enze Xie… Tags: text detection, end2end, text spotter, ...