Caffe learning 4-- source code analysis (classification.cpp)
A later stage will be the source of Caffe record while studying, we will study together progress!
I mainly learning routine Caffe is an example of the learning step by step to achieve a function which is used. The start of the stage, I was an example to learn Caffe / examples / cpp_classification / classification.cpp this category Caffe provided. In this article, the author of the study according to their own ideas, to organize this document.
Cpp can be seen from this document, which is the definition of a class Classifier, inference operation is performed (this document does not relate to the training process).
Operating conditions
From the following code, it can be seen run file must rely on OpenCV (OpenCV mainly used to read the image operation, etc.), thus defining a macro control.
#ifdef USE_OPENCV
/*code*/
#else
int main(int argc, char** argv) {
  LOG(FATAL) << "This example requires OpenCV; compile with USE_OPENCV.";
}
#endif  // USE_OPENCV
working process
The main function observed file, at the outset, it is determined that the required input 5 into parameters, respectively model_file: a parameter indicating the file model; trained_file: represents a model file; mean_file: represents image mean documents; label_file: represents the image tag meaning; file: classification express reasoning picture files needed.
And following this code is mainly to google-glog log system is initialized.
::google::InitGoogleLogging(argv[0]);After the logging system initialization, initialize a variable Classifier class classifier (specifically the following analysis and the like), and read by the image img cv :: imread, then classified by a classification function Classify classfier img Finally prediction the results show.
this, the whole of the main function to run to completion. As can be seen from the analysis, the most important part is the class classification function Classifier Classify.
int main(int argc, char** argv) {
  if (argc != 6) {
    std::cerr << "Usage: " << argv[0]
              << " deploy.prototxt network.caffemodel"
              << " mean.binaryproto labels.txt img.jpg" << std::endl;
    return 1;
  }

  ::google::InitGoogleLogging(argv[0]);

  string model_file   = argv[1];
  string trained_file = argv[2];
  string mean_file    = argv[3];
  string label_file   = argv[4];
  Classifier classifier(model_file, trained_file, mean_file, label_file);

  string file = argv[5];

  std::cout << "---------- Prediction for "
            << file << " ----------" << std::endl;

  cv::Mat img = cv::imread(file, -1);
  CHECK(!img.empty()) << "Unable to decode image " << file;
  std::vector<Prediction> predictions = classifier.Classify(img);

  /* Print the top N predictions. */
  for (size_t i = 0; i < predictions.size(); ++i) {
    Prediction p = predictions[i];
    std::cout << std::fixed << std::setprecision(4) << p.second << " - \""
              << p.first << "\"" << std::endl;
  }
}
Classifier Class Analysis
First, we look Classifier class definitions, which can be called only outside initialization function and classification function Classifier the Classify; internal functions provided by the image mean function SetMean, the prediction function Predict, WrapInputLayer and two preprocessing functions are Preprocess; internal variables there is a network of information net_, input_geometry_ represents input of size (width and height), num_channels_ represents the input channels num, mean_ represents the mean, labels_ picture is stored tag information.
class Classifier {
 public:
  Classifier(const string& model_file,
             const string& trained_file,
             const string& mean_file,
             const string& label_file);

  std::vector<Prediction> Classify(const cv::Mat& img, int N = 5);

 private:
  void SetMean(const string& mean_file);

  std::vector<float> Predict(const cv::Mat& img);

  void WrapInputLayer(std::vector<cv::Mat>* input_channels);

  void Preprocess(const cv::Mat& img,
                  std::vector<cv::Mat>* input_channels);

 private:
  shared_ptr<Net<float> > net_;
  cv::Size input_geometry_;
  int num_channels_;
  cv::Mat mean_;
  std::vector<string> labels_;
};
Classifier Class specific function analysis
Classifier Class file is the main function of the implementation, so the following analysis will function code line by line.
Initialization function Classifier
Classifier::Classifier(const string& model_file,
                       const string& trained_file,
                       const string& mean_file,
                       const string& label_file)
It said code is a class initialization function, which requires a total of four parameters, namely the four previously mentioned file path. The function starts to first specify the mode of operation of the CPU or GPU (which CPU_ONLY this macro is defined at compile time, when you install the reader should understand).
#ifdef CPU_ONLY
  Caffe::set_mode(Caffe::CPU);
#else
  Caffe::set_mode(Caffe::GPU);
#endif
Next, a function of the variables in the class net_ initialized Model is introduced, which were used and reset functions of the Net CopyTrainedLayersForm two (herein, not specifically analyze these two functions will be further explained in the follow-up) , two separate functions are functions: reset, is the model_file is the top net (i.e. model parameter files), and indicates that the network is only used to predict TEST; data CopyTrainedLayersFrom, imported model. CHECK_EQ then used to check the model inputs and outputs are only 1, and to check out input_layer num_channels_ its channel number only 1 or 3 (in line with the visual image data). Finally, the size of input_geometry_ get each channel input.
  /* Load the network. */
  net_.reset(new Net<float>(model_file, TEST));
  net_->CopyTrainedLayersFrom(trained_file);

  CHECK_EQ(net_->num_inputs(), 1) << "Network should have exactly one input.";
  CHECK_EQ(net_->num_outputs(), 1) << "Network should have exactly one output.";

  Blob<float>* input_layer = net_->input_blobs()[0];
  num_channels_ = input_layer->channels();
  CHECK(num_channels_ == 3 || num_channels_ == 1)
    << "Input layer should have 1 or 3 channels.";
  input_geometry_ = cv::Size(input_layer->width(), input_layer->height());
SetMean introduced through the function of the mean image data (specifically, the following analysis).
  /* Load the binaryproto mean file. */
  SetMean(mean_file);
Then the following code is used to import the file label prediction.
  /* Load labels. */
  std::ifstream labels(label_file.c_str());
  CHECK(labels) << "Unable to open labels file " << label_file;
  string line;
  while (std::getline(labels, line))
    labels_.push_back(string(line));
Finally, taken equal to the number of channels output_layer verify the labels and size.
  Blob<float>* output_layer = net_->output_blobs()[0];
  CHECK_EQ(labels_.size(), output_layer->channels())
    << "Number of labels is different from the output layer dimension.";
Mean read data SetMean
SetMean mean value function is read from the binary function. A better understanding of the function, the logical operation to read the file by particular class BlobProto (blob is important class caffe detailed analysis on the back), then the acquired data in mean_blob;
  BlobProto blob_proto;
  ReadProtoFromBinaryFileOrDie(mean_file.c_str(), &blob_proto);

  /* Convert from BlobProto to Blob<float> */
  Blob<float> mean_blob;
  mean_blob.FromProto(blob_proto);
  CHECK_EQ(mean_blob.channels(), num_channels_)
    << "Number of channels of mean file doesn't match input layer.";
Finally, the blob data placed in cv :: Mat.
 /* The format of the mean file is planar 32-bit float BGR or grayscale. */
  std::vector<cv::Mat> channels;
  float* data = mean_blob.mutable_cpu_data();
  for (int i = 0; i < num_channels_; ++i) {
    /* Extract an individual channel. */
    cv::Mat channel(mean_blob.height(), mean_blob.width(), CV_32FC1, data);
    channels.push_back(channel);
    data += mean_blob.height() * mean_blob.width();
  }

  /* Merge the separate channels into a single image. */
  cv::Mat mean;
  cv::merge(channels, mean);

  /* Compute the global mean pixel value and create a mean image
   * filled with this value. */
  cv::Scalar channel_mean = cv::mean(mean);
  mean_ = cv::Mat(input_geometry_, mean.type(), channel_mean);
Preprocessing functions
Preprocess and preprocessing functions including WrapInputLayer, WrapInputLayer first function, which is mainly acquired in input_blobs pointer net_ out on input_channels, and then processed by Preprocess function. First, if the input channel and the img unequal, the gradation transition to img space by cvtColor function.
  cv::Mat sample;
  if (img.channels() == 3 && num_channels_ == 1)
    cv::cvtColor(img, sample, cv::COLOR_BGR2GRAY);
  else if (img.channels() == 4 && num_channels_ == 1)
    cv::cvtColor(img, sample, cv::COLOR_BGRA2GRAY);
  else if (img.channels() == 4 && num_channels_ == 3)
    cv::cvtColor(img, sample, cv::COLOR_BGRA2BGR);
  else if (img.channels() == 1 && num_channels_ == 3)
    cv::cvtColor(img, sample, cv::COLOR_GRAY2BGR);
  else
    sample = img;
Then subjected to resize and standardization.
  cv::Mat sample_resized;
  if (sample.size() != input_geometry_)
    cv::resize(sample, sample_resized, input_geometry_);
  else
    sample_resized = sample;

  cv::Mat sample_float;
  if (num_channels_ == 3)
    sample_resized.convertTo(sample_float, CV_32FC3);
  else
    sample_resized.convertTo(sample_float, CV_32FC1);

  cv::Mat sample_normalized;
  cv::subtract(sample_float, mean_, sample_normalized);
Finally, split function to input it into the channel in.
cv::split(sample_normalized, *input_channels);Whereby the pretreatment is completed, the prediction.
Run the main function Predict
Last predict is very simple, pre-function after the call through, and then use the net in the forward prediction function can be achieved.
std::vector<float> Classifier::Predict(const cv::Mat& img) {
  Blob<float>* input_layer = net_->input_blobs()[0];
  input_layer->Reshape(1, num_channels_,
                       input_geometry_.height, input_geometry_.width);
  /* Forward dimension change to all layers. */
  net_->Reshape();

  std::vector<cv::Mat> input_channels;
  WrapInputLayer(&input_channels);

  Preprocess(img, &input_channels);

  net_->Forward();

  /* Copy the output layer to a std::vector */
  Blob<float>* output_layer = net_->output_blobs()[0];
  const float* begin = output_layer->cpu_data();
  const float* end = begin + output_layer->channels();
  return std::vector<float>(begin, end);
}
to sum up
After study completion classification.cpp, we have used Caffe conduct inference already have made an impression, then back to the contents inside the Caffe networks for learning.
Intelligent Recommendation

Caffe source code analysis
After loading the code with SI, first of all, from the implementation of caffe layer, the biggest difference in different frameworks is that the implementation of the layer also determines the flexibi...
Caffe learning (4): install caffe-ssd from the source code of the caffe environment
Download the caffe-ssd branch cmake configuration Enter the caffe-ssd root directory, my caffe root directory is /home/jqy/jqy_caffe/caffe-gpu/caffe-ssd, I will use $caffe instead below Pay attention ...
caffe source code analysis -Blob
This article analyzes thecaffeSource code analysis -BlobMainly the following aspects: Caffe understand the whole overview of the Blob Blob member variables BlobThe main function of the core is used wi...
caffe source code analysis -SyncedMemory
This article analyzes thecaffeinBlobMemory ManagementSyncedMemory,The main contents include: SyncedMemorywithBlobRelationship SyncedMemoryMethods, such as memory allocation, release SyncedMemoryIn mem...
caffe source code analysis --data_layer.cpp
dataLayer entire network as the input layer, Data taken from the leveldb. leveldb data is converted by the picture over. When network established. datalayer mainly responsible for setting some paramet...
More Recommendation
[AI] caffe source code analysis (a)
[A] caffe dependent on open source library [C ++] Detailed google gflags [C ++] Detailed google glog [C ++] Google Protocol Buffer (protobuf) explain (a) [C ++] Google Protocol Buffer (protobuf) Detai...
Analysis of InputLayer of Caffe source code
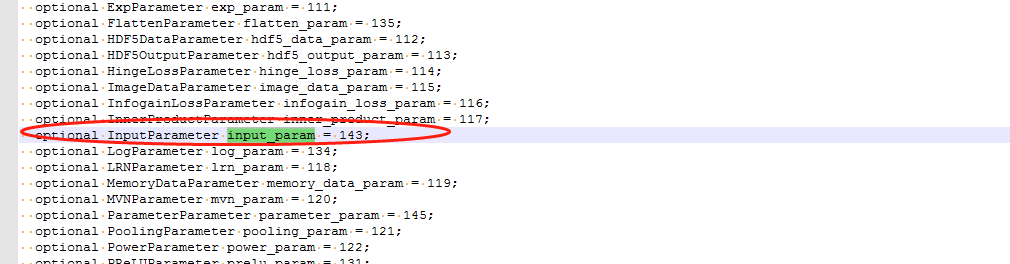
ImageDataLayer can complete caffe automatically read pictures for model training and inference, but in actual applications, generally images are collected through sensors, and the collected pictures a...
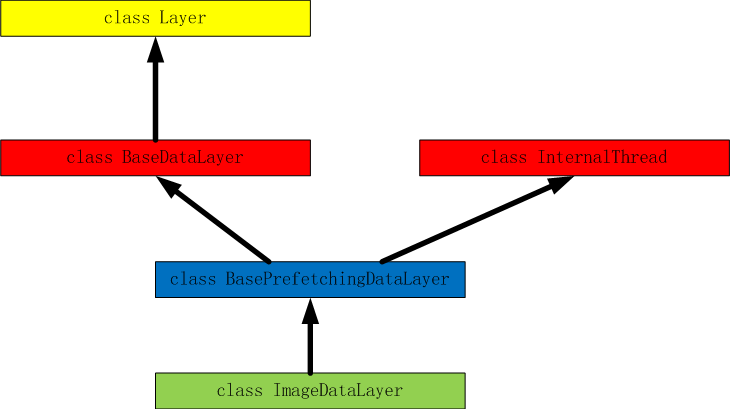
Analysis of ImageDataLayer of Caffe source code
table of Contents ImageDataLayer parameters Source root_folder new_height、new_width is_color crop_size Prototxt configuration Class ImageDataLayer Inheritance Source code DataLayerSetUp Get param...
Analysis of Layer_factory of Caffe source code
in<Analysis of the Layer of Caffe source code>, Basic analysis of the Layer code, we can know that Layer is the basic class of all other Layers, which expands the layers needed in each neural ne...
Caffe source code: blob analysis
directory table of Contents basic introduction Source code analysis Reshape function Blob constructor data_ data manipulation function Back propagation derivative diff_ operation function ShareData fu...