Use webpack's file-loader and url-loader to pack image resources
tags: webpack
I wrote the method of packaging js files in webpack, but what method will be used to package image resources? This article discusses and studies this issue.
The purpose of this article is to use webpack to package image resources and enable the packaged images to be displayed on the browser.
Initialize the directory
First of all, prepare a picture material. I used a mobile phone picture that I downloaded on the Internet in the format of jpg. Of course, it is also possible to use other formats such as png and gif. Then change the response in the configuration file. Configuration.
At the beginning, the directory looks like this:

This is the directory structure after installing webpack, webpack-cli, initializing the project (npm init), and manually adding the webpck.config.js file. If you don’t have these, you need to install and initialize them first. My previous articles also have I wrote, if necessary, I can read my previous articles.
The difference is that I added the image.js file and the image material.
Next, open the image.js file for coding. A relatively simple function is to introduce the image to image.js, create an img tag, the path src of the img tag is the imported image, and then mount the img tag on the page. .
Now show you the code:
image.js
import photo from './image/mz16th.jpg';

function Image () {
    var dom = document.getElementById('root');
    var img = document.createElement('img');
    img.src = photo;
    dom.append(img);
}

export default Image;
index.js
import Image from './image.js';

new Image();
Use file-loader
The webpack.config.js file is the packaging configuration. File-loader and url-loader can be used for packaging image resources. The first introduction is file-loader. To use file-loader, you need to install it. Use local installation, npm install file-loader- -save-dev or npm install file-loader -D, the successful installation shows the following:

Then configure the file-loader in the module:
const path = require('path');

module.exports = {
    mode: 'development',
    entry: {
        main: './src/index.js'
    },
    module: {
        rules: [
          {
            test: /\.(png|jpg|gif)$/,
            use: [
              {
                loader: 'file-loader'
              }
            ]
          }
        ]
      },
    output: {
        filename: 'bundle.js',
        path: path.resolve(__dirname, 'dist')
    }
}
mode is development means that the mode is the development environment, entry is the configuration of the entry file, here index.js in the src directory is the main entry file. The relevant configuration of the loader is in the module. In the rules, use indicates the loader to be used, and test indicates the file format that needs to be parsed using the loader in use. Here, the images in the three image formats of jpg\png\gif are analyzed. output is the configuration of the output file, that is, the name of the packaged file and the storage location of the directory. Here, the file name of the main (./src/index.js) file in the corresponding entry after packaging is named bundle.js, and the directory is stored in the dist folder in the directory where the webpack.config.js file is located.
The package.json file is configured with scripts
"scripts": {
    "build": "webpack"
  }
After executing the packaging command npm run build:

It can be seen that after packaging, the image is directly packaged into the dist directory, which is at the same level as the bundle.js output file.
But there is still a file missing, that is, the html file to be opened in the browser. At this step, I stepped on a pit, that is, the index.html file was directly created in the same directory as webpack.config.js. First look at the contents of the index.html file:
index.html
<!DOCTYPE html>
<html lang="en">
<head>
    <meta charset="UTF-8">
    <meta name="viewport" content="width=device-width, initial-scale=1.0">
    <meta http-equiv="X-UA-Compatible" content="ie=edge">
    <title>Index</title>
</head>
<body>
    <div id="root"></div>
</body>
<script src="./dist/bundle.js"></script>
</html>
As you can see, the script's src path is like this: .dist/bundle.js, originally thought that this is no problem, but open the index.html file in the browser, in fact, the picture is not displayed. What is the reason? The problem comes back to the src of the img tag in the image.js file. I wrote img.src = photo above, what is photo? In fact, photo is the name of the packaged picture, which is this thing: bf6497991f776c6b098b105b056c6adc.jpg. Obviously, the img tag directly introduces the name of the packaged picture, but the img tag is the image.js file in the same directory of webpack.config.js Created in, if img.src = bf6497991f776c6b098b105b056c6adc.jpg, it means that the packaged image file should be at the same level as the image.js file.
For further verification, you can open the packaged file bundle.js and check:

As you can see, _image_jpg__WEBPACK_IMPORTED... this thing does not have any upper folder, img.rsc directly points to it, so if index.html introduces this bundle.js, index.html cannot be found in the same level directory after packaging Picture files.
In this case, I can change img.src = `./dist/${photo}`. Pack again, check bundle.js:

After adding ./dist, the img.src in the bundled bundle.js file also changed. So I can see the picture displayed in the browser.

But if you want to save the packaged file and put it in the dist directory, and the source code files in the src directory are put in the src, is there a way to achieve src access to dist resources? I am still exploring...
The two simple methods that come to mind at the moment are either putting index.html in dist or the src path in the image.js file plus ./dist.

Let's solve this first. I'll make adjustments if I encounter good methods.
But instead of modifying the image.js file, I put the index.html file directly in the dist directory.


Pictures can still be displayed in the browser:

Solved the problem of picture display, next talk about the method of customizing the path and file name of the packaged picture. In fact, these two configurations are also very simple, using the placeholder configuration of options can be done:
const path = require('path');

module.exports = {
    mode: 'development',
    entry: {
        main: './src/index.js'
    },
    module: {
        rules: [
          {
            test: /\.(png|jpg|gif)$/,
            use: [
              {
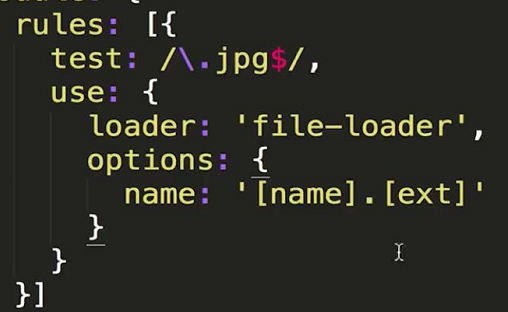
                loader: 'file-loader',
                options: {
                  name: '[name].[ext]'
                }
              }
            ]
          }
        ]
      },
    output: {
        filename: 'bundle.js',
        path: path.resolve(__dirname, 'dist')
    }
}
This configuration can keep the file name after packaging the same as the file name before packaging. For example, before packaging, the image name is mz16th, then after packaging, there will be no garbled file name.
First delete the bundle.js and pictures in dist, and keep index.html. Then package, view the dist directory or packaging information:


If equipped with hash, it will be packaged as:


The hash at the back is the garbled file name before.
If you want to put the packaged image resources in the specified folder in dist, you can use the outputPath property configuration:
const path = require('path');

module.exports = {
    mode: 'development',
    entry: {
        main: './src/index.js'
    },
    module: {
        rules: [
          {
            test: /\.(png|jpg|gif)$/,
            use: [
              {
                loader: 'file-loader',
                options: {
                  name: '[name]_[hash].[ext]',
                  outputPath: 'images/'
                }
              }
            ]
          }
        ]
      },
    output: {
        filename: 'bundle.js',
        path: path.resolve(__dirname, 'dist')
    }
}
Then pack. Also remove the bundle.js and pictures in the dist before packaging, check the packaged dist file:

Use url-loader
In addition to using file-loader to package image resources, you can also use url-loader to package. The difference is that url-loader is more suitable for packaging files with smaller pictures. The pictures packaged by url-loader are base64 pictures, while file-loader is suitable for packing larger pictures, but the pictures packed are not base64. .
Why is it that url-loader is suitable for packing smaller pictures? Because after the url-loader packs the picture, it will not add more files in the dist folder, but it is introduced in the bundled bundle.js. Therefore, if the picture is large, it is packaged into bundle.js, which will cause the bundle.js file to be too large. At this time, the page loading bundle.js will take a lot of time.
But there are ways to solve this problem. When using url-loader, configure a limit attribute. The value of limit is a numeric value, indicating the size of bytes. If it exceeds a certain value, the picture will be placed in the dist directory, just like the file-loader package, if it is within the limit value, it will be directly imported in bundle.js.
The use of url-loader also needs to be installed first.

In webpack.config.js, the other contents remain unchanged, change the file-loader to url-loader, and then add the limit attribute:
const path = require('path');

module.exports = {
    mode: 'development',
    entry: {
        main: './src/index.js'
    },
    module: {
        rules: [
          {
            test: /\.(png|jpg|gif)$/,
            use: [
              {
                loader: 'url-loader',
                options: {
                  name: '[name]_[hash].[ext]',
                  outputPath: 'images/',
                  limit: 400000
                }
              }
            ]
          }
        ]
      },
    output: {
        filename: 'bundle.js',
        path: path.resolve(__dirname, 'dist')
    }
}
Check the picture size:

The size of the picture is within the limit, so the picture resource will not be displayed in the dist folder after packaging, but it is introduced by bundle.js.

Check the picture format, this is the base64 format. A

At this time, I changed the limit setting to be smaller and then packaged it.

You can see that there will be one more image in the dist directory. Files exceeding the limit size will be placed under dist.
Check the picture format, the picture at this time is no longer base64.

The above share the use of file-loader and url-loader, their function is still relatively powerful, for parsing pictures, but I still encountered some problems in the process, if there is something to get better after use If you want, add it again.
-end-
Intelligent Recommendation
Implement file-loader and url-loader
file-loader implementation file-loader.js: url-loader implementation url-loader.js: webpack.config.js:...
file-loader in webpack, and url-loader
Applicable to ‘[name].[ext]’, which means that the packaged picture name is consistent with the original file name url-loader: The application method is basically the same as the fi...
Webpack parsing image, file-loader; and the difference between url-loader parsing
Note: Before installing, make sure the webpack project works properly! table of Contents 1. Install file-loader dependency 2. Create an img folder in the src directory and import a picture (the image ...

webpack uses file-loader and url-loader to handle image resource loading
webpack uses file-loader and url-loader to handle image resource loading 1. Use file-loader to load image resources Two, use url-loader to load pictures Third, the problem of incorrect image path afte...
Does webpack use url-loader or file-loader for images?
You can see that the url-loader is used for image compilation, and some people use file-laoder, so what is the difference between the two? Which one should I use? url-loader: Function: The function of...
More Recommendation

The use of webpack packing URL-loader and file-loader and the problems encountered
Import pictures in app.js: Install url-loader, file-loader: Configuration in webpack.dev.config.js: Execute: npm run dev, report an error: Reason for error: The regular expression behind test is added...
Webpack's loader principle and custom Loader
Articles directory 1. Loader classification and execution order 1.1 loader classification 1.2 Loader execution order 1.3 Use loader mode 1.3.1 Inner Union Loader 2. Develop loader steps 2.1 Developmen...
Url-loader handles problems encountered in image resources in css
When dealing with image resources in css, the two kinds of loaders we use arefile-loaderorurl-loaderThe main difference between the two is. Url-loader can set the image size limit. When the image exce...
WEBPACK Handling Image Resources URL-Loader Configuration, Base64
URL-Loader configuration for processing style images in Webpack base64 advantage The picture of the base64 format is the text format, which reduces the loss of the resource server. When using the base...