Ceph network module (3)-AsyncMessenger code flow analysis
1. The life cycle of the message module

As shown in the figure, OSD is used as an example to describe the life cycle of the message module. Unless otherwise specified in this article, it refers to the OSD daemon. Register and create a Messenger in the main() function of the daemon, and then bind the registered Messenger. After binding, start the message module to work. After the message module is started, the initialization of the OSD is started. In the initialization of the OSD Let Messenger be in the ready state, that is, ready to work. When the message module is completed, it is in the wait state, and delete the registered Messenger if necessary. This is the approximate life cycle of the message module. The operation of each process is described in detail below.
List of Messenger instances registered by OSD
| Numbering | Messenger instance name | effect |
| 1 | *ms_public | Used to process messages between OSD and Client |
| 2 | *ms_cluster | Used to process messages between OSD and cluster |
| 3 | *ms_hbclient | Used to process OSD and other OSD keep heartbeat messages |
| 4 | *ms_hb_back_server | Used to process OSD receiving heartbeat messages |
| 5 | *ms_hb_front_server | Used to handle OSD sending heartbeat messages |
| 6 | *ms_objecter | Used to process messages between OSD and Objecter |
- The system will start the corresponding daemon according to different roles. If the role is OSD, then start the daemon through the file ceph_osd.cc. The main() function is the first to enter;
- In the main() function, the modules required by the OSD are registered and initialized. We mainly analyze the message module. Six Messenger instances are registered in the main() function, as shown in the following table. Messenger is an interface class, which is implemented according to different needs. This article mainly analyzes from AsyncMessenger.
- Bind after initializing the message module. The specific binding is to call the bind function () of AsyncMessenger. The parameters of the instance call are g_conf->public_addr and g_conf->cluster_addr in the configuration file. AsyncMessenger's bind() function executes Processor::bind(). The binding is really completed in the processor's bind function. The processor's bind function has two parameters, one is addr and the other is port. The main operations performed in the processor's bind function are:
1) According to bind_addr, the socket parameter family is obtained;
2) Create a socket, and obtain the family parameters according to step 1);
3) Set the socket to non-blocking;
4) Bind the port to be monitored;
5) Get the name of the bound socket;
6) Listening port. - Open the message module. In step 2 created Messenger, you also need to open its service to work, the specific execution is performed by AsyncMessenger, when creating a new AsyncMessenger. AsyncMessnger calls WorkPool start in the start function to specifically execute the start work of AsyncMessenger.
- Start the OSD, before this there is a pre start (int err = osd->pre_init()), and after this there is a final start (osd->final_init();). The init function in the osd.cc file is executed by the OSD. The add_dispatcher_head() function of Messenger is called to add the response message instance to the list of dispatchers. In the add_dispatcher_head() function, if it is the first element in the linked list, the ready function is executed. The specific execution of the ready function is achieved by AsyncMessenger's ready, get the worker through WorkerPool, and then start the event processing center to handle the event. Start the worker thread and notify the event processing center that it can start work, mainly the creation and processing of events. At this time, the mechanism of AsyncMessenger has been basically started and can be used for normal work.
- The registered Messenger enters the wait state. This wait is different from the wait state we usually understand. The main operation of wait is to complete the cleaning work and close all connections.
- After executing the wait operation, delete the previously registered Messenger.
2. Message module initialization
The four modules of Monitor/Client/OSD/MDSDaemon have corresponding main() functions, which are in the ceph_mon.cc/ceph_fuse.cc/ceph_osd.cc/ceph_mds.cc source code file in the src folder directory, in their respective main( ) In the function, each module registers one or more Messengers (Messenger pointer points to the AsyncMessenger instance) as needed, and then calls the add_dispatcher_head ()/add_dispatcher_tail () function in the respective init() initialization function to start the message module. The initialization process of the message module is shown in the figure below.

The above figure shows the call flow of some key functions when the message module is initialized, which is roughly the same as the code flow. The following uses OSD as an example to describe the initialization process of the message module.
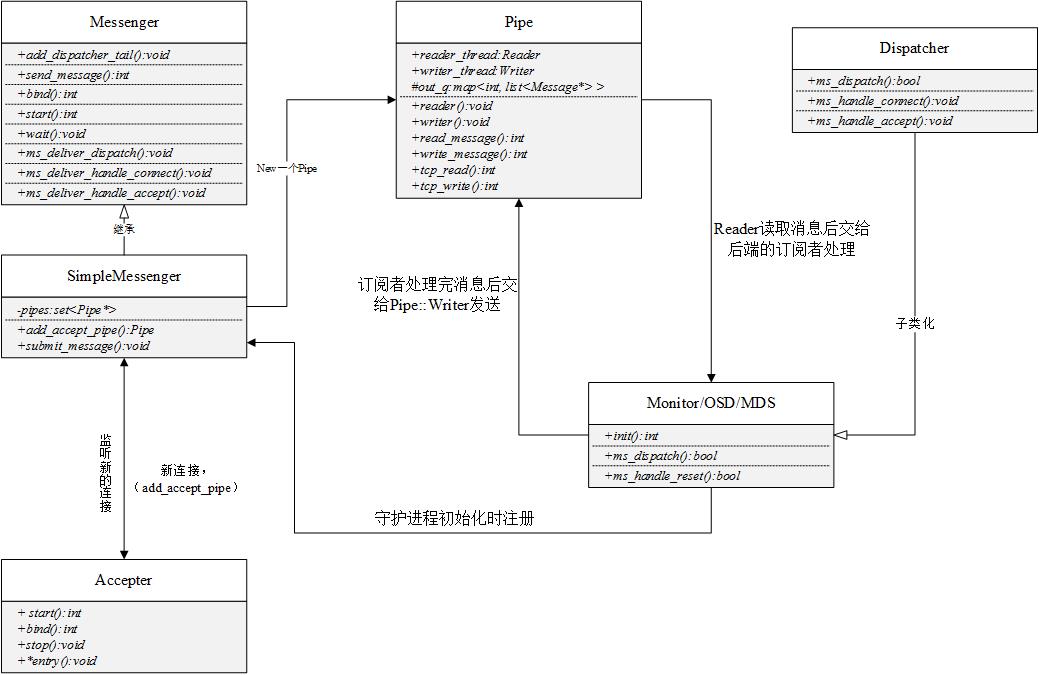
First perform some configuration and initialization required to start the current node in the mian() function, which includes the creation and registration of Messenger and Dispatcher. Monitor/Client/OSD/MDSDaemon are all subclasses of Dispatcher. Messenger::create() is used to create a messenger, but actually creates an AsyncMessenger instance. Call AsyncMessenger::bind() in the main() function to bind an IP address for network transmission to each AsyncMessenger. In the initialization function init() of the OSD module, call the add_dispatcher_head() or add_dispatcher_tail() function and perform the following operations:
- Add all Dispatchers created by OSD to the dispatchers team defined in Messenger;
- Call AsyncMessenger::ready() to start AsyncMessenger.
The initialization of the message module mainly starts two modules, one is the EventerCenter (event center), the startup process of the event center is described in detail in the following section. Another start is AsyncMessenger, call AsyncMessenger::ready() to obtain a worker thread, and then execute Processor::start(Worker *w) to perform specific initialization work. Create a file event in EventCenter::create_file_event(), call EpollDriver::add_event(), execute epoll_ctl, start registering an event with epoll, and EventCenter::process_events() in the event center is waiting for the event to occur. At the same time Processor::accept() is also executed to prepare to receive the connection. At this point, the entire message module is initialized.
Event Center Launch

In the AsyncMessenger network module, an event-driven model is adopted, and an event processing center is used in the event-driven model to process registered events. This section mainly describes the initialization of the Event Center.
First, start Messenger in the OSD daemon. Since Messenger is an interface for message processing, the specific execution is done by its subclass, namely AsyncMessenger::start(). AsyncMessenger completes the start of the worker thread pool when it starts. WorkerPool::start(). The worker thread pool creates a corresponding number of worker threads according to the configuration parameter ms_async_op_threads (the default value is 2). The role of the worker thread is to handle events. An event center EventCenter is defined in the worker thread. The specific execution of the event is completed by EventCenter. The specific execution function is EventCenter::process_events(). There are three main operations in the function:
- Call the event_wait() function of EpollDriver to execute epoll_wait, which is the main loop of epoll, and return the number of events that need to be processed. The system processes the event according to the value returned by epoll_wait;
- Use a for loop to process the events returned by epoll_wait, call the FileEvent *_get_file_event() function to create a file event, determine whether the operation is read or write according to the mask of the file event, and then call the corresponding callback function for processing;
- See if there are events in the external event container that need to be processed. If so, use a while loop to process the external events. The specific process is to call the callback function of the event.
At this point, AsyncMessenger and Event Center (EventCenter) have been started and initialized, and the message center has also entered the working state, waiting for the arrival of events and processing. The next section describes the reception of messages.
3. Receiving the message
Start message reception
A thread was created during the initialization of the message module, specifically for handling events, specifically by the EventCenter::process_events() function. When the message module starts, there is no event to process in the loop of EventCenter::process_events() until the Processor::start() function executes EventCenter::create_file_event() to create a file event and put it in the event center to process. The processing of messages is also carried out by events. Two callback pointers are defined in EventCenter-read_cb and write_cb, which are specially used to handle the reading and writing of messages. The specific execution is implemented by callback subclasses. When the event reaches the event center, the callback operation has been encapsulated, and specific operations are performed according to the callback operation. For example, AsyncConnection::process() handles the read operation, and AsyncConnection::handle_write() handles the write operation.
The following mainly describes the process of receiving messages.

Before the message is received, the event center has been started, that is to say, the event processing has been started. At this time, no event has been put into the event center for processing. The event is generated by EventCenter::create_file_event(), so the message is also received Operate in the form of events, and then call the corresponding receiving module to receive the message.
When Processor::start() calls EventCenter::create_file_event(), two parameters are passed, one is the value of mask EVENT_READABLE, which tells the event center to process the reading of the message, and the other is the instance of the callback pointer C_processor_accept, the event center itself does not process The specific operations are handled through callback functions. EventCenter::create_file_event() receive event operation is C_processor_accept instance. Determine the mask in the EventCenter::create_file_event() function, if it is EVENT_READABLE, call the corresponding callback function to handle the event, the callback class at this time is C_processor_accept, the callback operation performed is to receive the connection, specifically Processor:: accept(), on the one hand, call the standard socket function accept to receive the connection, on the other hand, call AsyncConnectionRef AsyncMessenger::add_accept() to handle the connection. AsyncMessenger::add_accept() creates a connection AsyncConnection when processing the request, then calls accept() of AsyncConnection to receive the message, first sets the state value to STATE_ACCEPTING, and then creates an event to receive the message for the event center to process. The event's maks is EVENT_READABLE, and the callback operation is read_handler. If the operation to create the event is locked at this time, the message read operation is placed in the external event container. After the event center function that handles the event is unlocked, it will process the external event container. , Will continue to process the read operation of the message.
The following mainly describes how the message reception status works (STATE_ACCEPTING).
Message receiving initial workflow

There are two ways to process the message. One is to determine whether the event is EVENT_READABLE according to the mask of the event. If Yes points the read_cb callback pointer to the incoming callback operation, namely read_handler. Another processing method is that the current create_file_event() is performing other operations and is locked. Then the dispatch_event_external() function will put the callback operation read_handler into external_events. The event processing center has a loop that polls external_events. Once a callback operation is found Put in, then call the corresponding callback function to deal with. Both of these two ways are to complete the read operation of the message by executing the read_handler callback function.
The callback operation of read_handler is to call AsyncConnection::process() for processing. There is a switch operation in process(). According to the value of state received by accept(), find the corresponding executive body, and enter AsyncConnection::_process_connection() according to the value of state. Create a new bufferlist in _process_connection() and add CEPH_BANNER to bl. CEPH_BANNER is a string that identifies this message as ceph data. Then get the address of a Messenger instance encode to bl through get_myaddr(). Then encode socket_addr to bl, and call try_send() to perform the preparation of sending the message. After the execution of try_send() function, the length of the remaining unsent message bytes is returned. If the returned value is 0, it means that the message has been sent. Set the value of status to STATE_ACCEPTING_WAIT_BANNER_ADDR. If the returned value is greater than 0, it means that the message has not been sent. Set the value of state to STATE_WAIT_SEND.
After the reception of the message is started, the reception state of the message is STATE_ACCEPTING. In this state, some simple processing is performed on the message, and then the state value is set to STATE_ACCEPTING_WAIT_BANNER_ADDR. Similar to TCP's three-way handshake process. In each receiving state, the message module will perform some simple processing operations on the message, such as Open message, read the header, middle part, data part, and finally read the data. The following mainly introduces the message receiving state (state) The conversion process, due to the corresponding processing of the message in each state, until the STATE_OPEN_MESSAGE_READ_FOOTER_AND_DISPATCH state message reception is completed.
Message receiving state transition diagram

As shown in the figure is the state transition diagram of the message. After the connection is established, the reception state of the message is STATE_ACCEPTING. In the STATE_ACCEPTING state, the message is added with the CEPH_BANNER logo, and then call try_send() to send it out. After success, the state value is set. Is STATE_ACCEPTING_WAIT_BANNER_ADDR.
In the STATE_ACCEPTING_WAIT_BANNER_ADDR state, read CEPH_BANNER and peer_addr to state_buffer. If successful, add peer_addr to addr_bl. addr_bl is a linked list of addresses. There is a possibility that the peer does not know which IP addresses they have, so it is necessary to tell the peer_addr the IP address bound by the socket, and then call the set_peer_addr() function to establish a connection according to the value of peer_addr, and set the state value to STATE_ACCEPTING_WAIT_CONNECT_MSG after completion .
In STATE_ACCEPTING_WAIT_CONNECT_MSG state, first read connect_msg to state_buffer,
connect_msg is a type of message connectiondata structure, There are some logos and certification information. After reading the identifier of the message from the connection, clear these identifiers, and then set the state value to STATE_ACCEPTING_WAIT_CONNECT_MSG_AUTH.
In the STATE_ACCEPTING_WAIT_CONNECT_MSG_AUTH state, first read the authentication information in the message, and then put it in the authorizer_bl. The authorizer_bl is a bufferlist that stores the logo. Then call handle_connect_msg according to the values of authorizer_bl and authorizer_reply to handle the connection.
In AsyncConnection::handle_connect_msg(), first determine whether the connection exists according to peer_addr, if the connection exists, you can perform subsequent operations, perform some processing on the connection, and then call AsyncConnection::_reply_accept() to send the reply information to the peer, send There is a flag in the message. If you can accept the message, reply with CEPH_MSGR_TAG_SEQ as the flag, and then set the state value to STATE_ACCEPTING_WAIT_SEQ.
In the STATE_ACCEPTING_WAIT_SEQ state, read the confirmation information into the state_buffer, and then set the priority of the message according to the confirmation information. If it is a high priority message, process it first. Finally, set the value of state to STATE_ACCEPTING_READY, that is, you can accept the message.
In the STATE_ACCEPTING_READY state, the main operation is to print the completed information of accept, then clear the connect_msg data structure used for connection, and finally set the state value to STATE_OPEN.
In the STATE_OPEN state, first read the identification information tag, if the tag is CEPH_MSGR_TAG_MSG, that is, read the message identification, set the state value to STATE_OPEN_MESSAGE_HEADER, otherwise perform some other processing.
Read the header of the message in the STATE_OPEN_MESSAGE_HEADER state, and then perform some CRC-like check work. If you receive a bad message, interrupt the current operation and return an error message. If there is no problem, set the state value to STATE_OPEN_MESSAGE_THROTTLE_MESSAGE. Proceed to the next message reading operation.
Judge the message in STATE_OPEN_MESSAGE_THROTTLE_MESSAGE. If it is blocked, create a time event to wait for processing. If it is normal, set the state value to STATE_OPEN_MESSAGE_THROTTLE_BYTES.
Calculate the operation of the currently received message header in the STATE_OPEN_MESSAGE_THROTTLE_BYTES state, then add a time stamp, and finally set the state value to STATE_OPEN_MESSAGE_READ_FRONT.
Call the read_until() function in the STATE_OPEN_MESSAGE_READ_FRONT state to read the header of the message (unlike the previous header verification information, this is the front part of the data) to the front. The front is a bufferlist structure defined in AsyncConnection, specifically Used to store the header of the message. After completion, set the state value to STATE_OPEN_MESSAGE_READ_MIDDLE.
In the STATE_OPEN_MESSAGE_READ_MIDDLE state, just like reading the header data, call the read_until() function to read the middle part of the message into the middle. Middle is also a bufferlist structure defined in AsyncConnection, which is specially used to store the middle part of the message. After completion, the state value is set to STATE_OPEN_MESSAGE_READ_DATA_PREPARE.
In the STATE_OPEN_MESSAGE_READ_DATA_PREPARE state, the preparation of reading the data part of the message is performed, for example, to determine whether the data structure of the data part in the received message is enough to accommodate the data, if the space of the existing received data structure of the application cannot accommodate the data, then Re-apply the space size for its use, no operation if possible, and finally set the value of state to STATE_OPEN_MESSAGE_READ_DATA to truly receive the data part of the message.
In the STATE_OPEN_MESSAGE_READ_DATA state, a while loop is used to read the data carried by the message, and the loop is skipped until there is no data readable in the message. In the loop, the message is read into the data, and the data is a bufferlist structure defined in AsyncConnection, Specially used to store the data part of the message. If the reading is not completed once, the terminal's current operation waits for the next time to continue reading the data, and finally sets the state value to STATE_OPEN_MESSAGE_READ_FOOTER_AND_DISPATCH, prepares to read the tail of the message and then distributes the message.
In the STATE_OPEN_MESSAGE_READ_FOOTER_AND_DISPATCH state, it mainly reads the tail of the message, and then processes the read message and distributes it to the registered Dispatcher for processing. The following section mainly analyzes how the received message is processed.
4. Message processing

As shown in the figure, this section mainly describes the processing of messages. After a series of state changes, the receiving end of the message communication reads the information contained in the message, but most of the read data is placed in the bufferlist. If the received message is distributed, the Dispatcher cannot process the data in the bufferlist. Therefore, a process of encapsulating the data in the bufferlist into a message is needed. Then send the encapsulated Message to Dispatcher for processing.
In the STATE_OPEN_MESSAGE_READ_FOOTER_AND_DISPATCH state, the tail footer is first read from the message, and then the current_header, front, middle, and data previously read are packaged into a message together. The execution process is completed by calling Message *decode_message(), first in the function Perform CRC check. If there is no problem, define a message instance of this type according to the type in the header, and then call Message::set_header() to encapsulate the header into the message instance, and call Message::set_footer() to encapsulate the fooer into the message instance. , Call Message:: set_payload() to encapsulate the front into the message instance, call Message:: set_middle() to encapsulate the middle into the message instance, and call Message:: set_data() to encapsulate the data Encapsulated into the message instance, the message has been encapsulated, and the encapsulated message can be distributed in the next step.
After encapsulating the message, call Message::set_connection() to add the current connection to the message connection, and then execute Messenger::ms_fast_preprocess() to perform a preprocessing on the distribution of the message. The Dispatcher registered during the specific execution will operate, such as OSD.
After the preprocessing is completed, a judgment is made on the current message, that is, whether the current message needs to be quickly dispatched. If fast delivery is required, call Messenger::ms_fast_dispatch(), select the registered Dispatcher from the fast_dispatchers list to quickly perform the message Distribute. If fast dispatch is not required, the normal dispatch process is called, and the event center is called to create an event to dispatch the message, and a new instance of the message dispatch class is created when the event is created. There is a thread in EventCenter waiting to process the events put into the event center. When it is found that the message needs to be dispatched, the callback function of the message delivery class is called to perform the specific delivery of the message. The function is Messenger::ms_deliver_dispatch(). Messenger is from the dispatchers list Select the registered Dispatcher to distribute the message normally.
Sending a message
The basic flow of message sending is shown in the figure below. The first registered Messenger calls send_message() to send a message. Since Messenger is an abstract class, the specific execution is completed by AsyncMessenger::send_message(). Add a Mutex::Locker to the AsyncMessenger::send_message() function and call AsyncMessenger::_send_message() to send the message m according to the destination address. In AsyncMessenger::_send_message(), first look for the created connection conn, then call AsyncMessenger::submit_message() through the conn to submit the message, and establish a connection in the function according to the previously found conn. Then call AsyncConnection::send_message() to send the message, but now the message is in the form of Message. If you send it through the network, you need a conversion, that is, convert the Message into a bufferlist that can be recognized by the network layer. This process is through AsyncConnection:: write_message() to complete, put the message in the sent list that specifically stores the message, identify which messages need to be sent, and then take out the header, footer and data parts of m and put them into complete_bl, complete_bl is a bufferlist, call AsyncConnection::_try_send() sends the data carried in complete_bl. The data in the bufferlist can not be sent directly, you need to put the data in the data structure msghdr, msghdr is a data structure provided by the system, specifically used to store the information sent through the socket. Then call AsyncConnection::do_sendmsg() to perform the specific sending operation of the message. There is a loop operation in the function. Call the system function socket:: sendmsg() to send the message.

The above flow is the general context flow of message sending, and each process of message sending is described in detail below.
As shown in Figure 1 below, in the AsyncMessenger::_send_message() function, first determine whether the incoming destination address is empty. If it is empty, delete the current message and return an error message. If it is normal, call AsyncConnectionRef _lookup_conn() according to the destination address to find the connection, that is, according to the destination address in ceph::unordered_map (entity_addr_t, AsyncConnectionRef) conns, if it is found, return to the AsyncConnection in conns immediately. Then call AsyncMessenger::submit_message() to perform the message submission. First determine whether the connection has been established before, and if so, directly call the AsyncConnection::send_message() function to send the message. If the connection does not exist, determine whether the connection required for the message is a local connection. If it is a local connection, directly call the AsyncConnection::send_message() function of the local connection instance to send the message. If the connection does not already exist, and the connection of the message is not a local connection, you need to create a new connection based on the destination address of the message and the type of connection, and then use this new connection to call the AsyncConnection::send_message() function to send the message.
The sending process of preparing messages in the AsyncConnection::send_message() function is shown in Figure 2 below. First determine whether the connection of the message is a local connection. If it is a local connection, put the message in the local_messages list, and then directly call AsyncConnection::local_deliver() to make a judgment on the local_messages in the function. If it is empty, end the local transmission, otherwise from Take out the message from the local_messages list, set the current connection status, set the received timestamp and other information, and then determine whether the message needs to be delivered quickly or in a normal way, and perform the corresponding operation according to the result of the judgment. If it is not a local message, determine whether the message needs fast delivery. If it is a fast delivery message, execute AsyncConnection::prepare_send_message() to add the data in the message to the bufferlist. If the message is delivered normally, determine whether a message needs to be processed. The processing is also performed through AsyncConnection::prepare_send_message(). After the message processing is completed, call AsyncConnection::write_message() to write the message.
figure 1:

figure 2:

From: http://blog.csdn.net/zhq5515/article/details/54236198#t4
Intelligent Recommendation
[CEPH] CEPH Network Module (4) - SimpleMessenger Data Structure and Code Process Analysis - Study
original: UML Schedule is used in the architecture of the Publish / Subscribe design mode. Module Description: Messenger This class is the publisher of the message, each Dispatcher subclass as a...
Ceph-deploy source analysis (3) - MON module
Why can't 80% of the code farmers can't do architects? >>> Ceph-deploy source analysis (3) - MON module original:http://www.hl10502.com/2017/06/19/ceph-deploy-mon/#more Ceph-deplo...

Ceph learning-Ceph network communication mechanism and source code analysis
Ceph network communication overall design Basic class introduction Message Simple communication mechanism SimpleMessager Connection Pipe Dispatcher Process analysis Message sending Message reception r...
[Ceph] CEPH Dispatcher Module Analysis
The DIPATCher class is the interface, OSD, MON, and other classes inherit this class, and implements the Dipatcher message distribution interface. Add Messenger :: list <dispatcher *> dis...
More Recommendation
Ceph network layer code analysis (1)
Foreword This article analyzes the source code of the ceph network layer. We look at the source code path src / msg there are 3 subdirectories. simple async xio These three relationships are side-by-s...
ceph network module
How the code starts: 1. The osd network communication messenger is defined in old.h, as shown in the figure below 2. Then check the creation of cluster_messenger. 3. Let's look at the or...
Another way of Ceph source code analysis 3: parsing ceph pg_temp (ceph temporary pg)
What is pg_temp Data structure related to pg_temp The construction process of pg_temp of osdmap class member osd judges whether PG needs temporary osd According to OSDService->pg_temp_wanted, send ...

Redis network communication module source code analysis (3)
How the listening fd and client fd are mounted to epfd In the same way, to mount an fd to EPFD, you need to call the system API epoll_ctl and search for the function name. In the file ae_epoll.c we fi...

Distributed | DBLE network module source code analysis (3)
Author: Lulu A technical person who loves technology and is willing to share. Currently, he is mainly engaged in the research of database-related technologies. Source of this article: original submiss...