Embed OpenGL to MFC
Handling from the CSDN blog:Embed OpenGL to MFC
My big job in computer graphics is to implement some functions based on the MFC framework using OpenGL. But I didn't know how to add OpenGL modules to MFC at first. So I found an article on the Internet for a long time and finally benefited from reading. Today I am going to translate this article.
Original address:Setting Up OpenGL in an MFC Control
The translation is as follows:
I haven't seen many articles on the web about integration features, even if I just set up a basic OpenGL window in an MFC control structure. The goal of this tutorial is to teach you step by step how to initialize an OpenGL rendering context in an MFC control structure (such as image control), as well as basic drawing functions based on timers, resizing events, basic camera functions, and more. In this tutorial I will be working in the Microsoft Visual Studio .NET 2003 environment (note: the translator is using VS2015), and I will try to make it understandable to people of all levels. I will add some specific steps for beginners, and non-beginners can skip these steps to find the parts they need. Anyway, welcome everyone's comments (good or bad), I will try my best to update this article until everyone is satisfied. thank you all. So let's get started!
Part 1: Creating the original OpenGL window
Step 1: Create a project
First we have to create an MFC dialog application project.File -> New -> Project selectMFC applicationName it "oglMFCDialog". Where to save the project depends on you, as long as you can remember where you saved it. whenMFC App WizardWhen it appears, inApplication typeSelect based on the dialog and clickcarry outButton. Other additional setup options are available atUser interface functionin. For example, I chose the minimized box.
Step 2 Create a control module
Found in the Resource Browser tabResource view, expandDialogFolder, then double click to automatically generateIDD_OGLMFCDIALOG_DIALOGDialog. You need to add a control component for rendering OpenGL content. A simplePicture control componentYes, then choose in the toolboxPicture ControlLet's go.
note: If the toolbox does not appear, look in the menu barView->toolboxTune it up.
You can directly organize the group into your dialog window, or you can resize it at any time.
You will need to set some property values for this Picture Control. When this Picture Control is selected, its properties are in the lower right corner, and the following properties are set:
Visible:False
ID:IDC_OPENGL
You might be wondering why the Visible property is set to False. When you load OpenGL rendering in any MFC, all you can do is use the square position of the control to aid in drawing OpenGL content. For some strange reason, if Visible is set to True, this control will overwrite your OpenGL content.
Step 3 Add an OpenGL class
Next, in order to set up OpenGL, I chose to add a separate class for it. It is a good habit to divide the main parts of the project into separate classes. So I will separate OpenGL from MFC.
To add a class, clickSolution explorerLabel, right click in the treeoglMFCDialogEngineering, choiceAdd -> Add ClassAnd choose from the templateC++ classthen clickAdd to. whenGeneral C++ Class WizardWhen present, set the following properties:
Class name:COpenGLControl
Base class:CWnd
Access (Access):public
checkVirtual destructor
Then click Finish and the creation is successful.
Step 4 Add Project Libraries
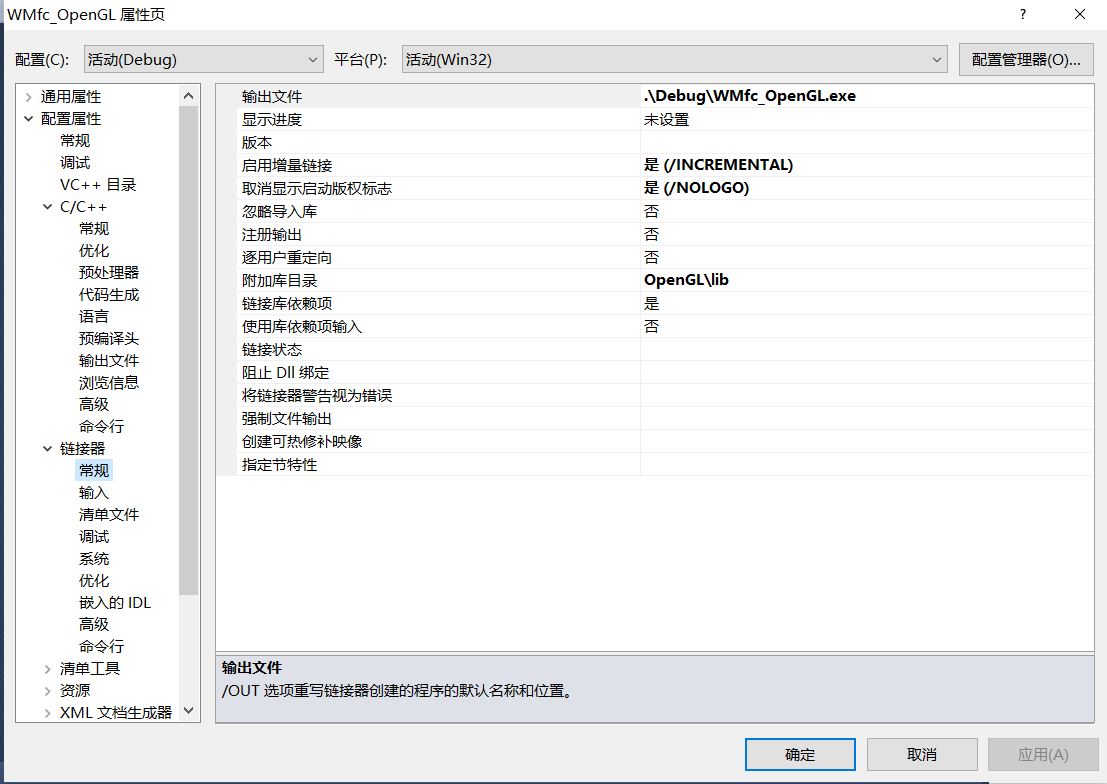
Since you need to use OpenGL's rendering capabilities, you also need to link some libraries to your project. Right click again in the treeoglMFCDialogProject, choiceAttributes,inProperty pageMedium choiceLinker -> Input, set the following variables:
Additional dependencies:opengl32.lib;glu32.lib
Note: Do not have any spaces between the two *.lib files
Step 5 Set the variables of the class
Within the scope of this project, some variables need to be added toOpenGLControl.hIn the public, private and private, you need to add #include statement, the code is as follows:
#include <gl/gl.h>
#include <gl/glu.h>

class COpenGLControl : public CWnd
{
   public:
      /******************/
      /* PUBLIC MEMBERS */
      /******************/
      // Timer
      UINT_PTR m_unpTimer;

   private:
      /*******************/
      /* PRIVATE MEMBERS */
      /*******************/
      // Window information
      CWnd    *hWnd;
      HDC     hdc;
      HGLRC   hrc;
      int     m_nPixelFormat;
      CRect   m_rect;
      CRect   m_oldWindow;
      CRect   m_originalRect;
      ...
pay attention:I arrange the functions in a specific order, which is very important. Because if some functions are instantiated before other functions, there will be a compilation error caused by the protected member. So, I put these functions in the following order:
- Construction and destructor.
- Manually added functions.
- The "afx_msg" function is automatically added.
- DECLARE_MESSAGE_MAP() call.
Step 6 Add the oglCreate function
a new function will be added toOpenGLControl.hwithOpenGLControl.cppin. This function will be responsible for building some basic window variables and function calls that are important to MFC. I named this function asoglCreate. The added code is as follows:
OpenGLControl.hvoid oglCreate(CRect rect, CWnd *parent);
OpenGLControl.cpp
void COpenGLControl::oglCreate(CRect rect, CWnd *parent)
{
   CString className = AfxRegisterWndClass(CS_HREDRAW |
      CS_VREDRAW | CS_OWNDC, NULL,
      (HBRUSH)GetStockObject(BLACK_BRUSH), NULL);

   CreateEx(0, className, "OpenGL", WS_CHILD | WS_VISIBLE |
            WS_CLIPSIBLINGS | WS_CLIPCHILDREN, rect, parent, 0);

   // Set initial variables' values
   m_oldWindow    = rect;
   m_originalRect = rect;

   hWnd = parent;
}
Step 7 Add the OnPaint function
Next you need to add a message class function. The difference between this function and other functions is also well recognized. When an event occurs in the program, MFC will call a specific message (WM_As a prefix), such as OnPaint, OnSize, OnCreate, etc. To add a message via Visual Studio, you canAttributesLooking in the windowMessageButton (the one to the right of the lightning bolt icon). If your cursor is in the file of your choice, this is where you add the event.
After finishing this, you first need to createOnPaintEvent, throughProperties -> Message WindowFound belowWM_PAINTevent. Then select from the drop down list<Add>OnPaint. You notice that the message function is added at the same timeOpenGLControl.hwithOpenGLControl.cppin. However, unlike the user-added function, this function has the prefix "afx_msg" and adds a call to the top of the cpp file. I recommend that you don't change what Visual Studio automatically adds unless you know what they do.
inOnPaintInside the function, only a small portion of the automatically generated code needs to be changed. The way you render (or draw) OpenGL windows yourself is different from MFC, except that you draw it through a timer. Just in case you need to fix a specific frame rate. Because the window is rendered by a timer,OnPaintThe function cannot be called in the same way. Therefore, you need to add a simple line instead of the original call. The following code needs to be addedOpenGLControl.cppIn the fileOnPaintfunction.
OpenGLControl.cpp
void COpenGLControl::OnPaint()
{
   //CPaintDC dc(this);    // device context for painting
   ValidateRect(NULL);
}
Step 8 Add the OnCreate function
Next, follow the previous method to add a message class, this time selectWM_CREATEMessage, choose<Add>OnCreate. As before, the new class will be added to the .h and .cpp files. When the program calls to it, you only need to add a function that will be added after the call of a line of code.oglInitializefunction.
note:Of course, you haven't added this function yet, and there will be compilation errors at runtime.
OpenGLControl.cpp
int COpenGLControl::OnCreate(LPCREATESTRUCT lpCreateStruct)
{
   if (CWnd::OnCreate(lpCreateStruct) == -1)
      return -1;

   oglInitialize();

   return 0;
}
Step 9 Add the oglInitialize function
As mentioned earlier, we will manually add this function, the oglInitialize function, which is called when your OpenGL class is created (byOnCreateMessage).oglInitializeThe function will be responsible for setting all the information needed for OpenGL rendering. This information includes the pixel format, rendering context, and clearing colors to ensure that the program swaps the cache properly.
note:BelowThe last line of the .cpp code fragmentOnDraw* Function, this function has not been created yet, and there will be a compilation error when running.
OpenGLControl.hvoid oglInitialize(void)
OpenGLControl.cpp
void COpenGLControl::oglInitialize(void)
{
   // Initial Setup:
   //
   static PIXELFORMATDESCRIPTOR pfd =
   {
      sizeof(PIXELFORMATDESCRIPTOR),
      1,
      PFD_DRAW_TO_WINDOW | PFD_SUPPORT_OPENGL | PFD_DOUBLEBUFFER,
      PFD_TYPE_RGBA,
      32,    // bit depth
      0, 0, 0, 0, 0, 0, 0, 0, 0, 0, 0, 0, 0,
      16,    // z-buffer depth
      0, 0, 0, 0, 0, 0, 0,
   };

   // Get device context only once.
   hdc = GetDC()->m_hDC;

   // Pixel format.
   m_nPixelFormat = ChoosePixelFormat(hdc, &pfd);
   SetPixelFormat(hdc, m_nPixelFormat, &pfd);

   // Create the OpenGL Rendering Context.
   hrc = wglCreateContext(hdc);
   wglMakeCurrent(hdc, hrc);

   // Basic Setup:
   //
   // Set color to use when clearing the background.
   glClearColor(0.0f, 0.0f, 0.0f, 1.0f);
   glClearDepth(1.0f);

   // Turn on backface culling
   glFrontFace(GL_CCW);
   glCullFace(GL_BACK);

   // Turn on depth testing
   glEnable(GL_DEPTH_TEST);
   glDepthFunc(GL_LEQUAL);

   // Send draw request
   OnDraw(NULL);
}
Step 10 Add the OnDraw function
Next, we will add beforeoglInitializeMentioned in the functionOnDrawfunction. This function will act as a message function, but it needs to be added manually. As you can generalize, you need to prefix the "afx_msg" in the declaration statement of the function. You will notice that you actually do nothing in the cpp code snippet, only one TODO comment. It will be used to implement some functions later in this tutorial, such as camera control.
note:If you run the program now, he won't report an error, but unfortunately there is nothing in the control, depending on the changes you made in the OnPaint function.
OpenGLControl.hafx_msg void OnDraw(CDC *pDC);
OpenGLControl.cpp
void COpenGLControl::OnDraw(CDC *pDC)
{
   // TODO: Camera controls.
}
Step 11 Add the OnTimer function
Now it's time to add it with a timerOnPaintThe function of the function. Let's add a new message class, chooseWM_TIMERMessage, then select from the drop down list<Add>OnTimerTo create a function.
** OnTimerThe code for the function is very straightforward. The program is executed by this function each time the timer of this class is called. Therefore, the value that the function automatically passes in is an unsigned integer that corresponds to the timer you created manually. useSelect** statement(Translator thinks it should be switch), I created the corresponding timercase. The basic "draw and swap cache" process will be in this timer. In the first half of this tutorial, you don't have to draw any graphics, just the correct swap cache.
OpenGLControl.cpp
void COpenGLControl::OnTimer(UINT nIDEvent)
{
   switch (nIDEvent)
   {
      case 1:
      {
         // Clear color and depth buffer bits
         glClear(GL_COLOR_BUFFER_BIT | GL_DEPTH_BUFFER_BIT);

         // Draw OpenGL scene
         // oglDrawScene();

         // Swap buffers
         SwapBuffers(hdc);

         break;
      }

      default:
         break;
   }

   CWnd::OnTimer(nIDEvent);
}
Step 12 Add the OnSize function
The last message function you need to add isOnSizefunction. As before, chooseWM_SIZEMessage and select it in the drop down list<Add>OnSize。
OnSizeThe function is called when the window size changes. In order to prevent the rendering window from being abnormal caused by the window size change, the perspective and viewport need to be adjusted. In this tutorial you don't really need to adjust the size of the window, but you can do it with the following functions if necessary:
OpenGLControl.cpp
void COpenGLControl::OnSize(UINT nType, int cx, int cy)
{
   CWnd::OnSize(nType, cx, cy);

   if (0 >= cx || 0 >= cy || nType == SIZE_MINIMIZED) return;

   // Map the OpenGL coordinates.
   glViewport(0, 0, cx, cy);

   // Projection view
   glMatrixMode(GL_PROJECTION);

   glLoadIdentity();

   // Set our current view perspective
   gluPerspective(35.0f, (float)cx / (float)cy, 0.01f, 2000.0f);

   // Model view
   glMatrixMode(GL_MODELVIEW);
}
Now that you are doneCOpenGLControlClass (at least initialized). The next step is to integrate him into your main MFC window, ieCoglMFCDialogDlgclass.
Step 13 Customize the main MFC dialog class
Your final step is to integrate your OpenGL class into the main MFC dialog. This process is very simple. First inoglMFCDialogDlg.hInclude your OpenGL class in the file and add oneCOpenGLControlThe class acts as a local variable.
oglMFCDialogDlg.h
#include "OpenGLControl.h"

class CoglMFCDialogDlg : public CDialog
{
   private:
      COpenGLControl m_oglWindow;
   .
   .
   .
Next, atoglMFCDialogDlg.cppExisting in the fileOnInitDialogThe following code in the function before the return statement can start the timer in the picture control you create, rendering OpenGL content.
note:In the accident test, I set the timer interval to 1 millisecond.
oglMFCDialogDlg.cpp::OnInitDialog
.
.
.
CRect rect;

// Get size and position of the picture control
GetDlgItem(IDC_OPENGL)->GetWindowRect(rect);

// Convert screen coordinates to client coordinates
ScreenToClient(rect);

// Create OpenGL Control window
m_oglWindow.oglCreate(rect, this);

// Setup the OpenGL Window's timer to render
m_oglWindow.m_unpTimer = m_oglWindow.SetTimer(1, 1, 0);
.
.
.
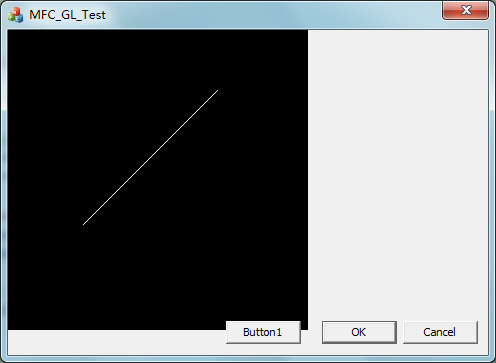
Step 14 Initialize the results of the OpenGL control
Now you are done! Now you should see the black background. Now you canOnTimerAdd a drawing function.
Part II: Extending the functionality of OpenGL (additional)
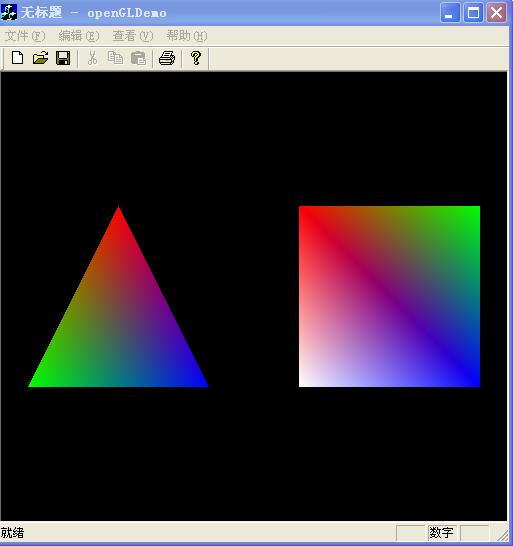
Step 15 Draw geometric figures
The next step is to draw some test graphics in your OpenGL space. Unfortunately, you need to set up the camera system, otherwise you won't be able to see these graphics. If there is no camera pointing straight to a specific point, the graphics you draw will be placed in the original position of the camera so that you can't see anything. So if you want to see what you are painting first, please see Step 16: Set up a Maya-style camera. In Step 16, you will create aAlias|Wavefront MayaStyle camera (rotate/zoom/pan with mouse). But I choose to do this in the next step.
In any case, the graphics drawn in this tutorial are very simple, just draw a cube (6 square faces). If you call againOnTimerFunction, will be calledoglDrawSceneFunction, you will create this function.
OpenGLControl.h
void oglDrawScene(void);
** OpenGLControl.cpp**
void COpenGLControl::oglDrawScene(void)
{
   // Wireframe Mode
   glPolygonMode(GL_FRONT_AND_BACK, GL_LINE);

   glBegin(GL_QUADS);
      // Top Side
      glVertex3f( 1.0f, 1.0f,  1.0f);
      glVertex3f( 1.0f, 1.0f, -1.0f);
      glVertex3f(-1.0f, 1.0f, -1.0f);
      glVertex3f(-1.0f, 1.0f,  1.0f);

      // Bottom Side
      glVertex3f(-1.0f, -1.0f, -1.0f);
      glVertex3f( 1.0f, -1.0f, -1.0f);
      glVertex3f( 1.0f, -1.0f,  1.0f);
      glVertex3f(-1.0f, -1.0f,  1.0f);

      // Front Side
      glVertex3f( 1.0f,  1.0f, 1.0f);
      glVertex3f(-1.0f,  1.0f, 1.0f);
      glVertex3f(-1.0f, -1.0f, 1.0f);
      glVertex3f( 1.0f, -1.0f, 1.0f);

      // Back Side
      glVertex3f(-1.0f, -1.0f, -1.0f);
      glVertex3f(-1.0f,  1.0f, -1.0f);
      glVertex3f( 1.0f,  1.0f, -1.0f);
      glVertex3f( 1.0f, -1.0f, -1.0f);

      // Left Side
      glVertex3f(-1.0f, -1.0f, -1.0f);
      glVertex3f(-1.0f, -1.0f,  1.0f);
      glVertex3f(-1.0f,  1.0f,  1.0f);
      glVertex3f(-1.0f,  1.0f, -1.0f);

      // Right Side
      glVertex3f( 1.0f,  1.0f,  1.0f);
      glVertex3f( 1.0f, -1.0f,  1.0f);
      glVertex3f( 1.0f, -1.0f, -1.0f);
      glVertex3f( 1.0f,  1.0f, -1.0f);
   glEnd();
}
Now, the last thing you have to do is replaceOnTimerThe comment part of the function, calledoglDrawScenefunction.
OpenGLControl.cpp::OnTimer
.
.
.
// Clear color and depth buffer bits
glClear(GL_COLOR_BUFFER_BIT | GL_DEPTH_BUFFER_BIT);

// Draw OpenGL scene
oglDrawScene();

// Swap buffers
SwapBuffers(hdc);
.
.
.
Step 16 Set up a Maya-style camera
Maya-style cameras refer toAlias|Wavefront MayaThe camera system used in . The left mouse button rotates, the right button zooms, and the middle button pans. To do this, you need to create oneOnMouseMoveFunction call.
selectionWM_MOUSEMOVEMessage, select from the drop down menu<Add>OnMouseMove, create a function. In the newly created function, you need to add the appropriate action for each button. If you recall the previous content, you create some member variables for rotation, scaling, and panning. You will set a new value for these variables.
OpenGLControl.hafx_msg void OnMouseMove(UINT nFlags, CPoint point);
OpenGLControl.cpp
void COpenGLControl::OnMouseMove(UINT nFlags, CPoint point)
{
   int diffX = (int)(point.x - m_fLastX);
   int diffY = (int)(point.y - m_fLastY);
   m_fLastX  = (float)point.x;
   m_fLastY  = (float)point.y;

   // Left mouse button
   if (nFlags & MK_LBUTTON)
   {
      m_fRotX += (float)0.5f * diffY;

      if ((m_fRotX > 360.0f) || (m_fRotX < -360.0f))
      {
         m_fRotX = 0.0f;
      }

      m_fRotY += (float)0.5f * diffX;

      if ((m_fRotY > 360.0f) || (m_fRotY < -360.0f))
      {
         m_fRotY = 0.0f;
      }
   }

   // Right mouse button
   else if (nFlags & MK_RBUTTON)
   {
      m_fZoom -= (float)0.1f * diffY;
   }

   // Middle mouse button
   else if (nFlags & MK_MBUTTON)
   {
      m_fPosX += (float)0.05f * diffX;
      m_fPosY -= (float)0.05f * diffY;
   }

   OnDraw(NULL);

   CWnd::OnMouseMove(nFlags, point);
}
Also, I am atCOpenGLControlAdd some initialization statements to the constructor of the class.
OpenGLControl.cpp
COpenGLControl::COpenGLControl(void)
{
   m_fPosX = 0.0f;    // X position of model in camera view
   m_fPosY = 0.0f;    // Y position of model in camera view
   m_fZoom = 10.0f;   // Zoom on model in camera view
   m_fRotX = 0.0f;    // Rotation on model in camera view
   m_fRotY = 0.0f;    // Rotation on model in camera view
}
The last thing to do now is change.OnDrawFunction, change the TODO comment to the following:
OpenGLControl.cpp::OnDraw
.
.
.
glLoadIdentity();
glTranslatef(0.0f, 0.0f, -m_fZoom);
glTranslatef(m_fPosX, m_fPosY, 0.0f);
glRotatef(m_fRotX, 1.0f, 0.0f, 0.0f);
glRotatef(m_fRotY, 0.0f, 1.0f, 0.0f);
.
.
.
Step 17 Correctly change the size of the window
Changing the size of an MFC window is a tedious task (perhaps compared to Visual Basic), but it can be done easily. And once you've done it, you can always use this code again. Here are the methods I have explored and are still in use. This involves two OnSize functions/functions of MFC and OpenGL.
First, enter the oglMFCDialogDlg.cpp file and create OnSize according to the previous method.Message function. This time generates the OnSize function for your MFC part, but you have to add some code, the whole Onsize function is like this.
oglMFCDialogDlg.cpp
void CoglMFCDialogDlg::OnSize(UINT nType, int cx, int cy)
{
   CDialog::OnSize(nType, cx, cy);

   switch (nType)
   {
      case SIZE_RESTORED:
      {
         if (m_oglWindow.m_bIsMaximized)
         {
            m_oglWindow.OnSize(nType, cx, cy);
            m_oglWindow.m_bIsMaximized = false;
         }

         break;
      }

      case SIZE_MAXIMIZED:
      {
         m_oglWindow.OnSize(nType, cx, cy);
         m_oglWindow.m_bIsMaximized = true;

         break;
      }
   }
}
You noticed that you changed the value of some variables that were not created. So now you have to find the OpenGL window code and add the following code after the existing OnSize function.
OpenGLControl.cpp
.
.
.
switch (nType)
{
   // If window resize token is "maximize"
   case SIZE_MAXIMIZED:
   {
      // Get the current window rect
      GetWindowRect(m_rect);

      // Move the window accordingly
      MoveWindow(6, 6, cx - 14, cy - 14);

      // Get the new window rect
      GetWindowRect(m_rect);

      // Store our old window as the new rect
      m_oldWindow = m_rect;

      break;
   }

   // If window resize token is "restore"
   case SIZE_RESTORED:
   {
      // If the window is currently maximized
      if (m_bIsMaximized)
      {
         // Get the current window rect
         GetWindowRect(m_rect);

         // Move the window accordingly (to our stored old window)
         MoveWindow(m_oldWindow.left,
                    m_oldWindow.top - 18,
                    m_originalRect.Width() - 4,
                    m_originalRect.Height() - 4);

         // Get the new window rect
         GetWindowRect(m_rect);

         // Store our old window as the new rect
         m_oldWindow = m_rect;
      }

      break;
   }
}
.
.
.
These are the above. simple? not simple? Please feel free to leave a comment. Thank you for reading, I hope I can help you.
Intelligent Recommendation
OpenGL drawing in MFC dialog
When we write software, we always have our own interface. Of course, we have to deal with MFC when using C++. The visual interface usually uses MFC's Dialog; OpenGL usually generates a window when dra...

MFC-OpenGL programming
aims (1) Draw three cubes, the positions are as shown in the figure. Request to draw the coordinate system 3 axes. (2) The three cubes rotate together along the coordinate axis (x or y or z). Say Ming...
MFC correctly configures OpenGL
MFC correctly configures OpenGL Library download link After the library downloads, decompress the project file: Subsequently modified attributes in the project: Finally, the header file is included in...
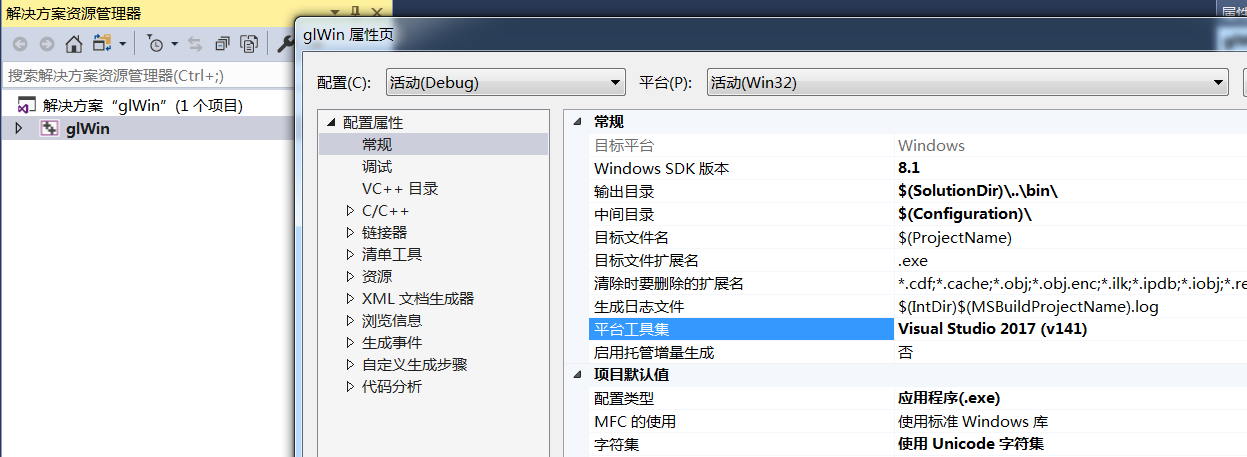
MFC OpenGL Record
MFC OpenGL Record https://www.songho.ca/opengl/gl_mvc.html https://www.opengldn.com/codes glWin.exe This earth can rotate The code is written by VS2015 Win32, not MFC project, and there are main.cpp f...
Embed a Google CEF browser in the MFC application
Disclaimer: Article from http://www.codeproject.com/articles/1105945/Embedding-a-chromium-browser-in-an-mfc-application First, the machine is turned over, there is no place, but it doesn't affect the ...
More Recommendation
Embed a third-party EXE application in C ++ MFC
Embed a third-party EXE application in C ++ MFC...
【OpenGL】 -001 Configure OpenGL under VS2015 MFC
【OpenGL】 -001 Configure OpenGL under VS2015 MFC Recently I was watching "OpenGL SuperBiber". The sample code of this book is implemented by GLFW + OpenGL, and the window system uses GLFW. Al...
MFC+OpenGL screen coordinates to OpenGL coordinates
I recently wrote an example using OpenGL, the center point (0, 0) of OpenGL is just the center point of our screen. Because I need dynamic drawing (drawing points, lines, circles, arcs...) and need to...
Nehe's OpenGL framework (MFC version)
NeheSeveralOpenGLFrames areWin32 sdkVersion, I need to nowMFCLearningOpenGL,I saw the first one he wrote today.OpenGLframe,atMFCImplemented in the middle. For the sake of simplicity, the full screen p...
MFC OpenGL Tag Cloud (transfer)
The first time I saw the tag cloud was at the end of last year, I was particularly interested in seeing this app. I remember when I was doing the Mobile app in Beijing in 2008, I was wondering if I co...