Git use notes
tags: git
table of Contents
Configure local users and mailboxes
Local warehouse submission modification
Merge a branch to the current branch
Local branch and remote branch link
View remote library information
Create a local branch corresponding to the remote branch
A local library is associated with both GitHub and associated code clouds
Code cloud push remote library failed
One computer manages projects under different github accounts
gitInstallation and use tutorial
Download and install
1. Download the Git client
GitClient download address :https://code.google.com/p/msysgit/downloads/list Copy the address to the browser bar to download.
2. Install the Git client
Welcome Screen : Direct next step;
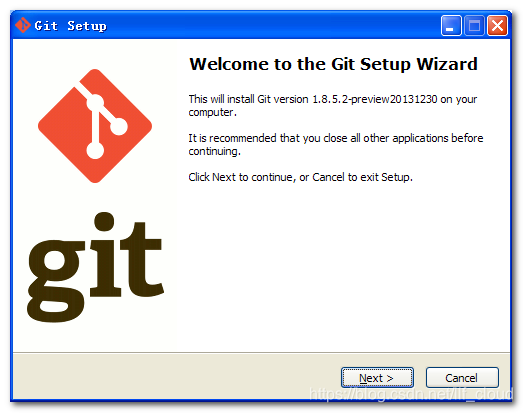
protocol : Must accept

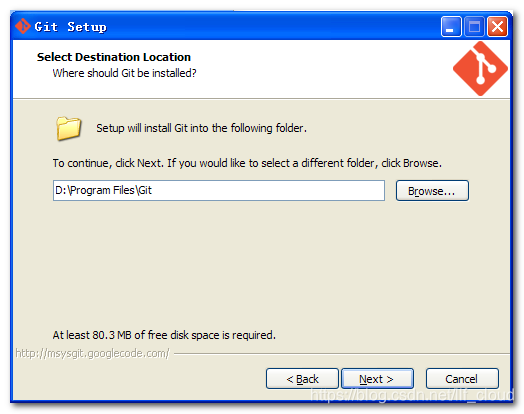
Installation location : Reserve 100M space, custom installation location;
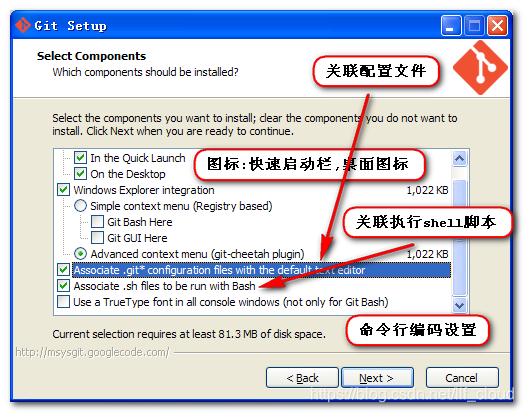
Select the installation component
:Can also be selected by default;
-- Icon component(Addition icons) : Choose whether to create a quick launch bar icon or whether to create a desktop shortcut;
-- Desktop browsing(Windows Explorer integration) : Browse source methods, separate context browsing using only bash or just Git GUI tools; advanced context browsing methods using the git-cheetah plugin plugin;
-- Associated profile : Whether to associate a git configuration file, which mainly displays the style of the text editor;
-- AssociationshellScript file : Whether to associate the script file executed by the Bash command line;
-- useTrueTypecoding : Whether to use TruthType encoding on the command line, which is a universal encoding developed by Microsoft and Apple;
Choose the default editor used by Git
Use the Nano editor by default : Use Nano Editor by default
Use Vim (The ubiquitous text editor) as Git's default editor: Use Vim as the default editor for Git
Use Notepad++ as Git's default editor: Use Notepad++ as the default editor for Git
Use Visual Studio Code as Git's default editor: Use Visual Studio Code as the default editor for Git

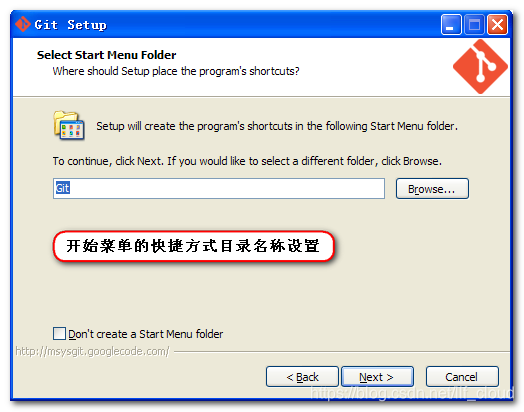
Start menu shortcut directory
Set the directory name of the shortcut in the start menu, or chooseNo longer create shortcuts in the Start menu;
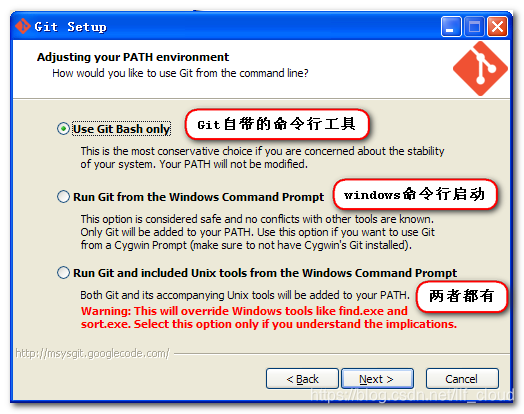
Set up command line tools
: Choose what command line tool to use, in general weDefault useGit BashYou can, Default selection;
-- GitBring your own : Use Git's own Git Bash command line tool; this is the safest option because your PATH won't be modified at all. You can only use Git Bash's Git command line tool.
-- system build-inCMD : Use the Windows command line tool; this option is considered safe because it only adds some minimal Git packages to the PATH to avoid confusing the environment with optional Unix tools. You will be able to use Git from Git Bash and Windows command prompts.
-- Both have : Both of them are configured at the same time, but note that this will overwrite the find.exe and sort.exe tools in Windows. If you don't understand these, try not to choose; Git and optional Unix tools will be added to your computer's PATH. Warning: This will override Windows tools such as "find and sort". Use this option only after you understand its meaning.
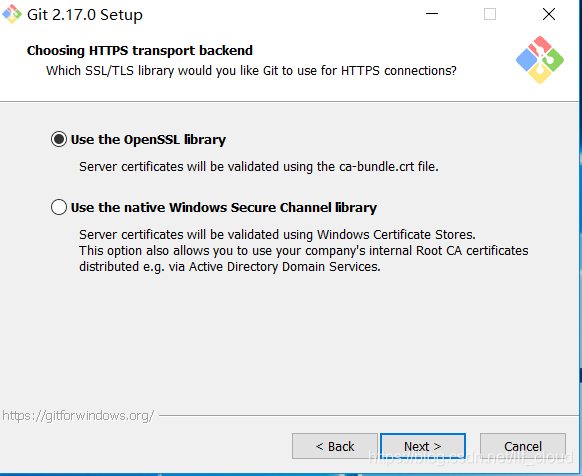
Transfer Protocol
Transmission protocol, the first one is https protocol, the second is ssl protocol
Use the OpenSSL library
Using the OpenSSL library, the server certificate will be verified using the ca-bundle.crt file.
Use the native Windows Secure Channel library
With the local Windows Secure Channel Library, the server certificate will be verified using the Windows Certificate Store. This option also allows you to use the company's internal root CA certificate, for example, through Active Directory Domain Services.
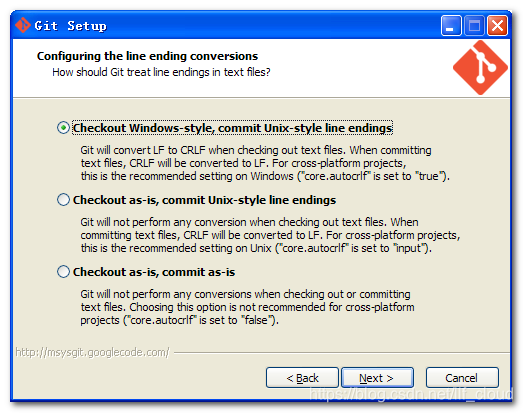
Choose a line feed format
-- Check outwindowsFormat converted tounixformat : If you are a cross-platform project and install git under windows system, select the first one if you want to convert the Windows formatted newline to the unix format.
-- Check out the original format and change tounixformat : Regardless of the format, a line change to a Unix format is submitted; a project representing the Unix platform.
-- No format conversion : No conversion, no matter what is checked, what is submitted; means non-cross-platform projects.
Checkout Windows-style,commit Unix-style line endings
Git converts LF to CRLF when a text file is checked out. When a text file is submitted, the CRLF will be converted to LF. For cross-platform projects, this is the recommended setting on Windows ("core.autocrlf" is set to "true")
Checkout as-is , commit Unix-style line endings
Git does not perform any conversions when checking out text files. When a text file is submitted, the CRLF will be converted to LF. For cross-platform projects, this is the recommended setting on Unix ("core.autocrlf" is set to "input")
Checkout as-is,commit as-is
Git does not perform any conversions when checking out or submitting a text file. This option is deprecated for cross-platform projects ("core.autocrlf" is set to "false")
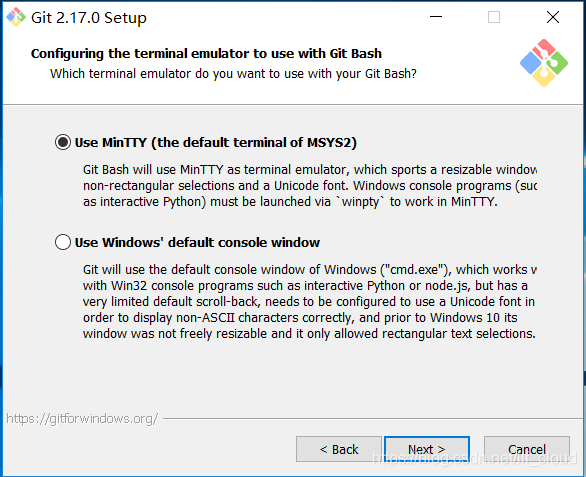
Terminal simulator
Configuring the terminal emulator for use with Git Bash
Use MinTTY:
GitThe Windows client will come with a Linux command-line tool called MinGW that can execute simple shell commands, similar to the cygwin function, and that's it.
In the MinGW command line window, you can run the mintty command to open the mintty window. You can use the ssh command to log in to the Linux server again.
Use MinTTY (the default terminal of MSYS2)
Git BashMinTTY will be used as a terminal emulator with resizable windows, non-rectangular selections and Unicode fonts. Windows console programs (such as interactive Python) must be started with 'winpty' to run in MinTTY.
Use Windows' default console window
GitWill use Windows' default console window ("cmd.exe"), which can be used with Win32 console programs (such as interactive Python or node.js), but the default rollback is very limited and needs to be configured to use unicode The fonts display non-ASCII characters correctly, and before Windows 10, their windows were not freely resizable and only rectangular text selection was allowed.
Configure additional options
Enable file system caching
Enable file system caching
File system data will be read in bulk and cached in memory for certain operations ("core.fscache" is set to "true"). This provides a significant performance boost.
Enable Git Credential Manager
Enable Git Credential Manager
Windows' Git Credential Manager provides secure Git credential storage for Windows, most notably multi-factor authentication support for Visual Studio Team Services and GitHub. (requires .NET Framework v4.5.1 or higher).
Enable symbolic links
Enable symbolic links (requires SeCreateSymbolicLink permission). Please note that existing repositories are not affected by this setting.
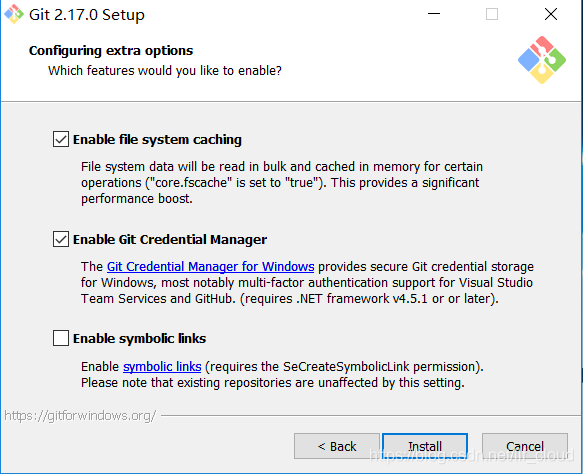
start installation :

End of installation
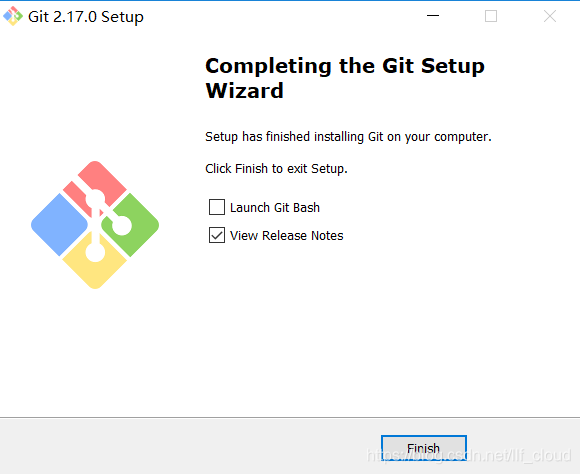
Git configuration
Github secret login
(1) Create local ssh
Use command : Create local ssh
ssh-keygen -t rsa -C "[email protected]"
Ps: -t rsa indicates the algorithm used, this option is the default option
GitHub Mailbox: The mailbox behind this command is the registered mailbox of GitHub.
Path Selection : After using this command, you will be prompted to select the ssh-key generation path. Here you can directly press Enter to default, and the generated ssh-key is in the default path.
Password Confirmation : Here we do not use a password to log in, it is too much trouble to use the password;

(2) Configuring ssh to GitHub
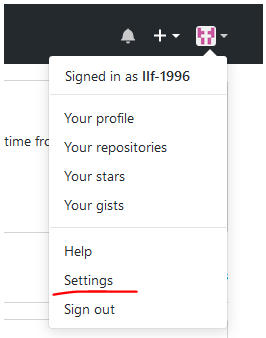
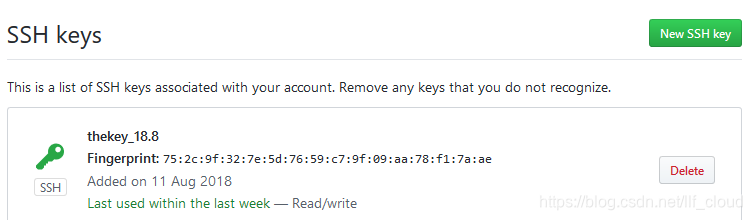
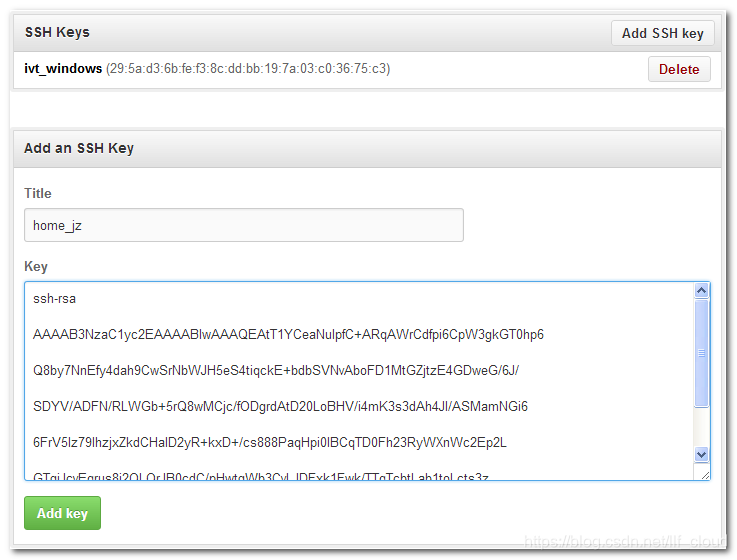
Go to the generated ssh directory: C:\Documents and Settings\Administrator\.ssh, open the id_rsa.pub file with Notepad, copy the contents of the file; then go to the GitHub website: To log in to GitHub, you need to register first, select Setting user settings :
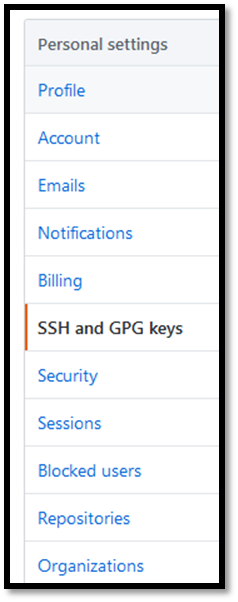
Select the left sideSSH and GPG keysOption:
Click on the rightNew SSH key :
Copy it abovessh-keyCopy in :
(3) Verify that the configuration is successful
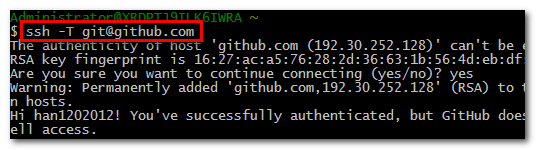
Use command :
ssh -T [email protected]
Success prompt : If Hi han1202012! You've successfully authenticated, but GitHub does not provide shell access. It means that the configuration is successful, you can connect to GitHub;
Enter Git
Windows mouse right click git bash here to open Git in the current directory
Configure local users and mailboxes
Username mailbox role: Before using gitWe need to set up a username and email address, which is used to upload the local repository to GitHub and display the code uploader on GitHub.
Use command :
git config --global user.name "HanShuliang" //Set username
git config --global user.email "[email protected]" //Set mailbox

Git command
initialization
Initialize a Git repository, using the git init command
git initAdd a remote library
There is a local library first, followed by a remote library.
Associated remote library
How do we associate a remote library when we have a local library and no remote libraries?
First build an empty remote repository on GitHub.
Then use the command locally
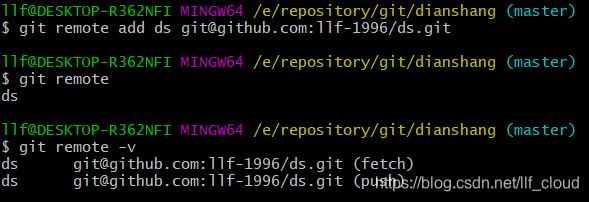
git remote add origin git@githubname:path/repo-name.gitOrigin is the name of the remote library. This is the default name for Git. It can also be changed to something else, but the name of origin is known as a remote library.
example:
Push remote library
After the association, use the commandgit push -u origin masterPush all content of the master branch for the first time;
After that, you can use the command after each local submission.git push origin masterPush the latest changes.
Since the remote library is empty, when we first push the master branch and add the -u parameter, Git will not only push the local master branch content to the remote new master branch, but also the local master branch and remote The master branches are associated and can be simplified at a later push or pull.
Cloning from a remote library
From zero development, then the best way is to create a remote library first, then clone it from a remote library.
Built remote library
First, log in to GitHub and create a new repository called gitskills. We check Initialize this repository with a README so that GitHub will automatically create a README.md file for us. Once created, you can see the README.md file.
clone
Now that the remote library is ready, the next step is to clone a local library with the command git clone. The cloned link address is on GitHub. Go to the remote library you just created and click "Clone or download" to copy the link.
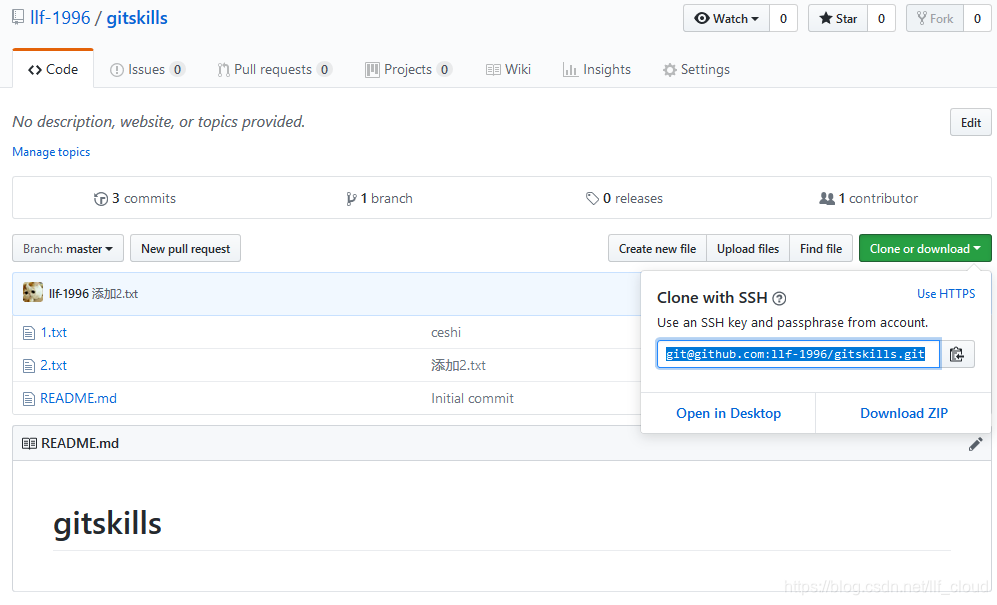
$ git clone [email protected]:llf-1996/gitskills.git

Cloning into 'gitskills'...

remote: Counting objects: 3, done.

remote: Total 3 (delta 0), reused 0 (delta 0), pack-reused 3

Receiving objects: 100% (3/3), done.
Be careful to change the address of the Git library to your own, then go to the gitskills directory and see that there is already a README.md file.
Local warehouse submission modification
Add files to the Git repository in two steps:
1. Use the command git add <filename>, note that you can use it multiple times and add multiple files.
2. Use the command git commit -m <message>, message refers to the description information submitted this time.
ps:
git add -ASubmit all changes;
git add -uSubmit modified (deleted) and deleted (deleted) files, excluding new files (new);
git add .Submit new (new) and modified (modified) files, excluding deleted files.
Branch
Create and switch branches
First, we create the dev branch and then switch to the dev branch:
$ git checkout -b dev
Switched to a new branch 'dev'
The git checkout command with the -b parameter indicates that the creation and switching are equivalent to the following two commands:
$ git branch dev # Create dev branch
$ git checkout dev # switch to dev branch
Switched to branch 'dev'
View branch
Then, use the git branch command to see the current branch:
$ git branch

* dev

  master
The git branch command will list all branches, and the current branch will be marked with an *.
Merge a branch to the current branch
git merge <name>
Merge the dev branch to the current branch master
llf@DESKTOP-R362NFI MINGW64 /f/learngit (master)
$ git merge dev
Already up to date.
Delete branch
git branch -d <name>
Delete dev branch
$ git branch -d dev
Deleted branch dev (was cf98a27).
Local branch and remote branch link
If git pull prompts no tracking information, then the link relationship between the local branch and the remote branch is not created, use the command git branch --set-upstream-to <branch-name> origin/<branch-name>, or use git branch - -set-upstream branch-name origin/branch-name.
Chestnut: Specify the link between the local dev branch and the remote origin/dev branch. Follow the prompts to set the dev and origin/dev links:
$ git branch --set-upstream-to=origin/dev dev

Branch 'dev' set up to track remote branch 'dev' from 'origin'.


ps: If you wish to set tracking information for this branch you can do so with:

git branch --set-upstream-to=origin/<branch> dev
View remote library information
Use git remote -v;
$ git remote -v
origin  [email protected]:llf-1996/learngit.git (fetch)
origin  [email protected]:llf-1996/learngit.git (push)
Push local branch
Push the branch locally, using git push origin branch-name, if the push fails, first grab the remote new commit with git pull.
$ git push origin masterCreate a local branch corresponding to the remote branch
When you clone from a remote library, you can only see the local master branch by default. Create a branch corresponding to the remote branch locally, using the command:
git checkout -b branch-name origin/branch-name
The names of local and remote branches are preferably the same;
Locally created branches are not visible to others if they are not pushed to the remote.
Label management
Create label
The command git tag <tagname> is used to create a new tag. The default is HEAD. You can also specify a commit id. Specifying a commit id indicates that the commit is added.
Specify label information
The command git tag -a <tagname> -m "blablabla..." can specify the tag information;
$ git tag -a v0.1 -m "version 0.1 released" 1094adbUse -a to specify the tag name, -m to specify the description text, and 1094adb to refer to the corresponding commit id.
View tag information
Git show <tagname>View tag information:
$ git show v0.9

commit f52c63349bc3c1593499807e5c8e972b82c8f286 (tag: v0.9)

Author: Michael Liao <[email protected]>

Date:   Fri May 18 21:56:54 2018 +0800


    add merge


diff --git a/readme.txt b/readme.txt

...
View all tags
Command git tag to view all tags.
Delete tag
$ git tag -d v0.1
Deleted tag 'v0.1' (was f15b0dd)
Push label to remote
The command git push origin <tagname> can push a local tag;
Command git push origin --tags to push all unpushed local tags
example:
If you want to push a tag to a remote, use the command git push origin <tagname>:
$ git push origin v1.0
Total 0 (delta 0), reused 0 (delta 0)
To github.com:michaelliao/learngit.git
* [new tag] v1.0 -> v1.0
Push all local tags that have not been pushed to the remote:
$ git push origin --tags
Total 0 (delta 0), reused 0 (delta 0)
To github.com:michaelliao/learngit.git
* [new tag] v0.9 -> v0.9
Delete remote label
The command git tag -d <tagname> can delete a local tag;
The command git push origin :refs/tags/<tagname> can delete a remote tag.
example:
1. If the tag has been pushed to the remote, it is a bit cumbersome to delete the remote tag, first delete it locally:
$ git tag -d v0.9

Deleted tag 'v0.9' (was f52c633)
2. Then, remove from the remote. The delete command is also push, but the format is as follows:
$ git push origin :refs/tags/v0.9

To github.com:michaelliao/learngit.git

 - [deleted]         v0.9
A local library is associated with both GitHub and associated code clouds
Taking the learngit local library as an example, we first delete the associated remote library named origin:
$ git remote rm originThen, firstAssociate GitHub's remote library(You can also associate the code cloud first):
$ git remote add github [email protected]:michaelliao/learngit.gitNote that the name of the remote library is called github, not called origin.
Then, againRemote library of associated code clouds:
$ git remote add gitee [email protected]:liaoxuefeng/learngit.gitAlso note that the name of the remote library is called gitee, not called origin.
Now, let's look at the remote library information with git remote -v and see two remote libraries:
$ git remote -v

gitee    [email protected]:liaoxuefeng/learngit.git (fetch)
gitee    [email protected]:liaoxuefeng/learngit.git (push)
github    [email protected]:michaelliao/learngit.git (fetch)
github    [email protected]:michaelliao/learngit.git (push)
If you want to push to GitHub, use the command:
git push github masterIf you want to push to the code cloud, use the command:
$ git push gitee masterIn this way, our local library can synchronize with multiple remote libraries at the same time:
┌─────────┐ ┌─────────┐
│ GitHub │ │ Gitee │
└─────────┘ └─────────┘
▲ ▲
└─────┬─────┘
│
┌─────────────┐
│ Local Repo │
└─────────────┘
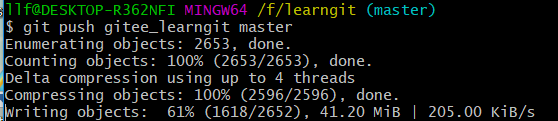
Code cloud push remote library failed
The error message is as follows:
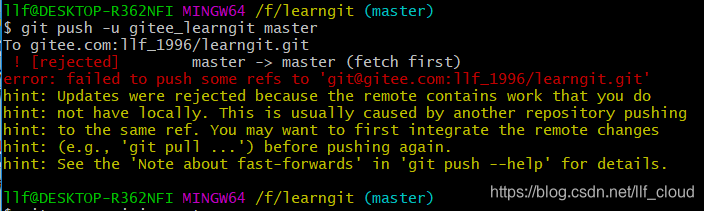
Solution:
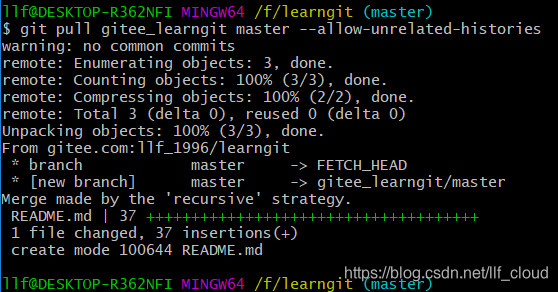
Ps: You can also use this command: git push -f, only one person, git push -f means to push your own native codebase to the remote, and overwrite, if the remote library is only for personal reuse, you can use this command.
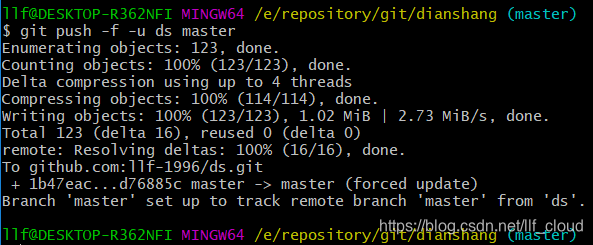
Push push
One computer manages projects under different github accounts
scene:
I have two github accounts for company and home, company is used in the company, home is used at home, the project of the recent company account needs me to work overtime at home, in order to let the home account can modify the remote library on the company account, I need to be in the company account. Add the ssh key of the home account so that the home account can be modified and uploaded.
The problem is: When I add the ssh key in the home account to the company account, I am prompted that the key has been used and cannot be added. Because the home ssh key has been added to my home account, it cannot be added to another account.
Liberation plan: Create multiple SSH keys under the computer of the home account. Provide a ssh key binding to the company account, so that the home can modify its own project or modify the company project.
Start
Step 1: Configure your user information: (Already configured, please skip to the second step)
command:
$ git config --global user.name "name" //Configure your account name
 $ git config --global user.email "email" //Configure your mailbox to create a github account;
View the configured user information:
$ git config user.name
$ git config user.email
The second step: generate ssh key
Here I create an ssh key, which is created by the default option.
command:
$ ssh-keygen -t rsa -C "mailbox name"
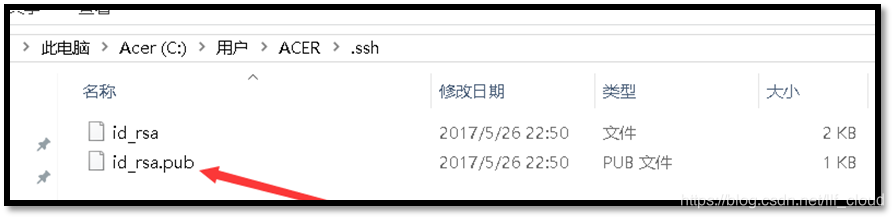
Once created, it will create a .ssh file in your git directory.
Open the file after it finds it; the id_rsa.pub file is your ssh key copied to github
Now let's create the second one:
Generate the ssh key command:
$ ssh-keygen -t rsa -C EmailThe focus is on:
It will prompt you to enter a file name to save the key. Don't press Enter here. Enter will create a file named id_rsa by default, which will overwrite the one we created earlier.
Enter the save path or file name, which is id_xyd.
After success, we look at the .ssh directory.
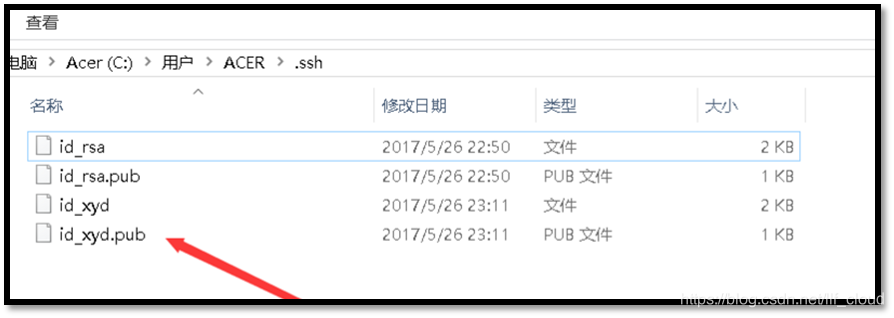
This ssh key can be provided to others for binding on github; here I provide the company account binding.
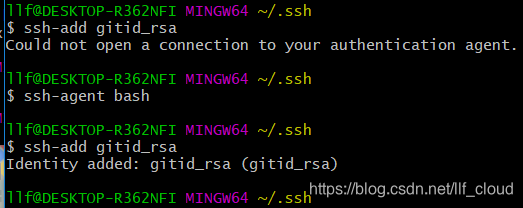
note:When adding a new ssh key, the default SSH will only read id_rsa, so in order for SSH to recognize the new private key, it needs to be added to the SSH agent.
Use the command: ssh-add ~/.ssh/id_rsa_me

If you get an error: Could not open a connection to your authentication agent. Cannot connect to ssh agent
Execute the ssh-agent bash command and then execute ssh-add
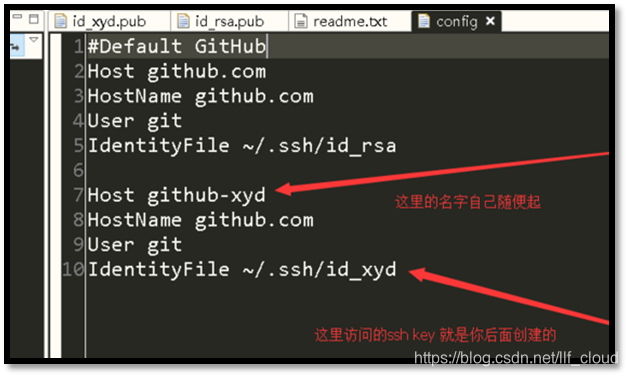
After binding, you need to configure config in the .ssh file. If you do not configure the account, you may conflict and report an error.
If there is no config file directly created; configure as follows
# Default GitHub
Host github.com
HostName github.com
User git
IdentityFile ~/.ssh/id_rsa

Host git
HostName github.com
User git
IdentityFile ~/.ssh/id_rsa
parameter:
Each host is configured with a single host. Each host needs to take an alias. Each host mainly configures two attributes: HostName and IdentityFile.
1. Host name can be taken as your favorite name, but this will affect git related commands, such as:
Host mygithub is defined as follows, the command is as follows, that is, the name immediately followed by git@ is changed to mygithub
git clone git@mygithub:PopFisher/AndroidRotateAnim.git
2. HostName This is the real domain address
3. IdentityFile here is the address of id_rsa
4. PreferredAuthentications configure what permissions authentication is used when logging in - can be set to publickey, password publickey, keyboard-interactive, etc.
5. User configuration uses the username
Finally, when linking the library, git remote add name git@github.com:path/repo-name.git;, to modify [email protected] as the host option information in the configuration file config.
chestnut:
The ssh key I gave to B is the new name I created later is id_xyd.pub. The host name I set in the host is github-xyd. When I associate the library, I need to change the previous [email protected] to your modified one. Host
Before modification: git@github.com:llf-1996/learngit.git
After modification: git@github-xyd:llf-1996/learngit.git or github-xyd:llf-1996/learngit.git
Intelligent Recommendation
svn and git use notes
This happened last week several things: Google released SHA-1 collision secure encryption examples Cloudflare leaked encrypted data networking session linux kernel vulnerability CVE-2017-6074 Encrypti...
Notes Use git (II)
Undo operation In the course of recent use git, sometimes I encountered such a problem: habitual "add -A", which will be all the modifications are added to the staging area, but had to modif...
Use a git notes:
Get code into Bitbucket fast using the command line Set up your local directory Set up Git on your machine if you haven't already. Create your first file, commit, and push...

GIT use and error Notes
As a very useful free version management tools, GIT has many advantages. Recent work has encountered a problem a lot of GIT. Recently I took over a project, the first time the source code uploaded to ...
Git everyday use Notes
Create a git repository Creating a branch Operation remote branch Version rollback Reproduced in: https: //my.oschina.net/u/3398936/blog/1615916...
More Recommendation
[] Use git notes
Pull remote branch If you can not pull git project, may not be updated telematics...

Git use notes to organize
Reference article Install git Install git tortoise Set username and password $ git config --global user.name "xxx" $ git config --global user.email "[email protected]" Generate key ssh-ke...

One of the notes on the use of git
is very useful for a large project, especially for small partners who suddenly entered the project, or the project was not pulled from git at the beginning And everyone’s packaged projects were ...

git use notes 2
Transfer from: Liao Xuefeng's official website 1. Check the status of the workspace To keep track of the status of the workspace, use the git status command. If git status tells you that some files ha...
Git simple use notes
Preface Before learning Git, we have to know what Git is What is Git? Git is currently the world's most advanced distributed version control system (no one). What are the characteristics of Git? Simpl...