I.MX YOCTO Project User Guide -
I.MX YOCTO Project User Guide -
5 Imaging Build
This section provides detailed information and procedures for building an image.
5.1 Build configuration
i. MX provides a script FSL-SETUP-RELEASE.SH, which simplifies the setting of the I.mx machine. To use this script, you need to specify the name of the specific computer to be generated and the desired graphical backend. This script sets the directory and configuration files for the specified computer and backend.
In the Meta-FSL-BSP-RELEASE layer, i.mx provides new or updated machine configurations that override the MetaFReescale machine configuration. FSL-SETUP-RELEASE.SH scripts copy these files to the meta-freescale / conf / machine directory. The following is an i.mx machine profile that can be selected. Check the latest additional release notes or computer directory.
  imx6qpsabreauto
  imx6qpsabresd
  imx6ulevk
  imx6ulz14x14evk
  imx6ull14x14evk
  imx6ull9x9evk
  imx6dlsabreauto
  imx6dlsabresd
  imx6qsabreauto
  imx6qsabresd
  imx6slevk
  imx6solosabreauto
  imx6solosabresd
  imx6sxsabresd
  imx6sxsabreauto
  imx6sllevk
  imx7dsabresd
  imx7ulpevk
  imx8qmmek
  imx8qxpmek
  imx8mqevk
  imx8mmevk
Each configuration method of generating folders must ensure that they only use one release. Each time you change the variable distro_features, you need a clean build folder. Each graphic rear end frame buffer, Wayland, Xwayland, and X11 have a release configuration. If you do not specify an issue file, the xwayland distribution will be set to the default. Version Configuration Save in local.conf set by Distro, displayed at BitBake runtime. In the past, we used the Poky distribution and customized version and providers in Layer.conf, but the custom release is a better solution. When using the default Poky release, you will use the default community configuration. As an I.MX version, we prefer to have a set of NXP support and have been tested.
The following is a list of release configurations. Note that Directf is no longer support, FSL-IMX-Wayland and FSL-IMX-FB are not supported on I.mx 8.
FSL-IMX-X11 - X11 graphic does not support in I.mx 8.
fsl-imx-wayland - Wayland weston graphics.
 FSL-IMX-Xwayland - Wayland graphics and X11. The X11 application using EGL is not supported.
 FSL-IMX-FB - Frame buffer graphic - no x11 or wayland. In i.mx 8The frame buffer is not supported.
You are welcome to create your own distribution files based on one of them to customize its environment without updating local.conf to set preferred versions and providers.
The syntax of the fsl-setup-release.sh script is as follows.
$ DISTRO=<distro name> MACHINE=<machine name> source fsl-setup-release.sh -b <build dir>
Distro = is the release of the configuration environment, which is stored in Meta-FSLBSP-
Release / IMX / META-SDK / CONF / DISTRO.
Image built
MACHINE=<MACHINE configuration name>It is the machine name of the configuration file in conf / machine in meta-freescale and meta-fsl-bsp-release.
-b<build dir>Specifies the name of the generated directory created by FSL-SETUP-RELEASE.SH scripts.
When the script is run, it prompts the user to accept EULA. Once the EULA accepts the local.conf stored in each generated folder, and no longer display the EULA acceptance query of the generated folder.
After the script runs, the working directory is the script just created, specified with the -b option. A CONF folder will be created, which contains bblayers.conf and local.conf files.
The /conf/bblayers.conf file contains all Metalayers used in the I.MX YOCTO project version.
Local.conf file contains computers and distribution specifications:
MACHINE ??= 'imx7ulpevk'
DISTRO ?= 'fsl-imx-x11'
ACCEPT_FSL_EULA = "1"
If necessary, you can change the machine configuration by editing this file.
Accept_fsl_eula in the local.conf file indicates that you have accepted the EULA condition.
In the Meta-FSL-BSP-Release layer, a unified machine configuration is provided for I.MX 6 and I.MX 7 machines (IMX6QPDLSOLOX.CONF and IMX6UL7D.CONF). i. MX uses these to build a public image, put all device trees in an image for testing.
Do not use these machines for any uses other than testing.
5.2 Select the I.MX YOCTO project image
The YOCTO project provides some images that can be used on different layers. Poky provides some images, Meta-Freescale and Meta-Freescale-Distro provide additional images, and the Meta-FSL-BSP-Release layer provides additional image recipes. The following table lists various key images, their contents, and layers that provide image recipes.
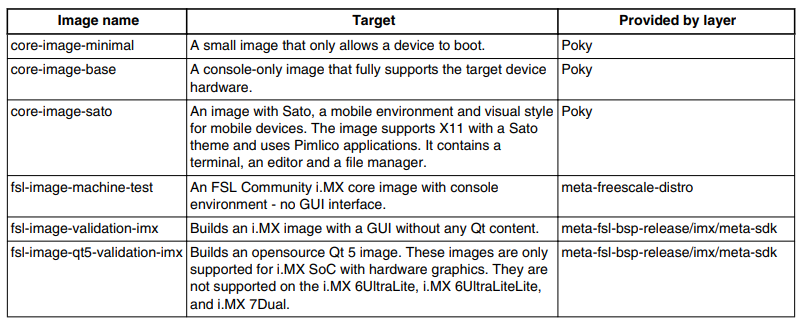
Table 1 i. MX YOCTO project image
5.3 Building an image
The YOCTO project builds the bitbake command. For example, BitBake builds a naming component.
Each component is built with multiple tasks, such as acquisition, configuration, compile, packaging, and deployment to target rootfs. BitBake Image Build all components needed to collect images in the dependency order of each task. The first build is the tool chain and the tools required to build components.
The following command is an example of how to build an image:
$ bitbake fsl-image-validation-imx
5.4 BitBake Options
The bitbake command used to build the image is BitBake. Other parameters can be used in the specific activities described below. BitBake provides a variety of useful options for developing a single component. To run using the BitBake parameter, the command is as follows:
Bitbake <parameter> <component>
It is the required generated package.
The following table provides some BitBake options.
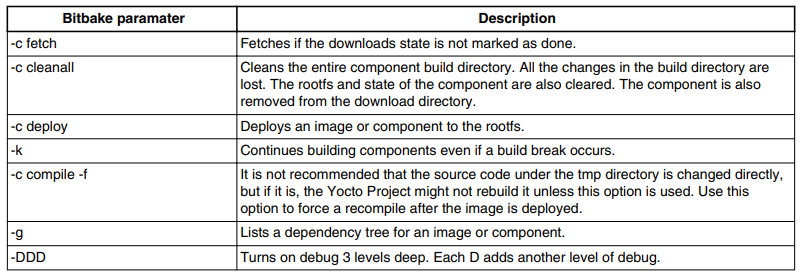
Table 2 BitBake Options
Bitbake parameter description
-c fetch If the download status is not marked as Done, the FETCH is executed.
 -c CleanLall Clears the entire component generation directory. All changes in the generated directory will be lost. The rootfs and status of the components are also cleared. Components are also removed from the download directory.
 -c deploy deploys the image or component to rootfs.
 - The k will continue to build components even if the build interrupt occurs.
 -c compile-f does not recommend directly change the source code in the TMP directory, but if this is the case, the YOCTO project may not rebuild it. Use this option to force recompilation after deployment images.
 -g Lists the dependence of the image or component.
 -DDD opens debug 3. Each D adds another debug level.
5.5 U-boot configuration
U-boot is configured in the host computer profile. This configuration is specified by the Uboot_Config setting. This requires setting uboot_config in local.conf. Otherwise, U-Boot builds the default use of SD boot.
They can be constructed by using the following command (change Machine to the correct target).

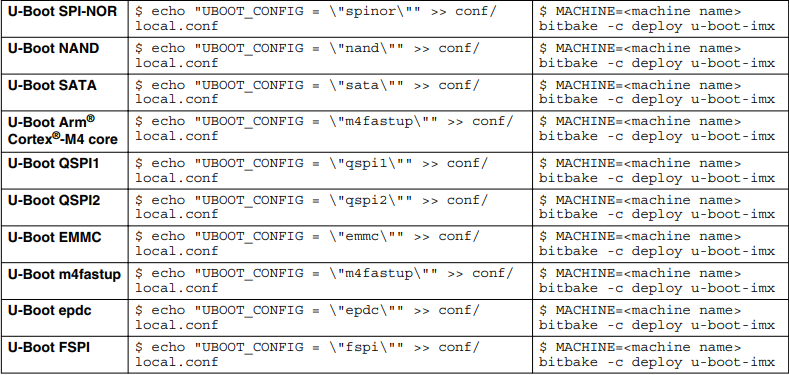
5.6 Building a scene
The following is a build scenario for various configurations.
Set the list and use the following command to populate the Yoto project layer:
$ mkdir imx-yocto-bsp
$ cd imx-yocto-bsp
$ repo init -u https://source.codeaurora.org/external/imx/imx-manifest -b imx-linux-sumo -m imx-4.14.98-2.0.0_ga.xml
$ repo sync
The following sections give some specific examples. Replace the machine name and backend that specifies the custom command.
5.6.1 I.MX 6QUAD Sabre-SD image on x-11
$ DISTRO=fsl-imx-x11 MACHINE=imx6qsabresd source fsl-setup-release.sh -b build-x11
$ bitbake fsl-image-validation-imx
This will build an X11 image without QT5. To build QT5, use FSL-Image-qt5-Validation-IMX.
5.6.2 I.MX 6QUADDLUS Sabre-Ai frame buffer image
$ DISTRO=fsl-imx-fb MACHINE=imx6qpsabreauto source fsl-setup-release.sh –b build-fb
$ bitbake fsl-image-qt5-validation-imx
This will build QT5 on the back side of the frame buffer. To build without QT5, use FSL-Image-Validation-IMX.
5.6.3 i.mx 8quadxplus mek xwayland image
$ DISTRO=fsl-imx-xwayland MACHINE=imx8qxpmek source fsl-setup-release.sh -b build-xwayland
$ bitbake fsl-image-qt5-validation-imx
This will build an xwayland image using QT5. To build without QT5, use FSL-Image-Validation-IMX.
5.6.4 I.MX 8M Quad Evk on Wayland Image
$ DISTRO=fsl-imx-wayland MACHINE=imx8mqevk source fsl-setup-release.sh -b build-wayland
$ bitbake fsl-image-qt5-validation-imx x
This will build a QT5 Weston Wayland image. To build without QT5, use FSL-Image-Validation-IMX.
5.6.5 Restart Build Environment
If the new terminal window is opened or restarted after the generated directory is set, you should use the installation environment script to set the environment variable and run again. No complete FSL-SETUP-RELEASE.SH is required.
$ source setup-environment <build-dir>
5.6.6 x11, chromium browser on xwayland and wayland
The YOCTO project community has I.MX SOC for X11, Xwayland and Wayland version chromium browser and GPU hardware. Please note that NXP does not support or test patches from the community. This section describes how to integrate chrome into rootfs and enable webgl hardware acceleration rendering. The Chromium browser needs to be automatically added to other layers in the FSL-RELEASE-SETUP.SH script, such as meta browsers.
In Local.conf, you can do the following:
For the MX6 with the GPU, the Chromium is added to the image.
CORE_IMAGE_EXTRA_INSTALL += "chromium-x11"
For Xwayland or Wayland, Chromium is added to your image.
CORE_IMAGE_EXTRA_INSTALL += "chromium-ozone-wayland"
5.6.7 QT 5 and QTwebenGine browser
QT5 has both business licenses and open source licenses. When you build in the YOCTO project, the default is an open source license. Be sure to learn the differences between these licenses and appropriately choose. After starting a custom QT5 development on an open source license, it cannot be used with a business license. Learn about the differences between these licenses with legal personnel.
There are four QT5 browsers available. QtwebEngine browser can find:
/usr/share/qt5/examples/webenginewidgets/StyleSheetbrowser
  /usr/share/qt5/examples/webenginewidgets/Simplebrowser
 /usr/share/qt5/examples/webenginewidgets/Cookiebrowser
 /usr/share/qt5/examples/webengine/quicknanobrowser
All three browsers can run by accessing the above directory and runs there. The touch screen can be enabled by adding parameters -Plugin EvDevTouch: / DEV / INPUT / Event0 to the executable. The display variable of the X11 release may need to set in the environment, and then you can start:
export DISPLAY=:0.0
The command line may look like one of the following:
./quicknanobrowser -plugin evdevtouch:/dev/input/event0
QtwebEngine works only on SOC with GPU graphics hardware, on I.MX 6, I.MX 7, and I.mx 8.
To include QtwebEngine in the image, place the following in local.conf or Image Recipe.
IMAGE_INSTALL_append = "packagegroup-qt5-webengine"
5.6.8 Systemd
SystemD is enabled for the default initializer. To disable systemd as the default setting, go to FSL-IMX-PREFERRED-ENV.INC and comment the SystemD section.
5.6.9 multi-library enabled
For I.MX8, you can use Multilib configuration to build 32-bit applications on a 64-bit operating system. Multilib provides the ability to build libraries with different target optimization or architectural format and merge them into a system image. By to your local.conf file. Multilibs declarations are typically lib32 or lib64, which needs to be defined in the multilib_global_variants variable, as shown below.
MULTILIBS = "multilib:lib32"
DefaultTune must be one of the AvaiLTunes values of this optional library type, as shown below.
DEFAULTTUNE_virtclass-multilib-lib32 = "armv7athf-neon"
Image installation will be added to the image, and the 32-bit libraries required for a particular application are as follows:
IMAGE_INSTALL_append += "lib32-bash"
For i.mx8, build 32-bit application supports the following statements that require local.conf. This configuration specifies the 64-bit computer as the host type and adds multilib: lib32, where these libraries are compiled with "ARMV7THF-neon" and then contain lib32-packages to all images.
MACHINE = imx8mqevk
# Define multiple library targets
Need conf / multilib.conf
MULTILIBS = "multilib:lib32"
DEFAULTTUNE_virtclass-multilib-lib32 = "armv7athf-neon"
# Add a multilib package to an image
IMAGE_INSTALL_append = "lib32-glibc lib32-libgcc lib32-libstdc++"
5.6.10 OP-TEE is enabled
OP-TEE requires three components: OPTEE_OS, OPTEE-Client, And Optee-Test. In addition, both kernel and u-boot are configured. OPTEE_OS resides in the boot loader, while the OP-TEE client and test reside in rootfs.
OP-TEE is enabled by default in this release. To disable the op-test, go to the meta-fsl-bsp-release / ivx / meta-bsp / conf / layer.conf file, comment out of the OP-TEE's distro_features_append and cancel the removal of the removal.
5.6.11 Compile Xen
The Xen project is supported on the I.MX 8QUADMAX / QuadxPlus board, and the provided service allows multiple operating systems to be executed on the same hardware with hardware virtualization.
To enable Xen build, add the following command line to local.conf:
DISTRO_FEATURES_append = " xen"
To boot two YOCTO operating systems, create three partitions (not less than 16GB) on the SD card. The first partition is FAT for saving Xen, Image, and FSL-IMX8QM-MEK-DOM0.DTB. The second and third partitions are used to save YOCTO ROOTFS.
At the U-Boot phase:
To boot from the SD card, run XenmcBoot.
To boot from the network, run XennetBoot.
Once started the first Linux operating system, perform the following steps:
1 Copy the image and FSL-IMX8QM-MEK-DOMU.DTB to / Home / root / xen.
2 Create a new file called DOMU.CFG. Then, run XL to create DOMU.CFG.
3 Use the XL List to view the running domain.
4 Use the XL console DOMU to connect to the DOMU console.
5 Press CTRL +] to exit the DOMU console.
For detailed usage of Xen XL, see https://xenbits.xen.org/docs/unstable/man/xl.cfg.5.html.
5.6.12 Build Jailhouse
Jailhouse is a static partition management program based on Linux operating system. It is supported on I.MX 8M Quad Evk and I.MX 8M MINI EVK board.
To enable Jailhouse Build, add the following to local.conf:
DISTRO_FEATURES_append = " jailhouse"
Running in U-bootrun jh_netboot Orjh_mmcboot. It loads a dedicated DTB for Jailhouse. Take i.mx 8M quad as an example, the Linux operating system starts:
#insmod jailhouse.ko
#./jailhouse enable imx8mq.cell
For more details on jailhouse on I.MX 8, see I.MX Linux? User Guide (IMXLUG).
6 image deployment
After the completion is completed, the image created is rested in / TMP / Deploy / Images. In most cases, the image is specific to the machine set in the environment setting. Each image built creates a U-Boot, a kernel, and an image type of image_fstype defined in a machine profile. Most machine configurations provide SD card images (.sdcard), an EXT3 and TAR.BZ2. EXT3 is only root file system. The .sdcard image contains u-boot, kernel and rootfs, which are fully set, can be used on the SD card.
6.1 Flashing an SD Card Image
The SD card image provides a complete system that uses U-Boot and kernel boots. To refresh the SD card image, run the following command
command:
$ bunzip2 -dk -f <image_name>.sdcard.bz2
$ sudo dd if=<image name>.sdcard of=/dev/sd<partition> bs=1M conv=fsync
For more information on flash memory, see I.MX Linux? "Prepare the SD / MMC Card" section in the User Guide (IMXLUG).
7 custom
There are three scenarios on the I.MX Linux operating system for build and custom:
Build an I.MX YOCTO project BSP and verify on the I.MX reference board. This method is described in detail in this document.
Custom kernel and create a custom board and device tree with kernel and u-boot. For more details on how to build an SDK and set a host other than the YOCTO project building environment, see Chapter 4.5.12 in the I.MX User's Guide (IMXLUG "in an independent environment Construct U-Boot and Kernel ".
Customize the release from the BSP provided for the i.mx Linux version by creating a custom YOCTO project layer. i. MX provides a number of presentation examples to showcase the custom layers on the i.mxgit repository of the Codearora forum on the I.MX BSP release. The rest of this document provides an instructions for creating a custom release and motherboard configuration.
7.1 Creating a custom release
Custom release can be configured to configure a custom build environment. Published release files FSL-IMX-X11, FSL-IMX-Wayland, FSLIMX-XWAYLAND, and FSL-IMX-FB are displayed in a specific graphical backend configuration. The release can also be used to configure other parameters such as kernel, uboot, and gstreamer. The I.MX release file is set to create a custom build test to test our I.MX Linux OS BSP versions.
It is recommended that each customer creates its own distribution file and uses this file to build an environment setting provider, version, and custom configuration. The release is created by copying an existing distribution file or includes a Poky.conf file, or includes an i.mx distribution, and use this as a starting point.
7.2 Creating a custom board configuration
Suppliers being developing a reference board may want to add their plates to FSL Community BSP. With the new machine supported by FSL Community BSP, you can easily share source code with the community and allow feedback from the community.
The YOCTO project makes it easier to create and share new I.MX-based boards. When the Linux operating system kernel and boot loader is working and testing the machine, the upgrade process should be started. In the machine configuration file, there must be a stable Linux kernel and boot loader (eg U-boot), which is very important as the default kernel and boot procedure of the computer.
Another important step is to determine the maintenance staff of the new machine. The maintenance personnel are responsible for working on the main package on the board. Machine maintenance personnel should update the kernel and boot loader, and test the user space package for the machine. For more information on machine maintainer roles, see FSL Community BSP Release Notes 2.4 documentation.
The required steps are shown below.
1 Customize the kernel profile as needed. The kernel profile is located in Arch / ARM / Configs, and the supplier kernel recipe should be customized through the versions loaded through the kernel formulation.
2 Customize U-boot as needed. For more information on this issue, see the I.MX BSP Transplant Guide (IMXBSPG).
3 Assign someone who serves as a single board. This person ensures that the file is updated as needed so that the construction is always valid. For more information, see the FSL Community BSP Release Notes 2.4 documentation.
4 Follow the instructions in Yoto Project Community Description Set Yoto project build as shown below. Use the community main branch.
a. According to the host Linux OS release, quickly start the download required from the YOCTO project.
b. Download repo using the following command:
$ curl https://storage.googleapis.com/git-repo-downloads/repo > ~/bin/repo
C. Create a directory to save all the content therein. You can use any directory name. This document uses FSLCommunity-BSP.
$ mkdir fsl-community-bsp
d. $ cd fsl-community-bsp
e. The REPO is initialized using the main branch of the repository.
$ repo init -u https://github.com/Freescale/fsl-community-bsp-platform -b master
f. Gets the formula that will be used to build.
$ repo sync
g. Set the environment:
$ source setup-environment build
5 Select a similar computer file in FSL Community FSL-Community-BSP / Sources / Meta-Freescale-3rdParty / Conf / Machine and copy it with name indicating your board. Edit the new board file and contain information about your board. At least change the name and description. Add Machine_Feature. Www.yoctoproject.org/docs/2.1/ref-manual/ref-manual.html#reffeatureS-Machine.
6 Test your changes using the latest community main branch to make sure all content work. At least use of CoreImage-
minimal。
$ bitbake core-image-minimal
7 Prepare the patch. Follow the "Style" Guide www.openembedded.org/wiki/styleguide and git.yoctoproject.org/cit/cgit.cgi/meta-freescale/tree/readme, the title is "Contribution".
8 upstream enters Meta-Freescale-3rdParty. Send patch to [email protected] up to [email protected].
Appendix A FAQ
A, 1 Quick start
This section summarizes how to set the YOCTO project on the Linux machine and build an image. See the chapter above in detail.
installationrepo utility:
To get BSP, you need to install "REPO". This only needs to be done once.
$: mkdir ~/bin
$: curl https://storage.googleapis.com/git-repo-downloads/repo > ~/bin/repo
$: chmod a+x ~/bin/repo
$: PATH=${PATH}:~/bin
Download the BSP Yoto project environment.
Use the correct name to get the version of the REPO INIT's -b option. This requires permission to execute once and distribute them for directory created in the first step. You can run the REPO SYNC to update the feedback to the latest version.
$: mkdir imx-yocto-bsp
$: cd imx-yocto-bsp
$: repo init -u https://source.codeaurora.org/external/imx/imx-manifest -b imx-linux-sumo -
m imx-4.14.98-2.0.0_ga.xml
note:
https://source.codeaurora.org/external/imx/imx-manifest/tree/?h=imx-linux-sumo provides a list of all list files supported in this release.
The setting of a specific backend MX8 frame buffer and the X11 release are not supported. For MX6 and MX7 SOC.
X11 setting
$: DISTRO=fsl-imx-X11 MACHINE=<machine name> source fsl-setup-release.sh -b build-x11
FB settings
$: DISTRO=fsl-imx-fb MACHINE=<machine name> source fsl-setup-release.sh -b build-fb
Wayland settings
$: DISTRO=fsl-imx-wayland MACHINE=<machine name> source fsl-setup-release.sh -b build-wayland
XWAYLAND setting
$: DISTRO=fsl-imx-xwayland MACHINE=<machine name> source fsl-setup-release.sh -b buildxwayland
Construct all backend
Do not build QT
$: bitbake fsl-image-validation-imx
Built using QT 5
$: bitbake fsl-image-qt5-validation-imx
A.2 Local configuration adjustment
An YOCTO project is built on time and disk usage, which takes up a large number of build resources, especially in multiple build directorys. There are some ways to optimize this, for example, using shared SSTATE cache (cache generated state) and DownloadS directory (save the download package). You can set anywhere in the local.conf file by adding a statement:
DL_DIR="/opt/freescale/yocto/imx/download"
SSTATE_DIR="/opt/freescale/yocto/imx/sstate-cache"
The directory must already exist and have appropriate permissions. When multiple build directorys are set, Shared Sstate will help, each directory uses a shared cache to minimize build time. The shared download directory minimizes the acquisition time. If there is no such settings, the YOCTO project defaults to the build directory for SSTATE cache and download.
Each package downloaded in the DL_DIR directory is marked. If your network encounters a problem when you get a package, you can manually copy the backup version of the package to the DL_DIR directory and use the touch command to create <package_name> .done file. Then run the bitbake command: bitbake.
For more information, see the YOCTO project reference manual.
A.3 formula
Each component is built by using a recipe. For new components, you must create a recipe to point to the source (src_uri) and specify a patch (if applicable). The YOCTO project environment built from the Makefile specified in the formula. When constructing from an automated tool, the formula should inherit Autotools and Pkgconfig.
Makefiles must allow CCs to be covered by cross-compilation tools to get packets generated using YOCTO projects.
Some components have formulations, but they need additional patches or updates. This can be implemented by using the BBAPPEND recipe. This will be attached to the existing recipe details about the updated source. For example, the BBAPPEND formula containing the new patch should contain the following:
FILESEXTRAPATHS_prepend := "${THISDIR}/${PN}:"
SRC_URI += file://<patch name>.patch
FileSextRapaths_prepend tells YOCTO Project to find the patches listed in SRC_URI in the directory listed.
note
If you do not select the BBAPPEND recipe, check the Fetch log file under the work folder (log.do_fetch) to check if the relevant patch is included. Sometimes, use the formula's git version instead of the version in the BBAPPEND file.
A.4 How to choose additional packages
If a package is provided, you can add additional packets to the image. The search list of the recipes provided by the community can be found on layers.openembedded.org/. You can search for the application that there is already YOCTO project recipe and find where to download it.
A.4.1 Update Image
The image is a group of packages and environment configurations.
Image files (such as FSL-IMAGE-GUI.BB) define packages in the file system. Root file system, kernel, module, and U-boot binary are available in Build / TMP / Deploy / Images.
note
You can build packets without being included in the image, but if you want to automatically install the package on rootfs, you must rebuild the image.
A.4.2 package group
The packet group is a set of packages that can be included in any image.
The packet group can contain a group of packages. For example, multimedia tasks can determine if the machine is determined whether to build a VPU package, therefore automatically selects the multimedia packet for each board supported by the BSP, and only multimedia packets are included in the image.
You can install additional packages by adding in /local.conf.
CORE_IMAGE_EXTRA_INSTALL += "<package_name1 package_name2>"
There are many packages. They are located in subdirectory named "packagegroup" or "packagegroups".
A.4.3 preferred version
The preferred version is used to specify the preferred version of the recipe for specific components. A component may have multiple recipes in different layers, and the preferred version points to a specific version to be used.
In the layer.conf of the Meta-FSL-BSP-RELEASE layer, the preferred version is set for all formulations to provide a static system for the production environment. These preferred versions are set to formally I.MX, but it is not required for future development.
The preferred version will help when the previous version may cause which formulation should be used. For example, the previous IMX-Test and IMX-LIB recipe used a year-month version control, which has been changed to version control.
If there is no preferred version, you may choose an old version. Unless the preferred version is set, it is usually selected by the git version. To set the preferred version, place the following in local.conf.
PREFERRED_VERSION_<component>_<soc family> = "<version>"
For example, IMX-LIB will be:
PREFERRED_VERSION_imx-lib_mx6 = “”
For more information on using preferred versions, see the YOCTO project manual.
A.4.4 preferred supplier
The preferred provider is used to specify the preferred provider of a particular component. A component can have multiple providers. For example, the Linux kernel can be provided by I.MX or Kernel.org, the preferred provider declares that the provider to use. For example, U-Boot is provided by the community through Denx.de and I.mx. Community provider is specified by Uboot-FSLC. The I.MX provider is specified by u-boot-IMX. To illustrate the preferred provider, enter the following in local.conf:
PREFERRED_PROVIDER_<component>_<soc family> = "<provider>"
PREFERRED_PROVIDER_u-boot_mx6 = "u-boot-imx"
A.4.5 SOC series
The SOC series records a class of changes that apply to a set of specific system chips. In each machine profile, a machine with a specific SOC series is listed. For example, I.MX 6DUALLITE SABRE SD is listed under the I.MX 6 and I.MX 6DUALLITE SOC Series. i. MX 6Solo Sabre Auto is listed under the I.MX 6 and I.MX 6SOLO SOC Series. Some changes can override changes in the machine configuration file for a specific SOC family in local.conf to overwrite changes in the machine profile. Below is an example of changing the MX6DLSABRESD kernel settings.
KERNEL_DEVICETREE_mx6dl = "imx6dl-sabresd.dts"
The SOC family is useful when performing changes to a class of hardware. For example, I.MX 28 EVK has no video processing unit (VPU), so all settings of the VPU should use I.MX 5 or I.MX 6 to be specific to the correct chip category.
A.4.6 BitBake log
BitBake will build and pack the process in the TEMP directory of TMP / Work /// Temp.
If the component cannot get a package, the error log is displayed in the log.do_fetch file.
If the component fails to be compiled, the error log is located in the log.do_compile file. Sometimes components do not deploy by expected. Check the directory under the build component directory (TMP / Work //). Check each recipe's package, packages-split, and sysroot * directory to see if the file is placed there (these files are in the stated position before copying to the deploy directory).
Appendix B References
For more information on boot switches, see "How to Guide I.MX Board" in the i.mx Linux User Guide (IMXLUG).
For information on how to download images using a U-Boot, see the "Using the U-Boot Download Image" section in the iMX Linux User Guide (IMXLUG).
For information on how to set up an SD / MMC card, see "Preparing for the SD / MMC Card" in the IMX Linux User Guide (IMXLUG).
Intelligent Recommendation
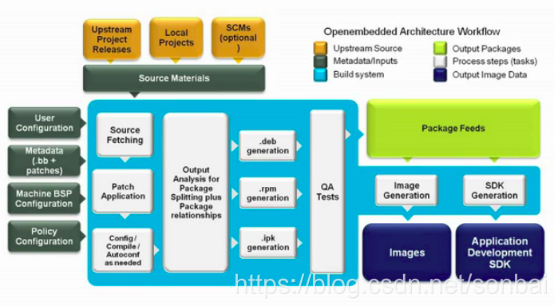
YOCTO Project concept
YOCTO Project components YOCTO Project components 1, BitBake Tool BitBake Clean Project Bitbake compilation 2, Recipes recipe file 3, Classes class file 4, configuretions file 5, Layers metadata Opene...
Yocto Project Quick Build
2019 Unicorn Enterprise Heavy Glour Recruitment Python Engineer Standard >>> Yocto Project Quick Build Build a typical image mirror using YOCTO Project Compatible with a specific hardware Com...
nxp yocto install guide-0
nxp yocto install guide -0 1. repo set 1 > Create a bin folder in the home directory. 2 > Add the following line to the .bashrc file to ensure that the ~/bin folder is in your PATH variable. 2.g...

【In-depth and easy to understand imx8 enterprise-level development practice | 01】imx8qxp yocto project construction guide
This is the 46th article of the future of the machine Original first post address: Article Directory 1. Overview 2. Repo installation and source code download speed up 2.1. Repo Tsinghua Source Accele...
YOCTO Add login user and password
Modify under local.conf file: 1. Modify the password of the root user, the password is jian123: 2. Add user name as jian, password is jianjian account:...
More Recommendation
The use of Yocto project (imx6dl processor)
Preface The magic of the Yocto project is that when you need to transplant some software, you only need to configure recipes (recipes, methods), and it will compile it for you! Amazing, this article m...

3. Yocto project development environment
3.3 Yocto project source repository The Yocto project team is athttps://git.yoctoproject.org/cgit/cgit.cgi/Maintains a full source repository of all Yocto Project files. This web-based source code bro...
WindRiver Linux Yocto Project Note
Project download 1. Windriver Linux YOCTO SDK download Windriver SDK custody on github, you can pass the linkwrlinuxVisit the repository. From the readme document, there are two ways to choose to choo...
i.MX-RT1052 official SDK analysis and project creation
Write in front: The purpose of this article is to summarize the backup and facilitate future queries. As it is a personal summary, please correct me if there is any error; in addition, most of the con...
YOCTO Practice (1): Build YOCTO Project Based on Dunfell
Because many times in work need to change the code based on YOCTO, compile SDK, I want to completely understand YOCTO's philosophy, the details of the entire build. Now open, based on YOCTO official d...