Jetson Agx Orin Connection Custom Hardware Device (Pinmux + Equipment Tree)
tags: hardware Embedded hardware Driving development Hardware engineering
Environmental information
- Ubuntu 20.04.4 LTS 64-bit
- Linux kernel: tegra 5.10.65
- JetPack 5.0.1-b118
Target
Access a customized data collection board on Jetson Agx Orin and receive data with SPI communication.
process
Some of my current devices are a Jetson Agx Orin and a collection board. The collection board is accessible through the Orin's 40 PIN interface. Overall, it is mainly divided into three steps:
- Adjust the Pinmux and open the SPI interface;
- Load the SPI device driver, customize equipment nodes with device tree files;
- Write your own hardware driver for collecting boards.
In the process of installation and configuration, I encountered various problems, and Orin's data and documents were relatively small, so to record = v =
Pinmux (BUSYBOX configuration)
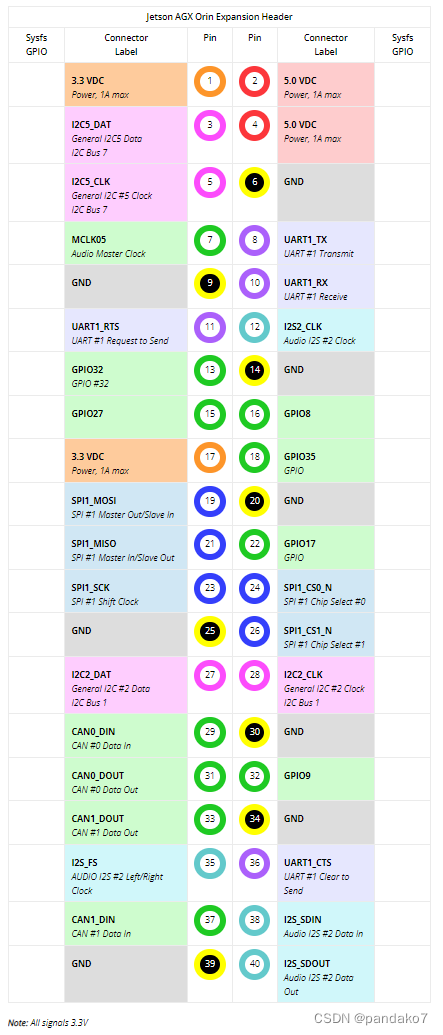
Pin Multiplexing (PIN Multiplexing), open the SPI function for the required PIN according to the 40 PIN GPIO Expansion Header. For example, I use SPI1, then we need to open 19, 21, 23, 24, 26.
Generally, the Jetson machine is configured with the PinmuX method to use Jetson-IO, but my current version of Orin will use Jetson-IO to report an error. The error message is:
Traceback (most recent call last):
  File "/opt/nvidia/jetson-io/jetson-io.py", line 25, in <module>
    from Jetson import board
  File "/opt/nvidia/jetson-io/Jetson/board.py", line 28, in <module>
    import Headers
  File "/opt/nvidia/jetson-io/Headers/__init__.py", line 34, in <module>
    if hdr.HDR.default:
AttributeError: module 'Headers.__init++' has no attribute 'HDR'
According to the information on the NVIDIA developer forum, the official will be fixed in the next version release.
So before fixing, you do not use Jetson-IO, and manually modify the value in register to configure Pinmux with Busybox. You can also modify the DTB file to configure it, but the process is more complicated, and there is no complete Orin configuration document at present, so it is manually configured by busybox. This configuration method will fail after restarting the machine and needs to be configured again, but the configuration is more convenient.
download
sudo apt-get install busybox
How to use:
Busybox devMem <32-bit address> # View the value in register
 busybox devMem <32-bit address> w <value> # Write to value for register
Find the address of register
-
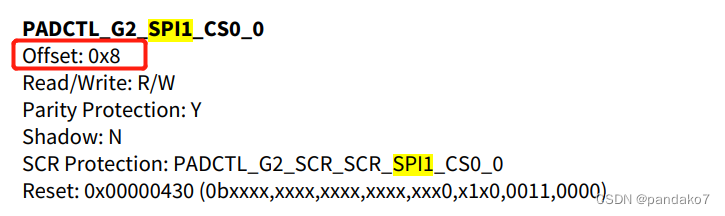
Finding the name of PIN in TRM is generally searching according to keywords. For example, I want to configure SPI1, search for "SPI1", find related register in the Pinmux registers chapter, and record offset.

-
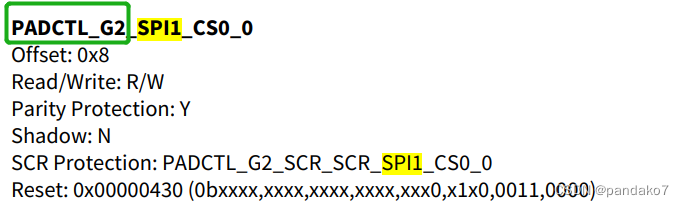
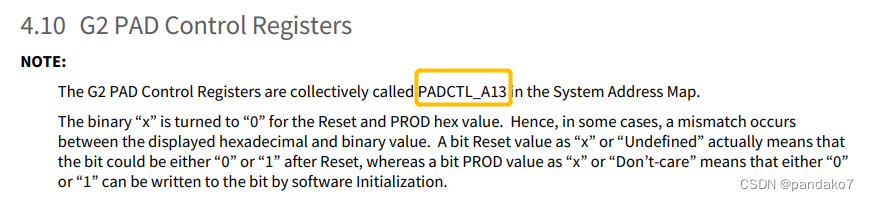
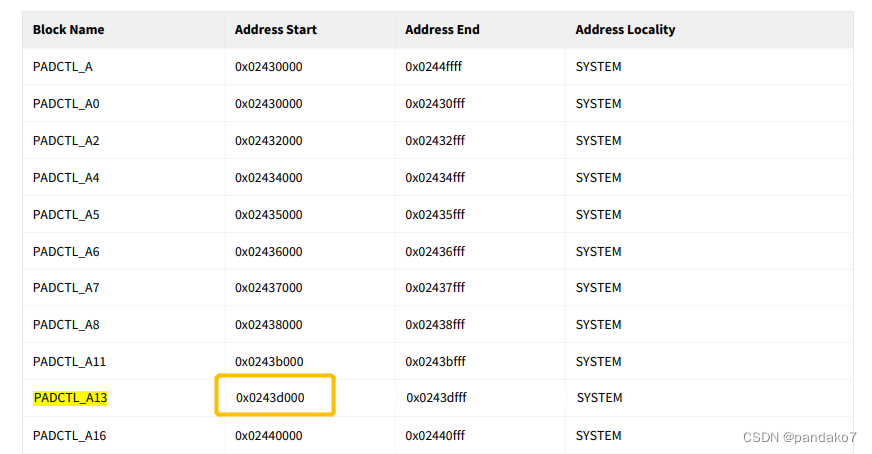
According to the name of the register just found, determine which Pad Control Group belongs to. For example, the padctl_g2_spi1_cs0_0 just found is under the G2 Pad Control Registers, and I see the corresponding padctl_a13. Search "padctl_a13" in TRM and find the corresponding start address in the System Address Map form. Record the start address.
-
register address = start address + offsetFor example, padctl_g2_spi1_cs0_0 is 0x0243d008.
Assign to register
The specific value of the given can be found in the TRM just now. For example, if you open the SPI1, you can assign a value.
busybox devmem 0x0243d008 w 0x00000400
busybox devmem 0x0243d018 w 0x00000450
busybox devmem 0x0243d028 w 0x00000400
busybox devmem 0x0243d038 w 0x00000400
busybox devmem 0x0243d040 w 0x00000400
After the modification, it can take effect immediately.
SPI driver and device tree (Device Tree)
Orin is driven by spidev, but it is not started when booting. Temporary startup can be usedmodprobe spidevYou can also add it to/etc/modules-load.d/modules.confAutomatically load in it.
But I need a custom SPI node, so I need to modify the device tree file. The method is to use another host Flash DTB to just brush the content of DTB.
Find the DTB file to be modified
View on Orin:
dmesg | grep -i dts
You can see the file name../hardware/nvidia/platform/t23x/concord/kernel-dts/tegra234-p3701-0000-p3737-0000.dts。
Brush
Find another host of Ubuntu. I am a virtual machine for Ubuntu 18 used under Windows.
-
Download and install NVIDIA SDK Manager. Open the software, hook it in STEP 1 and Step 2, download the required Jetpack, in Step 3 milesSkip Need the Flash part,Only downloadEssence At this time, you can not insert the orin machine. If the download address is not modified, it will finally appear in the Home directory
~/nvidia/nvidia_sdk/JetPack_5.0.1_DP_Linux_JETSON_AGX_ORIN_TARGETS, There are needed to flash the machine insideflash.sh。

-
Download Kernel source code with the same version of Orin (https://developer.nvidia.com/embedded/jetson-linux), decompress it, and in
/Linux_for_Tegra/source/publicDecompresskernel_src.tbz2This is the source code of Kernel.
-
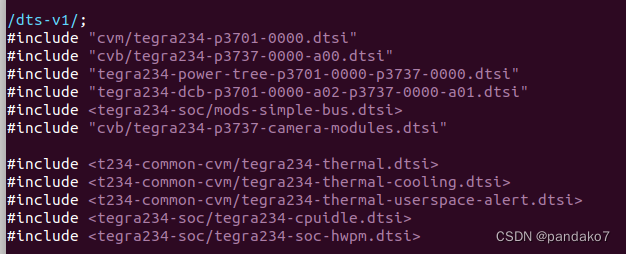
Find the DTS file to be modified. Find the corresponding file according to the file path just found on Orin. After opening, I didn't see the SPI -related content, so in the INCLUDE file, you can find the content of the SPI
/Linux_for_Tegra/source/public/kernel_src/hardware/nvidia/platform/t23x/concord/kernel-dts/cvb/tegra234-p3737-0000-a00.dtsi
-
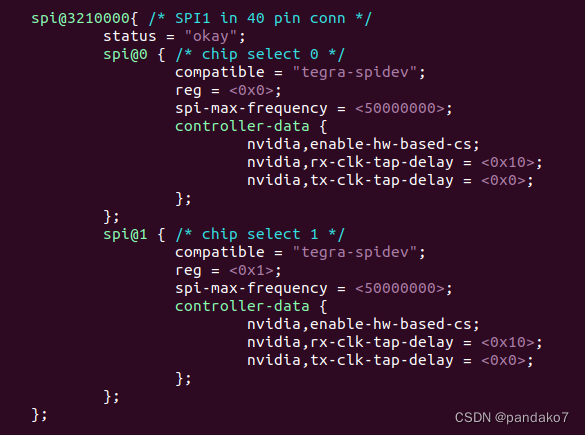
Modify the content of the file according to your own needs, such as changing your name or compatible.
-
Create kernel kernel compilation.
The package required for compilation:
sudo apt install build-essential bc
sudo apt install flex
sudo apt install bison
The complete step of compilation:
Ps. You may also compile DTB files here.
- Under the compiled folder,
arch/arm64/boot/There isdtsFolder, copy the contents inside and replace it to the Jetpack folder downloaded with SDK Manager:~/nvidia/nvidia_sdk/JetPack_5.0.1_DP_Linux_JETSON_AGX_ORIN_TARGETS/Linux_for_Tegra/kernel/dtb。 - Connect Orin with Recovery Mode to this host.
- Start flashing:
./flash.sh -k A_kernel-dtb jetson-agx-orin-devkit mmcblk0p1
After the end, Orin will start and complete.
verify
Check whether the device tree has newly added nodes:
ls /sys/firmware/devicetree/base/
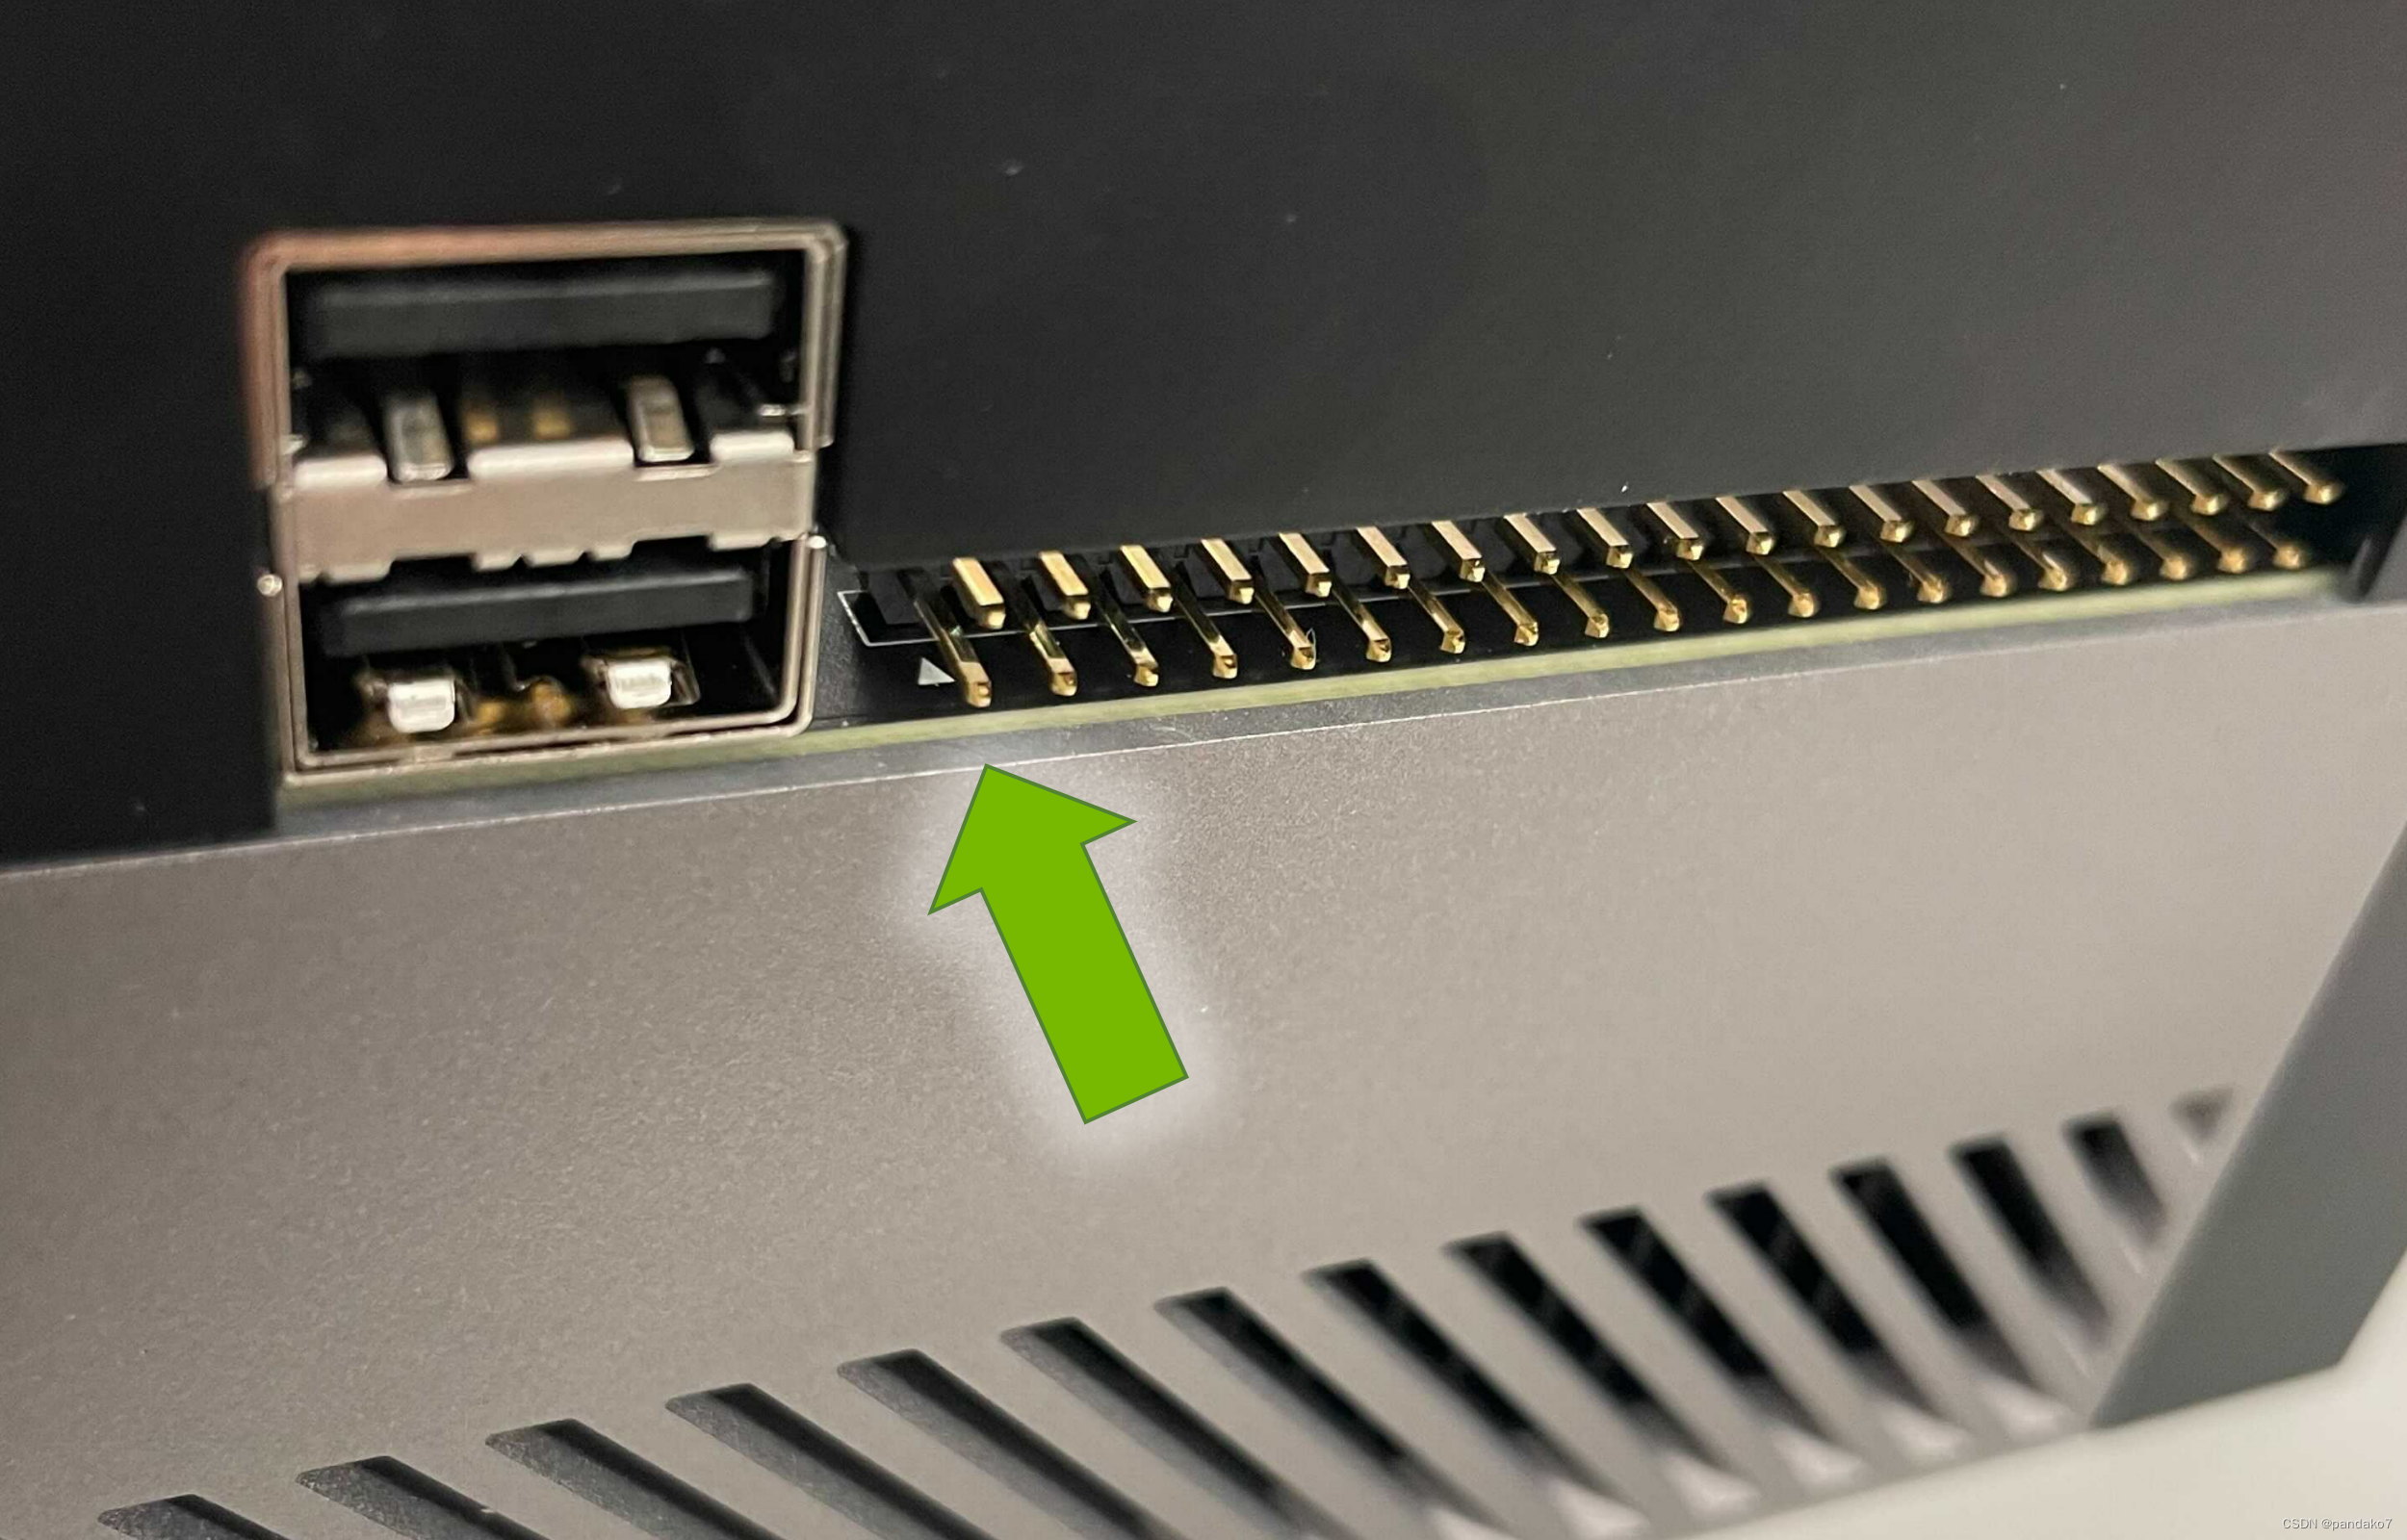
Insert hardware equipment
Select the right interface connection according to the hardware device. For example, I want to use 40-Pin Header. For the Orin machine, there is a PIN1 place marked by the arrow. Pay attention to the correspondence when connecting, and cannot be inverted.
Load the custom hardware driver
For the well -written hardware driver, compile it.koFile, loading driver:
sudo insmod mydriver.ko
If you are/dev/Find your own custom device, that is, the driver configuration is successful.
Turn off this driver:
sudo rmmod mydriver.ko
Relevant information
- 40pin map:https://jetsonhacks.com/nvidia-jetson-agx-orin-gpio-header-pinout/
- Orin modify Pinmux
- SPI1 configuration:https://forums.developer.nvidia.com/t/spi1-not-work-on-xavier/72141
- Orin information:https://developer.nvidia.com/embedded/learn/jetson-agx-orin-devkit-user-guide/howto.html
- Equipment tree file conversion:
sudo dtc -I dtb -O dts A.dtb > A.dts
sudo dtc -I dts -O dtb A.dts > A.dtb
- Jetson tutorial:
- Driver writing:
Intelligent Recommendation
Nvidia Jetson AGX Xavier hardware related
Article Directory Preface Carrier PCB stackup and impedance 699-Pin connector Ethernet M.2 PCIE 40-Pin expansion port Fan interface Automatic control interface Power domain Buttons and indicators audi...
Machine vision (2) hardware nvidia jetson AGX
The NVIDIA Jetson Xavier AGX is a small form factor computing device. The device has a 512-core Volta GPU and Tensor Cores, 32 GB RAM, 2 deep learning accelerators, 1 vision accelerator, and supports ...
Jetson Orin/Agx Xavier platform 4-16 GMSL2/GSML1 camera collection kit recommendation
1 Introduction After the last time I wrote Jetson Orin FPDLINK collecting kits, many fans were very interested; Jetson Orin Platform Multi-Lu FPDLINK III camera collection set recommendation_bingDund'...

NVIDIA AGX Orin Failed to connect to github.com port 443: Connection timed out
refer to: Git error: Failed to connect to github.com port 443: Timed out solution The following errors appear when git cloning YOLOV5: At the same time github.com can't be opened refer to Git error: F...
Play Nvidia Jetson (18) --- NANO XAVIER Equipment Tree Device Tree Related
background This article introduces some related knowledge of equipment tree, including where the device tree file is, how to modify, how to compile, and how to apply. These problems stepped on a lot o...
More Recommendation
Jetson Xavier NX / AGX Connection Realsense D435 Installation Steam
Both of these are not clearly explained to support each other's equipment, and the official website is written in Not Official Support. There are quite a lot, and it is also simple. The following is c...
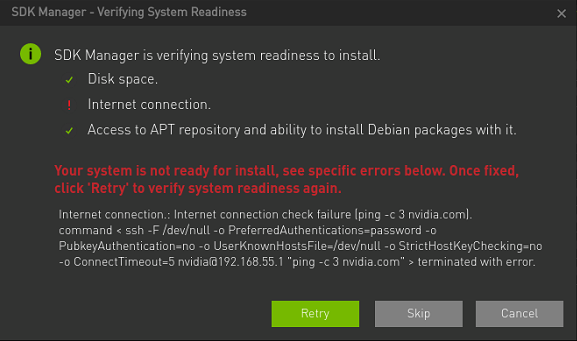
Nvidia Jetson Agx Xavier flash step3 internet connection error
error message: Internet connection: Internet connection check failure ping -c 3 nvidia.com command < ssh -F /dev/null -o PreferredAuthentications-password -o PubkeyAuthentication=no -oUserKnownHost...
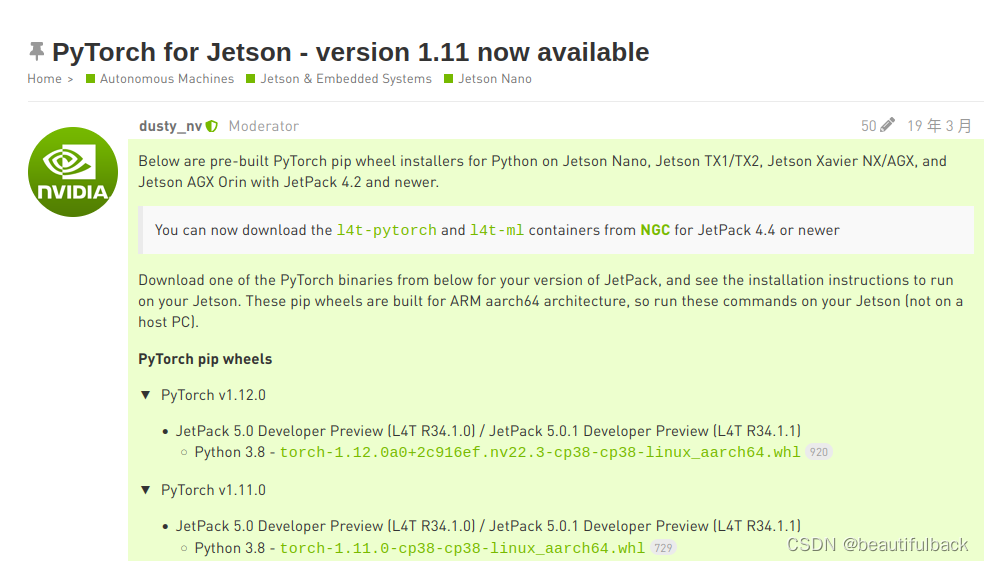
Jeston Agx Orin Install PyTorch1.11.0+TORCHVISION0.12.0
Pytorch1.11.0+TORCHVISION0.12.0 (extraction code: HDOD) one. Use the Jeston platform:This guide provides instructions for installing PyTorch for Jetson Platform NVIDIA Jetson Agx Orin developer kit in...
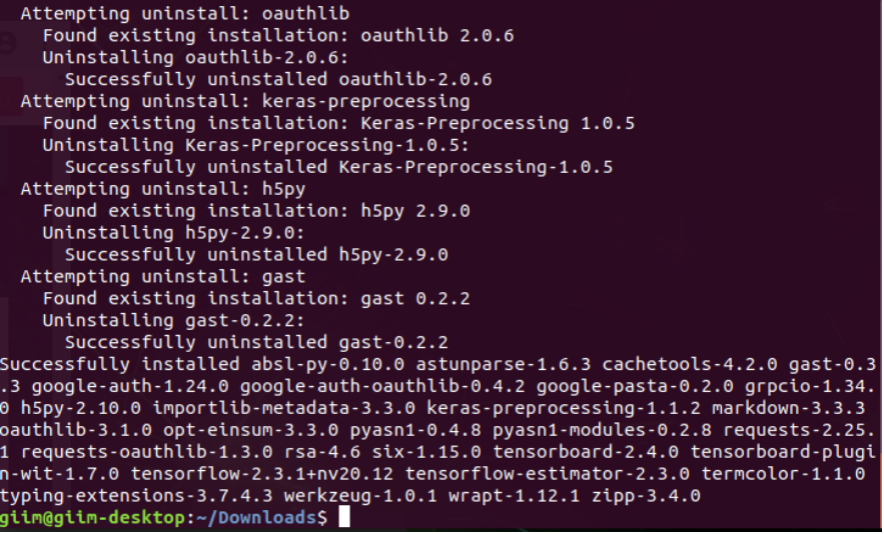
Jetson AGX installed Tensorflow
Jetson AGX is of course used to experiment deep learning, but the installation process and PC on the AGX are different. The official forum provides the corresponding installation steps and instruction...
Jetson AGX Install Pycharm
Everyone will basically use Python programming on Jetson. How can Pycharm so excellent Python editor is not available. AGX can run Pycharm, you need to note that AGX cannot install official JDK, which...