Android Studio development JNI example
Introduction to JNI and NDK
JNI (Java Native Interface) is a layer of interface encapsulated by Java to call C, C++ and other Native codes, which is equivalent to a bridge. Through JNI, you can operate some system-related features that Java cannot complete, especially in image and video processing.
NDK (Native Development Kit) is a set of tools provided by Google. One of its features is to provide cross-compilation, that is, C or C++ is not cross-platform, but the dynamic library generated by the NDK configuration is compatible with various platforms. For example, C generates an .exe file after compiling on the Windows platform,Then the source code can be compiled by NDK to generate a binary file that runs on Android phones.so
Use ndk-build to develop JNI examples in AS
Before Android Studio 2.2, the support for JNI development was not very good. Development generally uses Eclipse+ plug-ins to write local dynamic libraries. Later, Google officially enhanced support for JNI, including built-in NDK.
1. Create a new project in AS
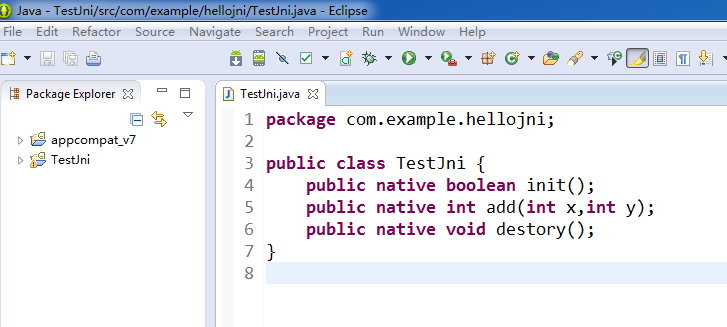
2. Declare a native method
package com.mercury.jnidemo;

public class JNITest {

    public native static String getStrFromJNI();

}
3. Generate header files through javah command
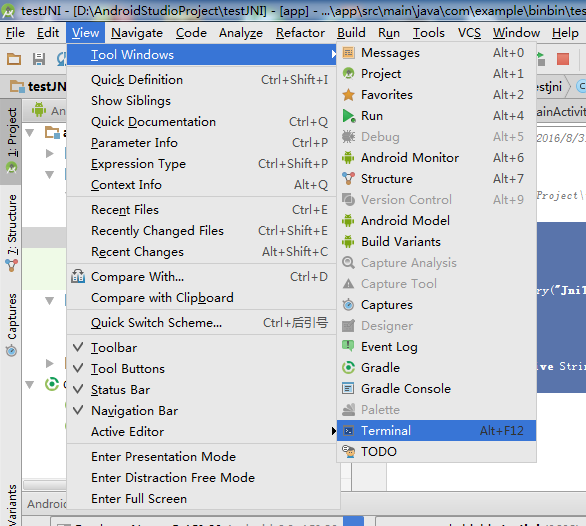
In the AS terminal, first enter the directory where the class to call the native code is located, that is, the specific path in the project, for example, here iscd app\src\main\java. Then generate the header file of the class through the javah command, pay attention to the package name + class name. Here isjavah -jni com.mercury.jnidemo.JNITestTo generate header filescom_mercury_jnidemo_JNITest.h
The actual project does not need to include this header file in the end. Developers who are not familiar with the syntax of C can know the relevant syntax of JNI with the help of this header file:
/* DO NOT EDIT THIS FILE - it is machine generated */
#include <jni.h>
/* Header for class com_mercury_jnidemo_JNITest */

#ifndef _Included_com_mercury_jnidemo_JNITest
#define _Included_com_mercury_jnidemo_JNITest
#ifdef __cplusplus
extern "C" {
#endif
/*
 * Class:     com_mercury_jnidemo_JNITest
 * Method:    getStrFromJNI
 * Signature: ()Ljava/lang/String;
 */
JNIEXPORT jstring JNICALL Java_com_mercury_jnidemo_JNITest_getStrFromJNI
  (JNIEnv *, jclass);

#ifdef __cplusplus
}
#endif
#endif
First introduce jni.h, which contains many macro definitions and structures that call local methods. The important point is the format of the method name. Here JNIEXPORT and JNICALL are macros defined in jni.h. JNIEnv * represents a pointer to the JNI environment through which you can access the interface methods provided by JNI. jclass is also defined in jni.h. The type is jobject, which is actually a pointer of uncertain type. It is used to receive this in Java. In actual writing, generally only followJava_package name_class name_method nameEnough.
4. Implement JNI method
The header file above just defines the method, but does not implement it, just like an interface. Here is a simple JNI method with no parameters in C.
First create a jni directory, I created it directly in the parent directory of src, or in other directories, because in the end only the compiled dynamic library is needed. Create Android.mk and demo.c files in the jni directory.

Android.mk is a makefile configuration file, and Android uses makefiles for automated compilation. The name defined by LOCAL_MODULE is the name of the compiled so library, for example, here isjni-demo,The name of the final generated dynamic library is called libjni-demo.so. LOCAL_SRC_FILES represents the name of the source file involved in the compilation, here is demo.c
LOCAL_PATH := $(call my-dir)

include $(CLEAR_VARS)

LOCAL_MODULE := jni-demo
LOCAL_SRC_FILES := demo.c

include $(BUILD_SHARED_LIBRARY)
Here demo.c implements a very simple method, returning String type.
#include<jni.h>

jstring Java_com_mercury_jnidemo_JNITest_getStrFromJNI(JNIEnv *env,jobject thiz){
    return (*env)->NewStringUTF(env,"I am Str from jni libs!");
}
At this time, the dynamic library compiled by NDK will have four CPU platforms: arm64-v8a, armeabi-v7a, x86, x86_64. If you create Application.mk, you can specify the CPU platform to be generated, and the syntax is very simple:
APP_ABI := all
This will generate dynamic libraries under each CPU platform.
5. Use ndk-build to programmatically generate .so library
Switch back to the parent directory of the jni directory and run the ndk-build command in Terminal to generate a libs folder at the same level as the jni directory, which stores the .so library of the corresponding platform. At the same time, there is an intermediate temporary obj folder, which can be deleted together with the jni folder.
It should be noted that to use NDK, you must first configure the relevant path of ndk-build under build.gradle, so that there will be relevant prompt functions when writing local code, and can be associated with relevant header files:
externalNativeBuild {
        ndkBuild {
            path 'jni/Android.mk'
        }
    }
Another point is that many information on the Internet add the following code to build.gradle:
sourceSets{
        main{
            jniLibs.srcDirs=['libs']
        }
    }
This specifies the storage location of the target .so library. But in actual use, even if it is not specified, the correct .so library file can still be loaded at runtime, and the following error will sometimes be reported if the code is added:
 Error:Execution failed for task ':usejava:transformNativeLibsWithMergeJniLibsForDebug'.
	> More than one file was found with OS independent path 'lib/x86/libjni-calljava.so'
	>
6. Load the .so library and call the method
The .so library must be loaded when the class is initialized, which is usually written in a static code block. The name is the previous LOCAL_MODULE.
    static {
        System.loadLibrary("jni-demo");
    }
It should be noted that if it is a JNI method with parameters, then directly add the pre-typedef data type in jni.h in the parameter list.

JNI calls Java
Unlike JNI calling C, the process of JNI calling Java does not exist alone. Instead, write a native method. Java calls the method through JNI first, and then calls back the corresponding Java method in the class inside the method. The steps are somewhat similar to reflection in Java. Write and define three click events, three Native methods, and three Java method types here, and judge whether it is successful according to the related Log.
public class MainActivity extends AppCompatActivity {

    public static final String TAG = "MainActivity";

    @Override
    protected void onCreate(Bundle savedInstanceState) {
        super.onCreate(savedInstanceState);
        setContentView(R.layout.activity_main);
    }

    static {
        System.loadLibrary("jni-calljava");
    }

    public void noParamMethod() {
        Log.i(TAG, "A Java method without parameters was called");
    }

    public void paramMethod(int number) {
        Log.i(TAG, "A Java method with parameters is called" + number + " ");
    }

    public static void staticMethod() {
        Log.i(TAG, "Static Java method is called");
    }

    public void click1(View view) {
        test1();
    }

    public void click2(View view) {
        test2();
    }

    public void click3(View view) {
        test3();
    }

    public native void test1();

    public native void test2();

    public native void test3();

}
1. Call Java no-parameter method
- JNI calls the local method and finds the class according to the class name. Note that the class name is separated by "/".
- After finding the class, find the method based on the method name. The last parameter of the function GetMethodID is the signature of the parameter list. Unlike Java, C uses signatures to find methods.
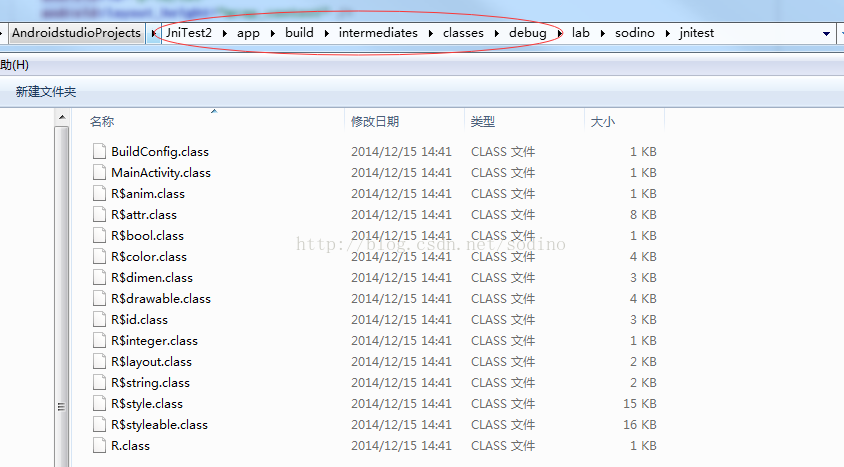
- Get the signature of the method: first locate the parent directory where the bytecode file of this class is located, generally in
module\build\intermediates\classes\debug>,byjavap -s com.mercury.usejava.MainActivityGet all the internal type signatures of the entire class. The signature of the parameterless method test1() is()V。 - The callback of the method is completed by the CallVoidMethod of the JNIEnv object, and the last formal parameter is a variable parameter.
JNIEXPORT void JNICALL Java_com_mercury_usejava_MainActivity_test1
  (JNIEnv * env, jobject obj){
       //Callback noParamMethod in MainActivity
    jclass clazz = (*env)->FindClass(env, "com/mercury/usejava/MainActivity");
    if (clazz == NULL) {
        printf("find class Error");
        return;
    }
    jmethodID id = (*env)->GetMethodID(env, clazz, "noParamMethod", "()V");
    if (id == NULL) {
        printf("find method Error");
    }
    (*env)->CallVoidMethod(env, obj, id);
  }
2. Calling Java parameter methods
Similar to the no-parameter method, but the difference between the parameter signature and the variable parameter
3. Call Java static method
Note that the way to get the method name isGetStaticMethodID, The function name of the calling method isCallStaticVoidMethodAnd because it is a static method, the jobject parameter should not be passed in, but directly jclass.
JNIEXPORT void JNICALL Java_com_mercury_usejava_MainActivity_test3
  (JNIEnv * env, jobject obj){
    jclass clazz = (*env)->FindClass(env, "com/mercury/usejava/MainActivity");
    if (clazz == NULL) {
        printf("find class Error");
        return;
    }
    jmethodID id = (*env)->GetStaticMethodID(env, clazz, "staticMethod", "()V");
    if (id == NULL) {
        printf("find method Error");
    }

    (*env)->CallStaticVoidMethod(env, clazz, id);
  }
Corresponding log

Use CMake to develop JNI
CMake is a cross-platform installation (compilation) tool. By writing CMakeLists.txt, you can generate the corresponding makefile or project file, and then call the underlying compilation. After AS 2.2, the tool has added support for CMake. The official recommendation is to use CMake+CMakeLists.txt instead of ndk-build+Android.mk+Application.mk to build JNI projects.
1. Create a project built with CMake
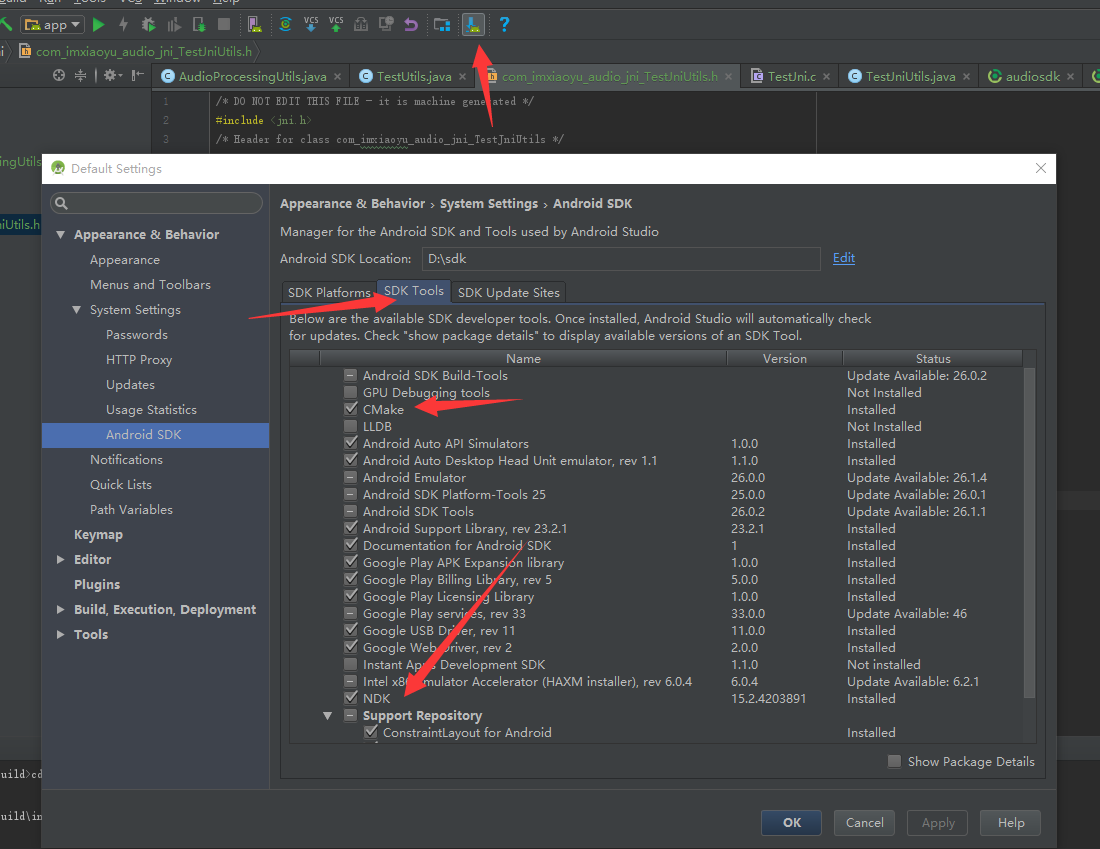
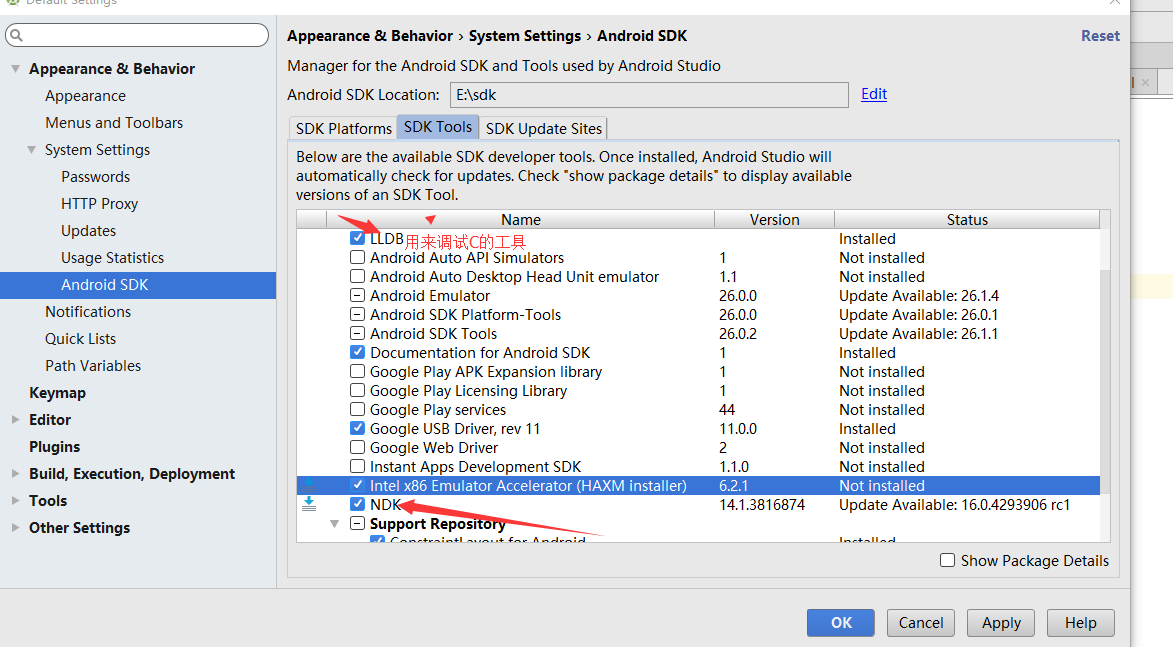
Before starting, AS must first install SDK Tools->CMake in SDK Manager

Just checkInclude C++ Support. It will prompt to configure the functions supported by C++.

Generally the default is fine, the specific meaning of each option:
- C++ Standard: Specify the environment for compiling the library.
- Exception Support: The current project supports C++ exception handling
- Runtime Type Information Support: In addition to exception handling, it also supports dynamic casting, module integration, and object I/O
2. Project directory structure

There is .externalNativeBuild directly under the main Module of the created project, and a CMakeLists.txt is added, which is equivalent to the previous configuration file. And there is a cpp folder in the src/main directory, which stores C++ files, which is equivalent to the previous jni folder. This is a sample JNI method generated by AS after the project is created, and it returns a string. Later development of JNI can follow this directory structure.
Correspondingly, some configurations have been added under build.gradle.
android {
    ...
    defaultConfig {
        ...
        externalNativeBuild {
            cmake {
                cppFlags "-std=c++14 -frtti -fexceptions"
            }
        }
    }
    buildTypes {
        ...
    }
    externalNativeBuild {
        cmake {
            path "CMakeLists.txt"
        }
    }
}
The properties of externalNativeBuild in defaultConfig are related to the option configuration when creating the project. The externalNativeBuild defines the storage path of CMakeLists.txt.
If you only use it in your own project, the CMake method will automatically compile the cpp file into the so file and copy it in when packaging the APK. If it is to be provided for external use,Make Project, AfterwardslibsYou can see the generated .so file of the corresponding configuration of the relevant CPU platform in the directory.
CMakeLists.txt
CMakeLists.txt can customize commands, find files, include header files, and set variables. See detailsOfficial document. The core content of CMakeLists.txt generated by the project by default is as follows:
 # The smallest cmake version we need when compiling the native library
cmake_minimum_required(VERSION 3.4.1)

 # Equivalent to Android.mk
 add_library( # Sets the name of the library. Set the name of the compiled native library
             native-lib

                           # Sets the library as a shared library. Type of library
             SHARED

                           # Provides a relative path to your source file(s). Compiled file path
             src/main/cpp/native-lib.cpp )

 # Add some libraries that we need to rely on when compiling our local library, here is the library for logging
find_library( # Sets the name of the path variable.
              log-lib

              # Specifies the name of the NDK library that
              # you want CMake to locate.
              log )

 # Associate your own generated library with some third-party libraries or system libraries
target_link_libraries( # Specifies the target library.
                       native-lib

                       # Links the target library to the log library
                       # included in the NDK.
                       ${log-lib} )
Use CMakeLists.txt to also specify the output path of the so library, but it must be set before add_library, otherwise it will not take effect:
set(CMAKE_LIBRARY_OUTPUT_DIRECTORY
	 ${PROJECT_SOURCE_DIR}/libs/${ANDROID_ABI}) #Specify the path
 #The generated so library is in the libs folder in the same level directory as CMakeLists.txt
If you want to configure the target CPU platform of the so library, you can set it in build.gradle
android {
    ...
    defaultConfig {
        ...
        ndk{
            abiFilters "x86","armeabi","armeabi-v7a"
        }
    }
	...

}
It should be noted that if add_library is used multiple times, multiple so libraries will be generated. If you want to compile multiple local files into a so library, just add the relative path of multiple C/C++ files in the last parameter.
Use C language to realize string encryption
A relatively simple way to implement string encryption in Java is XOR, which converts the string into a character array, and traverses each character in it with a key (which can be a character) to perform an XOR operation to generate a new character string. If implemented with JNI and C, the general steps are as follows (jstring is the string to be encrypted):
1 Get the length of jstring
2 Dynamically create a char* with the same length as data
3 Convert the jstring type to a char array (received with char*)
4 Traverse the char array and perform XOR operation
5 Convert char* to jstring type and return
6 Release dynamically opened heap memory space
Effect picture

I am using the 5.0 emulator, sometimes it crashes, check the system log, it will report an error:
JNI DETECTED ERROR IN APPLICATION: input is not valid Modified UTF-8
I checked it on the Internet. When JNI calls the NewStringUTF method, it will exit when it encounters an unknown character, because the checkUTFString in the virtual machine dalvik/vm/CheckJni.cpp will check the character type. The alternative is to check whether char* contains non-UTF-8 characters before starting the conversion, and return an empty string if some. The complete code is as follows:
#include<jni.h>
#include <stdlib.h>

jboolean checkUtfBytes(const char* bytes, const char** errorKind) ;

jstring Java_com_mercury_cmakedemo_MainActivity_encryptStr
        (JNIEnv *env, jobject object, jstring data){
    if(data==NULL){
        return (*env)->NewStringUTF(env, "");
    }
    jsize len = (*env)->GetStringLength(env, data);
    char *buffer = (char *) malloc(len * sizeof(char));
    (*env)->GetStringUTFRegion(env, data, 0, len, buffer);
    int i=0;
    for (; i <len ; i++) {
        buffer[i] = (char) (buffer[i] ^ 2);
    }

    const char *errorKind = NULL;
    checkUtfBytes(buffer, &errorKind);
    free(buffer);
    if (errorKind == NULL) {
        return (*env)->NewStringUTF(env, buffer);
    } else {
        return (*env)->NewStringUTF(env, "");
    }
}

//Pass in char* and errorKind, if errorKind is not NULL, it means that it contains non-utf-8 characters, and deal with it accordingly
jboolean checkUtfBytes(const char* bytes, const char** errorKind) {
    while (*bytes != '\0') {
        jboolean utf8 = *(bytes++);
        // Switch on the high four bits.
        switch (utf8 >> 4) {
            case 0x00:
            case 0x01:
            case 0x02:
            case 0x03:
            case 0x04:
            case 0x05:
            case 0x06:
            case 0x07:
                // Bit pattern 0xxx. No need for any extra bytes.
                break;
            case 0x08:
            case 0x09:
            case 0x0a:
            case 0x0b:
            case 0x0f:
                /*
                 * Bit pattern 10xx or 1111, which are illegal start bytes.
                 * Note: 1111 is valid for normal UTF-8, but not the
                 * modified UTF-8 used here.
                 */
                *errorKind = "start";
                return utf8;
            case 0x0e:
                // Bit pattern 1110, so there are two additional bytes.
                utf8 = *(bytes++);
                if ((utf8 & 0xc0) != 0x80) {
                    *errorKind = "continuation";
                    return utf8;
                }
                // Fall through to take care of the final byte.
            case 0x0c:
            case 0x0d:
                // Bit pattern 110x, so there is one additional byte.
                utf8 = *(bytes++);
                if ((utf8 & 0xc0) != 0x80) {
                    *errorKind = "continuation";
                    return utf8;
                }
                break;
        }
    }
    return 0;
}
Intelligent Recommendation

Android Studio JNI development tutorial
Introduction to JNI and NDK 1: JNI Java Native Interface: Java Native Interface 1: JNI is a mechanism for Java and other voice communication provided by the Java language (mainly C/C++). Java can call...
Realize jni development in android studio
In the development of the project, for the sake of security, it is agreed that the front and back ends need to encrypt and decrypt data. The client's network request encryption and decryption logic is...
Android Studio development JNI project
Why can't 80% of programmers be architects? >>> After creating a new project using Android Sutdio, the next step is to record the basic steps of creating an NDK project. This arti...
Android Studio JNI Development Detailed
1 Configuring NDK Plus in the project's gradle.properties file If you print #include <android/log.h> #include <string.h> #define LOG_TAG "MYLOG" #define ...
Android Eclipse JNI development example
transferred from the blog "The complete process of building NDK development environment under android and getting started with TestJNI》 http://blog.csdn.net/adaixiaoxiao/article/details/51822744 ...
More Recommendation

A simple example of JNI developed by Android Studio
JNIL: Java Native Interface, java local development interface. The communication interface between Java and C / C ++ is a protocol used to communicate Java and native code (C / C ++). Compilation envi...
Android studio JNI static registration example
Reprinted from: https://www.cnblogs.com/wzben/p/5733571.html Preparation: Download the NDK. Simply put, to use C/C++, you must use the NDK. Direct Baidu search and then go to the official website to d...
Android Studio A simple non-traditional Jni example
Jni is a middleware for Java to run and call C and C++ code, which can be understood as an adapter. My C/C++ level is limited to the algorithm examples of the courses in college. I haven't really writ...
The first example developed by android studio jni
The main application of jni development is java calling c/c++ to perform some operations on the bottom layer. It is recommended that children’s shoes who don’t know this part can take a lo...
JNI development specification for NDK development in Android Studio
NDK explained: Ndk is a set of tools. Android NDK adds the word "Native" in front of SDK, which is Native Development Kit, so it is called "NDK" by Google. As we all know, Android ...