QT official website:https://www.qt.io/zh-cn/develop
1、PySide6、PyQt6、PyQt5
Pyside6, PYSIDE2, and PYQT5 are based on the QT library. QT is a set of C ++ libraries and development tools, including graphic user interface, network, thread, regular expression, SQL database, SVG, OpenGL, XML, user and application settings, positioning, positioning, positioning Positioning services, short -range communication (NFC and Bluetooth), web browsing, 3D animation, charts, 3D data visualization, and interaction with the application store. There are very powerful graphical interface development libraries.
So PyQt5、PySide2、PySide6 What is the difference between the three?
Pyqt5 is basically not much different from pyside2. It is a set of QT API libraries in the Python environment. many. However, the advantage of PYSIDE is that there are detailed official maintenance documents. Pyside6 is a updated version of PYSIDE2 [QT 5 upgrades to QT 6, PYSIDE2 has also upgraded to pyside6 (directly from 2 to 6)], and there is almost no difference between the two. The code conversion between the three of them is also very simple. Therefore, it is recommended to use PYSIDE6 to create a QT6 -based GUI program.
1.1 Main concept
Qt for python official document:https://doc.qt.io/qtforpython/contents.html
1. Interface bearing part (control)
- Main class: qwidget
- Inheritance class:
QWidget
Qwidget subclass (too much, it cannot be complete)
:https://doc.qt.io/qtforpython-6/PySide6/QtWidgets/index.html#module-PySide6.QtWidgets:
2. Interface framework (layout)
- Main class: qlayout
- Inheritance class:
QGridLayout (grid layout)
QBOXLAYOUT (simple up and down layout)
QstackedLayout (the layout of the widget)
FlowLayout
3. The interface component part (actually the widget class)
- button
- label
- etc.
4. Interface style part
- color
- size
- font
- Icon
5. Interface interaction part
- action
- event
- signal
- slot
- connect
Conceptual relationship
- Qwidget, as the main body of the page, is mounted on layout (layout). Layout (layout) can add the component of the page, via Action (action, similar to clicks), events, signal (signal) Connect (action binding) generate interaction
- Through style, similar to icon (icon), size, color, font, etc., modify the details of the interface
- Layout is needed on the widget. Layout can continue to add widget, you can keep it all the time
The differences between the three window bases (qmainwindow, QWIDGET, QDIALOH)
In the usual QT development, it is usually necessary to write its own window class, so which class should this window class inherit?
- QWIDGET inherits in Qobject and QPAINTDEVICE,
- QDIALOG and Qmainwindow inherited in QWIDGET.
Let's take a look at the difference between the three window base classes:
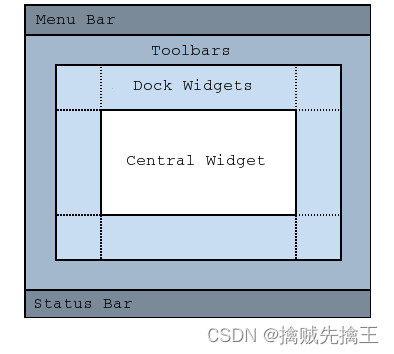
- 1. qmainwindow: qmainwindow class provides a "Central window components, menu bar, toolbar, status bar" of Main application windowEssence The QMainWindow window is often inherited. Qmainwindow has its own layout. You can use QMENUBAR (menu bar), Qtoolbar (toolbar), QStatusbar (status bar), and QDOCKWIDGET (suspended window). The layout has a central area that can be occupied by any type of small window.
- 2. QWIDGET: The Qwidet class is a base class for all user interface objects. The window component is a basic unit of the user interface. It receives the mouse, keyboard and other messages from the window system, and draws itself on the screen. A window part can be blocked by his parent window or other windows.
- 3. QDIALOG: The QDialog class is the base class of the dialog box window. The dialog box window is mainly used for short -term tasks and the top window for short -term communication with users. QDialog can be a modular dialog box or a non -modal dialog box. QDIALOG supports extensions and returns, and can have the default button. QDialog can also have a QSIZEGRIP in the lower right corner of it, using SetsizeGripenabled ().
Pattern dialog box
Block the dialog box entered in the same application in the same application. The mode dialog box has its own event cycle. The user must complete the interactive operation in this dialog box and close it before accessing any other window in the application. The mode dialog box only prevents the access to the interview with the conversation, allowing users to continue using applications in other windows.The most common method for displaying the modal dialog is to call its exec () function. When the user turns off the dialog box, exec () will provide a useful return value, and the process control will continue to be performed from the place of EXEC (). Under normal circumstances, the dialog box is closed and returned to the corresponding value. We connect to the default button, for example, the "OK" button is connected to the Accept () slot, and the "cancel" button is connected to the Reject () slot. In addition, we can also connect the Done () slot and pass it to it of the access or rejection.
Non -mode dialog box
The dialog box operates in other windows in the same program. Finding and replacing dialog boxes in text processing are usually non -mode, allowing users to interact with the main window and dialog box of the application at the same time. Call the show () to display the informal dialog box and immediately return the control to the caller.If the Show () function is called after hiding the dialog box, the dialog box will be displayed in its original position. This is because the window position determined by the window manager is not clearly specified by the programmer. ) Move the dialog box before displaying.
Half -mode dialog box
Call setmodal (true) or setwindowmodality (), then show (). Different from exec (), show () is immediately returned to the controller.For the progress dialog box, calling Setmodal (TRUE) is very useful. Users must have the ability to interact with them, such as to cancel long -term operation operations. If you use Show () and Setmodal (TRUE) to perform a long -term operation, you must call Qappaction :: processevents () to interact with the dialog box during the execution process (refer to QPROGRESSDialog).
QMainWindow, Qwidget, QDIALOH principles
- If you need to be embedded in other windows, it is created based on Qwidget.
- If it is a top dialog box, it is created based on QDIALOG.
- If it is a main window, it is created based on QMainWindow.
Qmainwindow usage example:
# -*- coding: utf-8 -*-

from PySide6.QtCore import (
    QCoreApplication, QDate, QDateTime, QLocale,
    QMetaObject, QObject, QPoint, QRect,
    QSize, QTime, QUrl, Qt
)
from PySide6.QtGui import (
    QBrush, QColor, QConicalGradient, QCursor,
    QFont, QFontDatabase, QGradient, QIcon,
    QImage, QKeySequence, QLinearGradient, QPainter,
    QPalette, QPixmap, QRadialGradient, QTransform
)
from PySide6.QtWebEngineWidgets import QWebEngineView
from PySide6.QtWidgets import (
    QApplication, QMainWindow, QMenuBar, QPushButton,
    QSizePolicy, QStatusBar, QWidget, QPlainTextEdit
)


class Ui_MainWindow(object):
    def setupUi(self, MainWindow):
        if not MainWindow.objectName():
            MainWindow.setObjectName(u"MainWindow")
        MainWindow.resize(700, 567)
        self.centralwidget = QWidget(MainWindow)
        self.centralwidget.setObjectName(u"centralwidget")
                 Self.plainTextedit = qplaintextedit (Self.centralwidget) #
        self.plainTextEdit.setObjectName(u"plainTextEdit")
        self.plainTextEdit.setGeometry(QRect(90, 40, 521, 311))
                 Self.pushbutton = qpushbutton (self.centralwidget) #
        self.pushButton.setObjectName(u"pushButton")
        self.pushButton.setGeometry(QRect(330, 410, 75, 24))
        MainWindow.setCentralWidget(self.centralwidget)
        self.menubar = QMenuBar(MainWindow)
        self.menubar.setObjectName(u"menubar")
        self.menubar.setGeometry(QRect(0, 0, 700, 22))
        MainWindow.setMenuBar(self.menubar)
        self.statusbar = QStatusBar(MainWindow)
        self.statusbar.setObjectName(u"statusbar")
        MainWindow.setStatusBar(self.statusbar)

        Self.ReTranslateui (mainwindow) # Call the Retranslateui (Self, MainWindow) function below.

        QMetaObject.connectSlotsByName(MainWindow)

    # setupUi

    def retranslateUi(self, MainWindow):
        MainWindow.setWindowTitle(
            QCoreApplication.translate("MainWindow", u"\u81ea\u5b9a\u4e49\u7684\u6807\u9898\u680f", None))
        self.plainTextEdit.setPlaceholderText(QCoreApplication.translate("MainWindow", u"\u8bf7\u8f93\u5165", None))
        self.pushButton.setText(QCoreApplication.translate("MainWindow", u"\u70b9\u51fb", None))
    # retranslateUi


 # ================== The above is automatic generated code ==================== ===
 # =================== The following code to display it =================== ===
app = QApplication()
main_window = QMainWindow()

 Auto_ui_window = ui_mainwindow () # instantiated component
 Auto_UI_WINDOW.SetupUI (main_window) # Call the SetupUI () method and pass it to the main window parameter.

 # Bind the button to call the button.
 # Auto_UI_WINDOW.Pushbutton.clICKed.connect
 Auto_UI_WINDOW.Pushbutton.Clicked.connect (lambda x: auto_ui_window.plaintextedit.appendingplaintext ("click button"))

main_window.show()
app.exec()
pass
1.2 InstallationPySide6
PySide6.QtWidgets:https://doc.qt.io/qtforpython-6/PySide6/QtWidgets/index.html#module-PySide6.QtWidgets
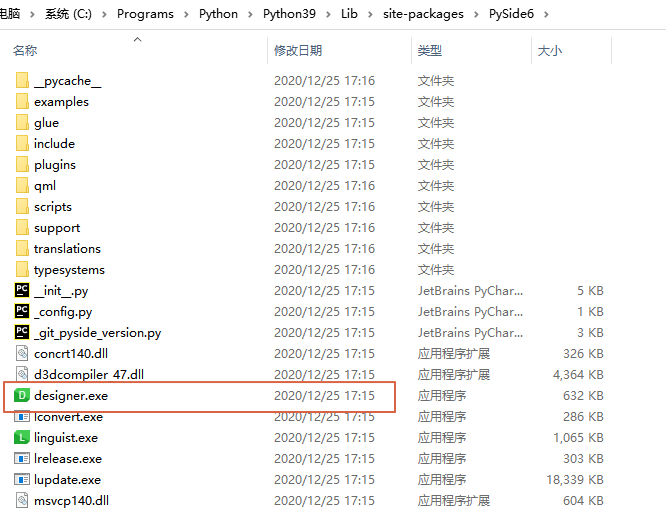
The PYSIDE6 library is still very large, there are nearly 200m, it is recommended to use domestic mirror to download. PYSIDE6 only supports the Python 3.6+ version. In addition, it pays special attention to it only supports 64 -bit Python.
Install:pip install PySide6
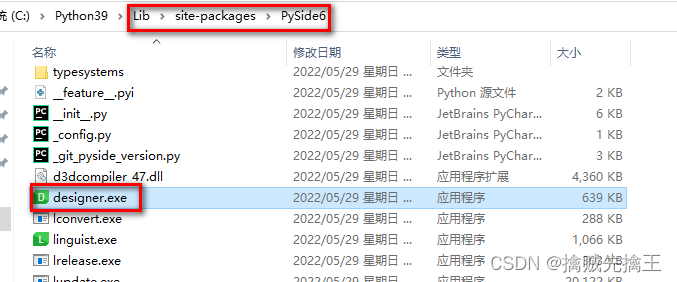
After the installation is complete, the designer.exe is found in the Python installation path. Designer is a very practical tool in the Python design that allows people to write the QT interface not only using pure code, but also set on the basis of visualization, which is very convenient.
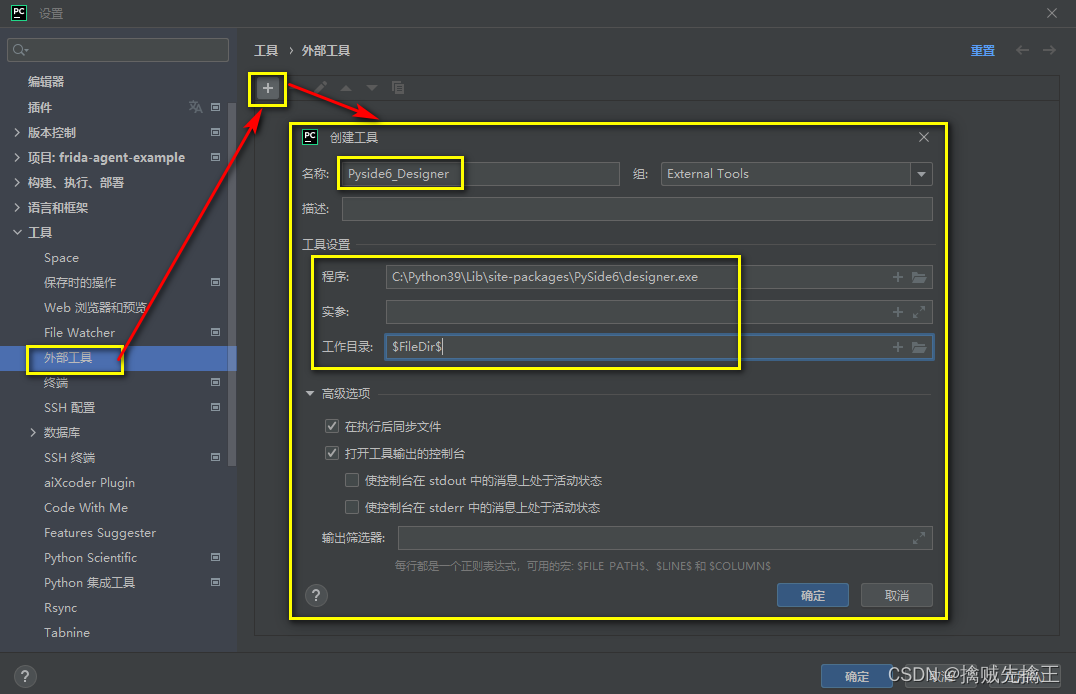
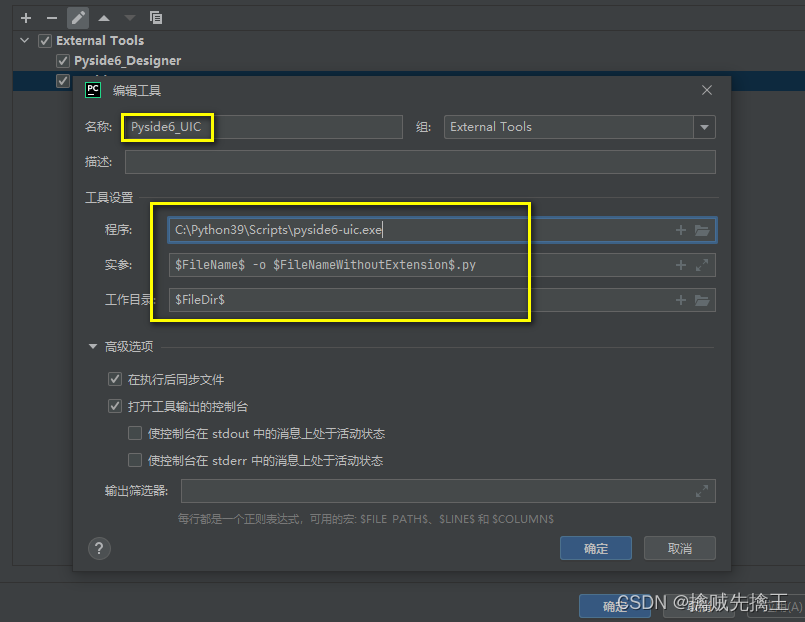
Pycharm configuration PYSIDE6 tool
Run pycharm, set up ---> external tools ---> click +, addPyside6_Designer and Pyside6_UIC
- Add pyside6_designer
Name: pyside6_designer (defined by itself)
Program: Pyside6-designer installation path.C:\Python39\Lib\site-packages\PySide6\designer.exe
Real parameter: not fill in
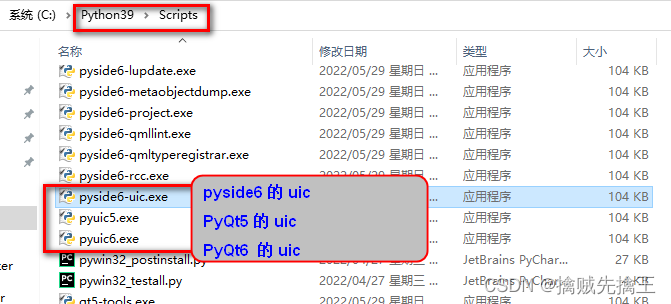
Work list: $FileDir$ - Add pyside6_uic Name: pyside6_uic (can be defined by itself)
Program: PYSIDE6-UIC installation path.C:\Python39\Scripts\pyside6-uic.exe
Real parameters: $ FILENAME $ -O $ FILENAMEWIUTEXTENSION $ .py
Simple example:
import sys
import random
from PySide6 import QtCore, QtWidgets, QtGui


class MyWidget(QtWidgets.QWidget):
    def __init__(self):
        super().__init__()

        self.hello = ["Hallo Welt", "Hei maailma", "Hola Mundo", "Привет мир"]

        self.button = QtWidgets.QPushButton("Click me!")
        self.text = QtWidgets.QLabel("Hello World", alignment=QtCore.Qt.AlignCenter)

        self.layout = QtWidgets.QVBoxLayout(self)
        self.layout.addWidget(self.text)
        self.layout.addWidget(self.button)

        self.button.clicked.connect(self.magic)

    @QtCore.Slot()
    def magic(self):
        self.text.setText(random.choice(self.hello))


if __name__ == "__main__":
    app = QtWidgets.QApplication([])

    widget = MyWidget()
    widget.resize(800, 600)
    widget.show()

    sys.exit(app.exec())
1.3 InstallationPyQt6
If you use pyside6 for development, you can not install PYQT6 or PYQT5
pip install PyQt6
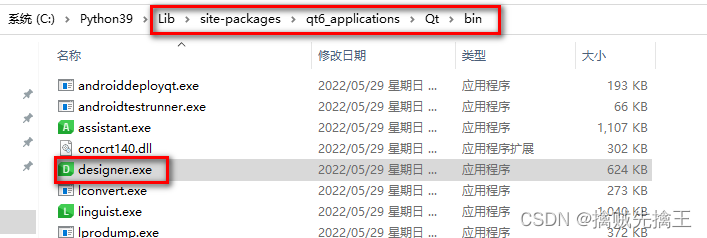
pip install pyqt6-tools
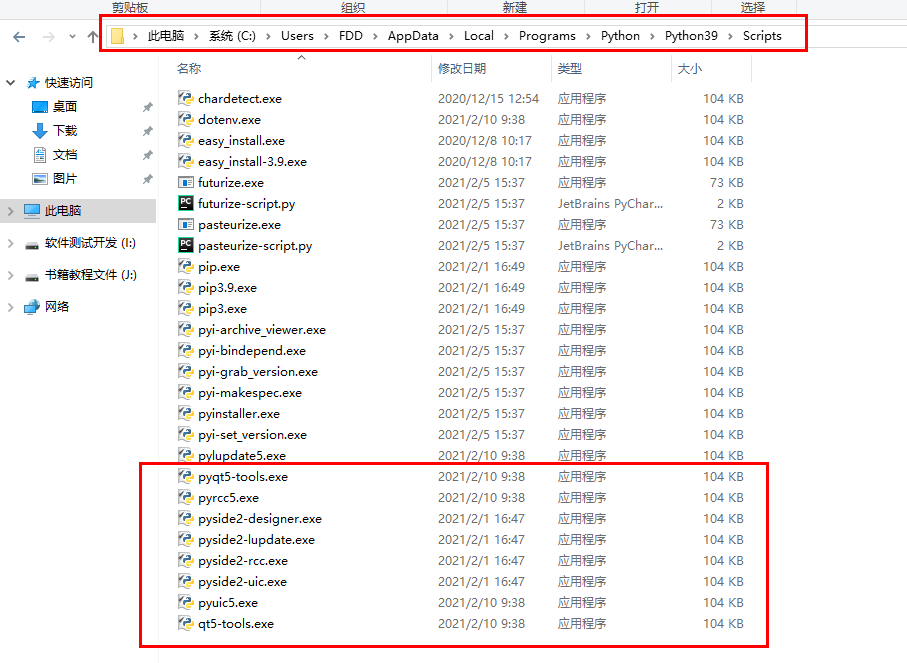
After installing "Pyqt6-Tools", you can go under the Python pathLib\site-packages\qt6_applications\Qt\bin Find the designer.exe tool in the directory.
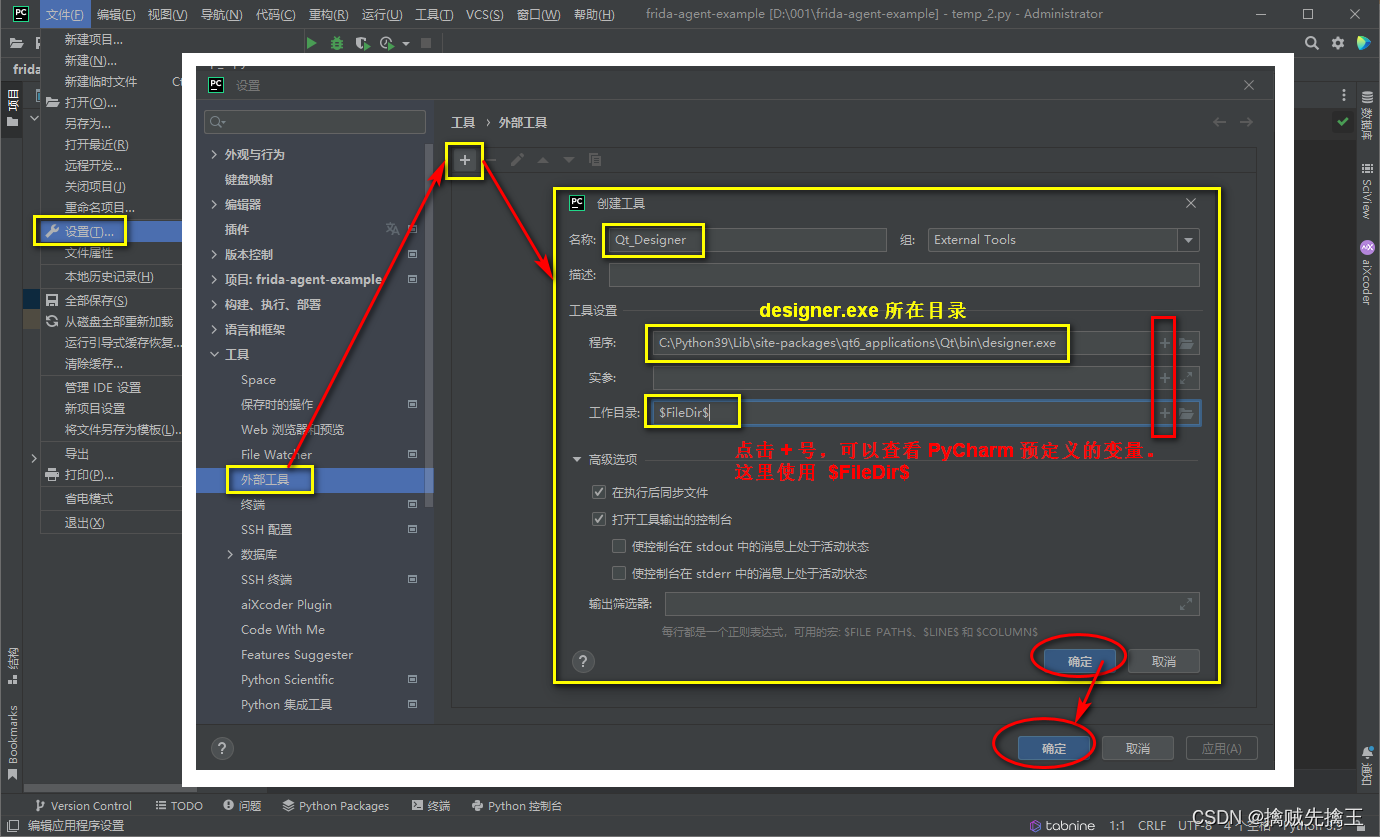
Pycharm configurationdesigner.exe
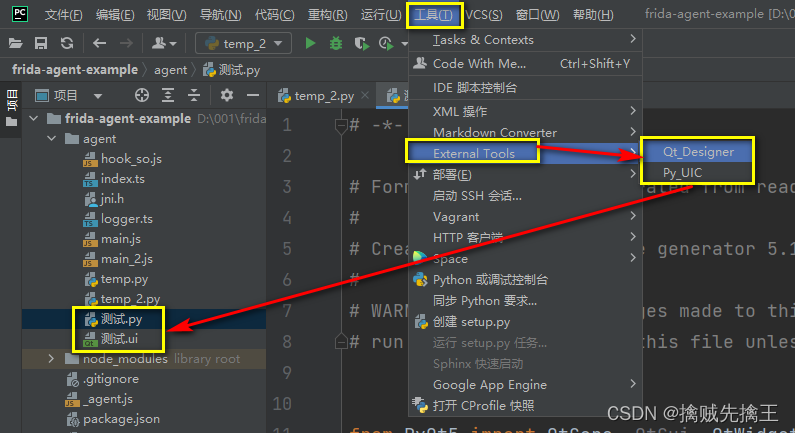
- Click in "File ---> Settings ---> Tools ---> External Tools"+No., add external tools.
- Fill in the name "Qt_Designer", This name can be filled at random
- "program"Fill in"designer.exe" path of.
- "Work list"You can click the + number on the input box, select the predetermined directory variable, choose here$FileDir$
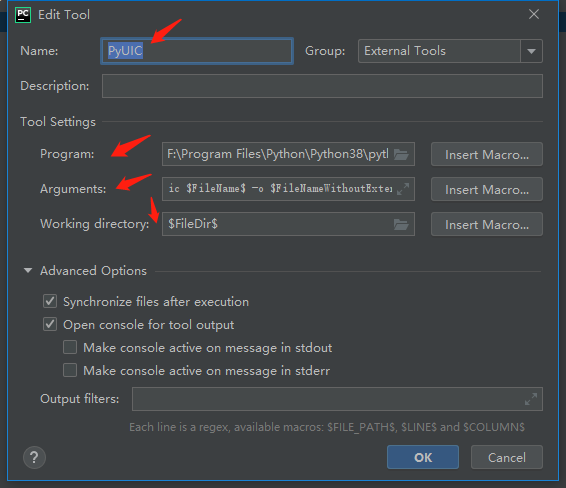
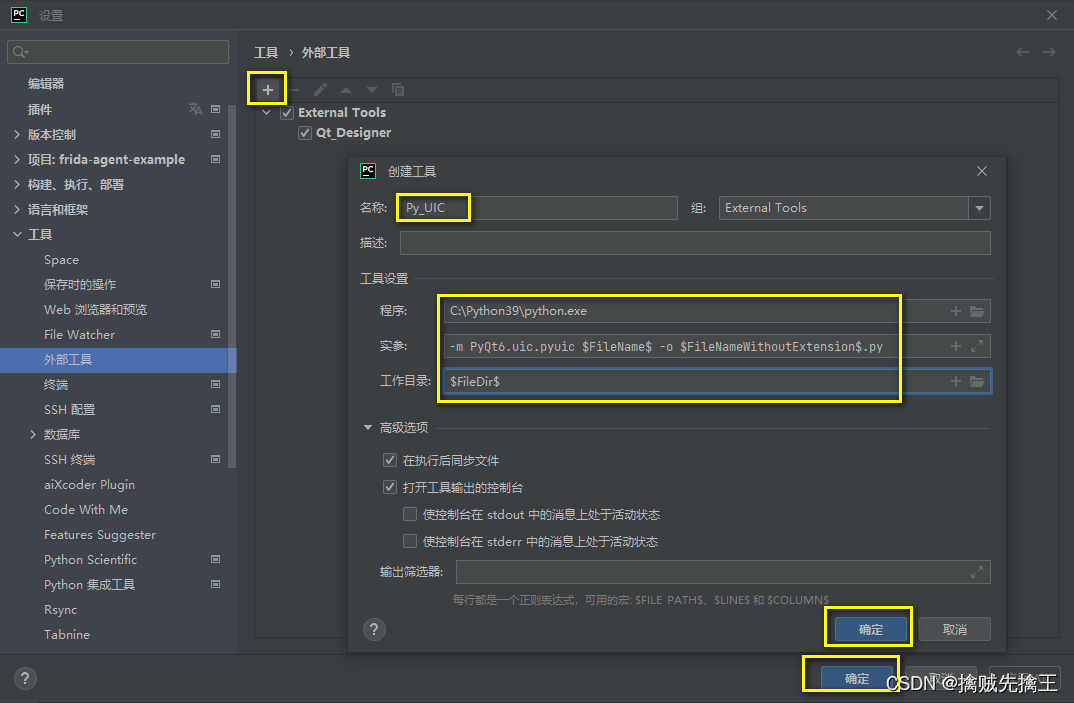
Pycharm configurationPyuic
PyUIC Mainly used "Convert Qt interface to PY code"
- Click in "File ---> Settings ---> Tools ---> External Tools"+No., add external tools.
- Fill in the name "Py_UIC", This name can be filled at random
- "program"Fill in"python.exe" path of.
- "Arguments"Fill in-m PyQt6.uic.pyuic $FileName$ -o $FileNameWithoutExtension$.pyNote: -m parameter is "willLibrary moduleRun as script, here the library module is pyqt6.uic.pyuic,
Check the lib \ site-PACKAGES \ PYQT5 \ UIC directory, and find that the call is pYUIC.PY
-O parameter is the output file name - "Work list"Fill in$FileDir$
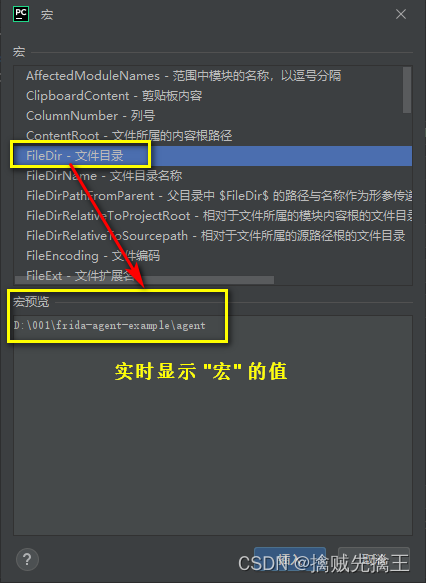
System customized macro ginseng (When clicking the number of macroscopes, you can display the value of the current project in real time):
1.4 Command line executionuic Generate PY code
If you don't fill in "Arguments"In this option, in pycharm, click .ui file ---> and then right-click ---> ExternalTools-> PYUIC cannot generate .py files. Only through the command line .py file:pyuic6.exe test.ui -o test.py。
As long as the corresponding QT is installed, you can find the corresponding UIC executable file and directly command the line execution.
Open the path example where xxx.ui is located in CMD, and then execute:pyuic6 xxx.ui -o xxx.py
2. Design UI files and convert to .py files.
pass Qt_Designer Design the Qt interface, and then save it "Test .UI" document
Re -passPy_UICWill according to "Test .UI"File generates the same name"Test .py" document.
If the py_uic configuration above is correct, the .py file is very simple:
- .ui file ---> Right-click-> External Tools ---> Py_uic to automatically generate py files
There is only one inherited by the Object class inherited from the Object class.
3. Run the .py file, the graphical interface appears
At this time, run the .py file directly and find that the graphic interface will not be displayed.
There are two ways to display the interface.
Method 1: Run this .py file to see the method of the interface
PySide6
Add this code to the end of the file:
if __name__ == "__main__":
    import sys
    from PySide6 import QtWidgets
         app = qtwidgets.qapplication (sys.argv) # Create a qapplication, which is the software app you want to develop
         Mainwindow = qtwidgets.qmainwindow () # Create a QMainWindow to load various components and controls you need
         # MainWindow = qtwidgets.qwidget () # Create a QMainWindow to load various components and controls you need
         UI = UI_Mainwindow () # UI is an instantiated object of the UI class you created
         UI.SetupUI (mainwindow) # SetupUI method in the execution class, the parameter of the method is the QMainWindow created in the second step
         Mainwindow.show () # execute the show () method of qmainwindow, display this QMainWindow
         sys.exit (app.exec_ ()) # Use exit () or click the closure button to exit Qapplication
Full code:
# -*- coding: utf-8 -*-
################################################################################
## Form Generated from Reading UI FILE 'Test .ui'
##
## Created by: Qt User Interface Compiler version 6.3.0
##
## WARNING! All changes made in this file will be lost when recompiling UI file!
################################################################################
from PySide6.QtCore import (
QCoreApplication, QDate, QDateTime, QLocale,
QMetaObject, QObject, QPoint, QRect,
QSize, QTime, QUrl, Qt
)
from PySide6.QtGui import (
QBrush, QColor, QConicalGradient, QCursor,
QFont, QFontDatabase, QGradient, QIcon,
QImage, QKeySequence, QLinearGradient, QPainter,
QPalette, QPixmap, QRadialGradient, QTransform
)
from PySide6 import QtWidgets
from PySide6.QtWidgets import (
QApplication, QMainWindow, QMenuBar, QPushButton,
QSizePolicy, QStatusBar, QWidget
)
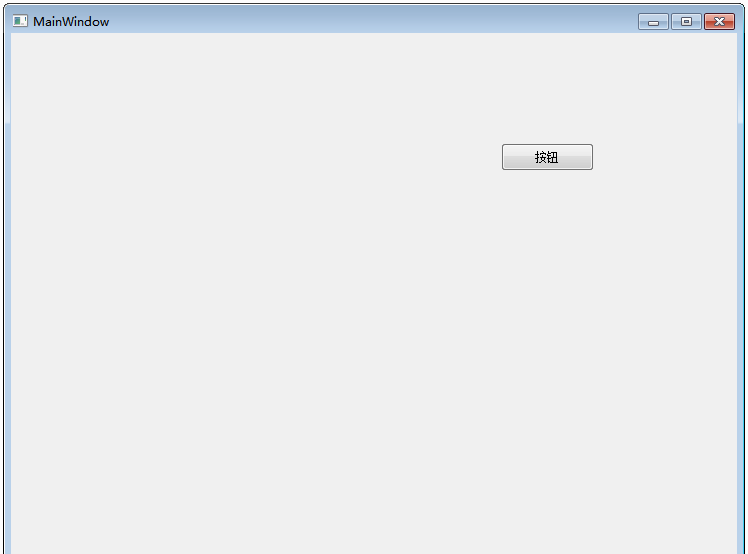
class Ui_MainWindow(object):
def setupUi(self, MainWindow):
if not MainWindow.objectName():
MainWindow.setObjectName(u"MainWindow")
MainWindow.resize(800, 600)
self.centralwidget = QWidget(MainWindow)
self.centralwidget.setObjectName(u"centralwidget")
self.pushButton = QPushButton(self.centralwidget)
self.pushButton.setObjectName(u"pushButton")
self.pushButton.setGeometry(QRect(150, 160, 211, 111))
MainWindow.setCentralWidget(self.centralwidget)
self.menubar = QMenuBar(MainWindow)
self.menubar.setObjectName(u"menubar")
self.menubar.setGeometry(QRect(0, 0, 800, 22))
MainWindow.setMenuBar(self.menubar)
self.statusbar = QStatusBar(MainWindow)
self.statusbar.setObjectName(u"statusbar")
MainWindow.setStatusBar(self.statusbar)
self.retranslateUi(MainWindow)
QMetaObject.connectSlotsByName(MainWindow)
# setupUi
def retranslateUi(self, MainWindow):
MainWindow.setWindowTitle(QCoreApplication.translate("MainWindow", u"MainWindow", None))
self.pushButton.setText(QCoreApplication.translate("MainWindow", u"PushButton", None))
# retranslateUi
if __name__ == "__main__":
import sys
from PySide6 import QtWidgets
app = qtwidgets.qapplication (sys.argv) # Create a qapplication, which is the software app you want to develop
Mainwindow = qtwidgets.qmainwindow () # Create a QMainWindow to load various components and controls you need
# MainWindow = qtwidgets.qwidget () # Create a QMainWindow to load various components and controls you need
UI = UI_Mainwindow () # UI is an instantiated object of the UI class you created
UI.SetupUI (mainwindow) # SetupUI method in the execution class, the parameter of the method is the QMainWindow created in the second step
Mainwindow.show () # execute the show () method of qmainwindow, display this QMainWindow
sys.exit (app.exec_ ()) # Use exit () or click the closure button to exit QapplicationPyQT5
Pyqt5 basic function:http://code.py40.com/1961.html
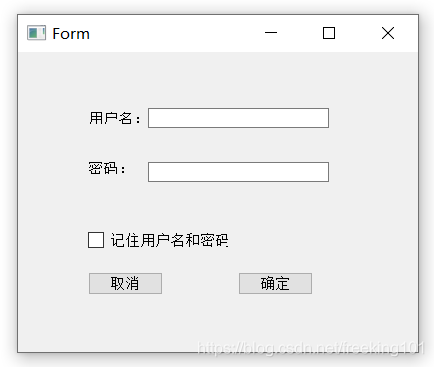
Similar to PYSIDE6, a complete example code (temp.py ):
# -*- coding: utf-8 -*-
# @Author :
# @File : temp.py
# @Software: PyCharm
# @description : XXX
from PyQt5 import QtCore, QtGui, QtWidgets
import sys
class Ui_MainWindow(object):
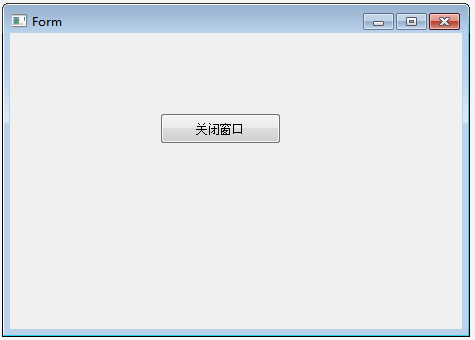
def setupUi(self, Form):
Form.setObjectName("Form")
Form.resize(400, 300)
self.pushButton = QtWidgets.QPushButton(Form)
self.pushButton.setGeometry(QtCore.QRect(70, 220, 75, 23))
self.pushButton.setObjectName("pushButton")
self.pushButton_2 = QtWidgets.QPushButton(Form)
self.pushButton_2.setGeometry(QtCore.QRect(220, 220, 75, 23))
self.pushButton_2.setObjectName("pushButton_2")
self.checkBox = QtWidgets.QCheckBox(Form)
self.checkBox.setGeometry(QtCore.QRect(70, 180, 141, 16))
self.checkBox.setObjectName("checkBox")
self.lineEdit = QtWidgets.QLineEdit(Form)
self.lineEdit.setGeometry(QtCore.QRect(130, 56, 181, 20))
self.lineEdit.setObjectName("lineEdit")
self.lineEdit_2 = QtWidgets.QLineEdit(Form)
self.lineEdit_2.setGeometry(QtCore.QRect(130, 110, 181, 20))
self.lineEdit_2.setObjectName("lineEdit_2")
self.label = QtWidgets.QLabel(Form)
self.label.setGeometry(QtCore.QRect(70, 60, 54, 12))
self.label.setObjectName("label")
self.label_2 = QtWidgets.QLabel(Form)
self.label_2.setGeometry(QtCore.QRect(70, 110, 54, 12))
self.label_2.setObjectName("label_2")
self.retranslateUi(Form)
QtCore.QMetaObject.connectSlotsByName(Form)
def retranslateUi(self, Form):
_translate = QtCore.QCoreApplication.translate
Form.setWindowTitle(_translate("Form", "Form"))
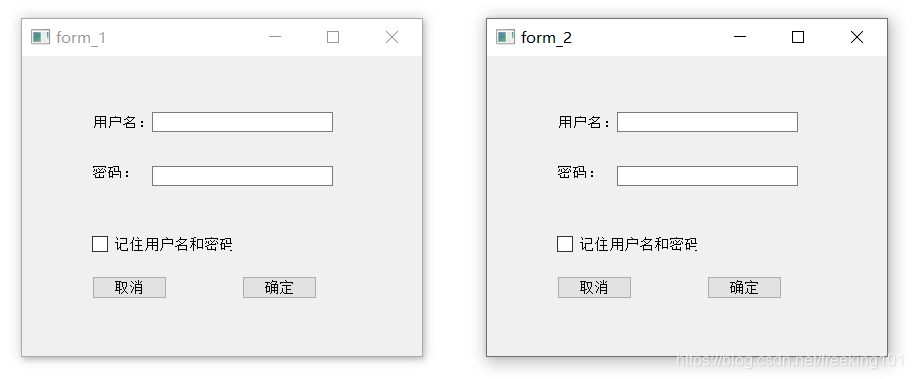
self.pushbutton.settext (_translate ("form", "cancel"))))
Self.pushbutton_2.Settext (_Translate ("Form", "OK")))
Self.checkbox.settext (_translate ("form", "Remember the username and password")))))
Self.label.setText (_translate ("form", "user name:"))
Self.label_2.Settext (_translate ("Form", "Password:"))
if __name__ == "__main__":
app = qtwidgets.qapplication (sys.argv) # Create a qapplication, which is the software app you want to develop
Mainwindow = qtwidgets.qmainwindow () # Create a QMainWindow to load various components and controls you need
UI = UI_Mainwindow () # UI is an instantiated object of the UI class you created
UI.SetupUI (mainwindow) # SetupUI method in the execution class, the parameter of the method is the QMainWindow created in the second step
Mainwindow.show () # execute the show () method of qmainwindow, display this QMainWindow
sys.exit (app.exec_ ()) # Use exit () or click the closure button to exit QapplicationProgram cloud screenshot:
PyQT6
Importerror: DLL LOAD FAILED While Importing Qtgui: Can't find the specified program.
Ready to use pyside6, you will not find the specific reason anymore.
Method 2: Call this module in other files
Realize by inheriting qtwidgets.qwidget or qtwidgets.qmainwindow
class MyForm(QMainWindow, Ui_MainWindow):

    def __init__(self):
        super(MyForm, self).__init__()
        self.setupUi(self)


if __name__ == '__main__':
    import sys
    app = QApplication(sys.argv)
    my_form = MyForm()
    my_form.setWindowTitle('my_form')
    my_form.show()
    sys.exit(app.exec())
    pass
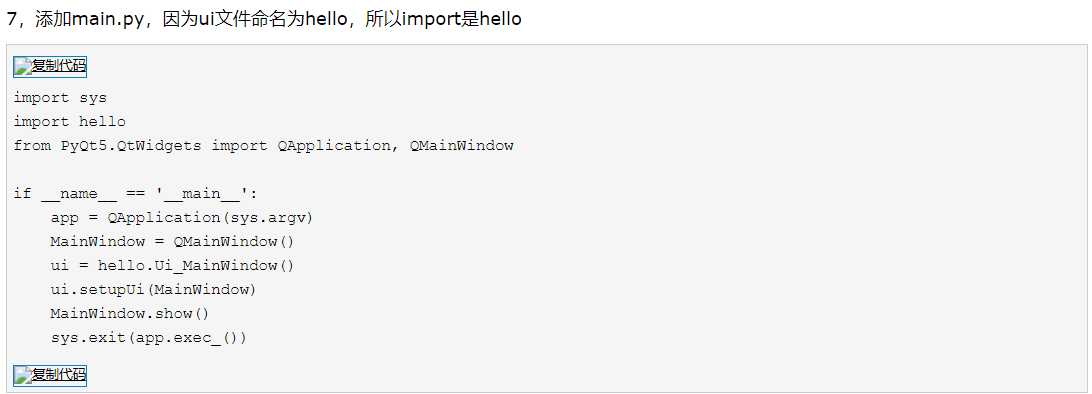
The generated python file only defines the code of the main window and its control, and does not have the code of the program entry. In order to adhere to the principle of view and logic separation, you can write a new script call this file and create a window. The right -click RUN in Method 1 can display the method of the interfaceNot conflicting, Just call this module in other files. Call the file writing (main.py ):
# -*- coding: utf-8 -*-
# @Author  :
# @File    : main.py
# @Software: PyCharm
# @description : XXX


import sys
from temp import Ui_MainWindow
from PyQt5 import QtWidgets


# UI class
class MyWindow1(QtWidgets.QWidget, Ui_MainWindow):
    def __init__(self):
        super(MyWindow1, self).__init__()
        self.setupUi(self)


 # UI class
class MyWindow2(QtWidgets.QMainWindow, Ui_MainWindow):
    def __init__(self):
        super(MyWindow2, self).__init__()
        self.setupUi(self)


 # Call Show
if __name__ == "__main__":
    app = QtWidgets.QApplication(sys.argv)
    form_1 = MyWindow1()
    form_1.setWindowTitle('form_1')
    form_1.show()

    form_2 = MyWindow2()
    form_2.setWindowTitle('form_2')
    form_2.show()

    sys.exit(app.exec_())
Calling file (temp.py ) Like the temp.py file above. Undead UI_MainWindow class, use its constructor to construct the main window, and define the entrance to the program. Create the QT window by creating the Qapplication object
Screenshot of the program:
4. Introduction and entry of pyqt5 qt designer
Writing the UI interface in PYQT can be implemented directly through the code, or it can be done through QT Designer. Qt Designer's design conforms to the architecture of the MVC, which realizes the separation of views and logic, thereby achieving the convenience of development. The operation method in Qt Designer is very flexible. The control can be viewed at any time through the dragging method.
Qt Designer is installed with the Pyqt5-Tools package, and its installation path is under the "Python installation path \ lib \ site-PACKAGES \ pyqt5 \ qt5 \ bin". If you want to start Qt Designer, you can go directly to the above directory,
- Double -click DESIGNER.EXE to open Qt Designer;
- Or add the above path to the environment variable, enter the designer in the command line;
- Or configure it in PyCharm to open it as an external tool.
The .ui file generated by Qt Designer (essentially a file in the XML format) can be converted into a .py file through the PYUIC5 tool.
Qt Designer interface profile
Click QTDESIGNER to open the interface of the QtDesigner and pop the window as shown in the figure below.
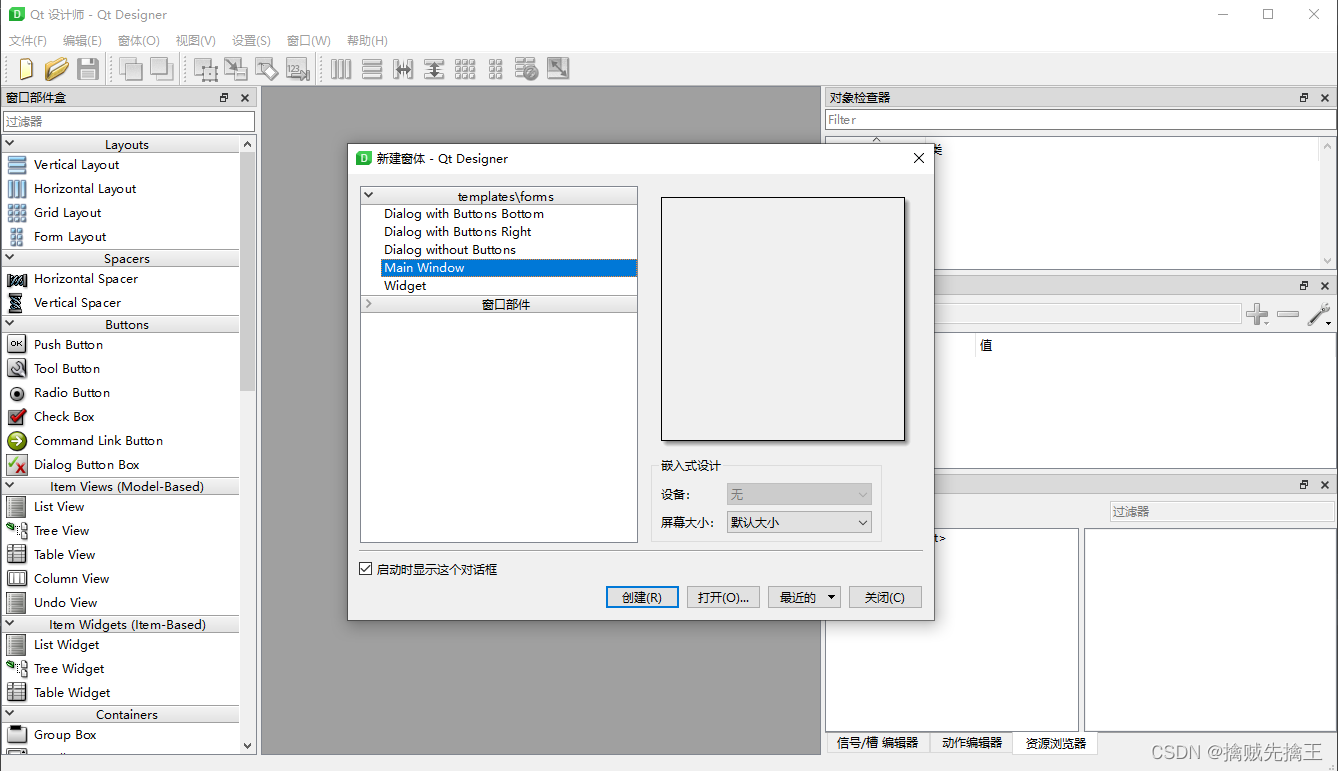
Create a new Form to give 5 templates, of whichWidget and MainWindow Most commonly used. Create one hereMainWindow Essence The leftmost menu of the above interface is Widget Box. The Widget Box contains all Widget components. Drag out components such as button, view, and input from the left widget box to the middle window.
Click the menu bar ---> Window ---> Preview (the shortcut key is CTRL+R), you can preview the designed interface, or "preview and" to select preview under the corresponding theme style.
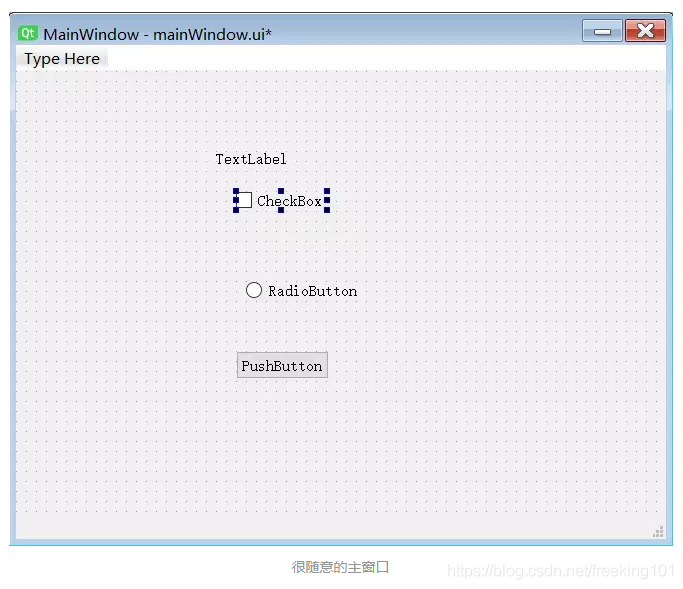
Drag a label and Button to enter the main window (Main Window).
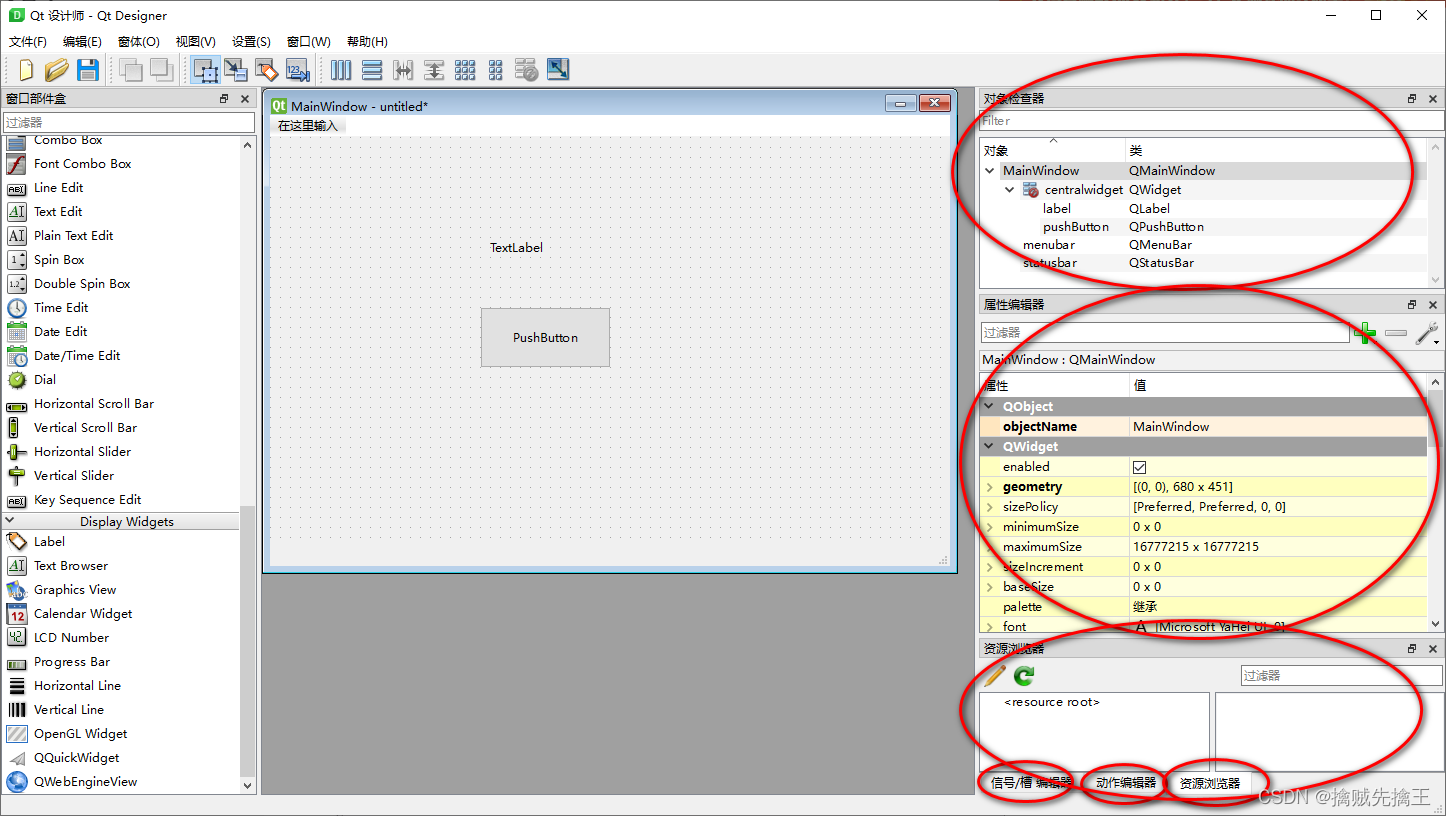
At this time in the upper right corner Object Inspector (Object inspector) You can see the placed objects in the main window (label and pushbutton) and its corresponding QT class. Taking Label as an example, click Label in Main Window or select Label in Object Inspector, check the right area of the right area, which mainly contains the attributes as follows: the attributes are as follows:
| name | meaning |
|---|---|
| objectName | Control object name |
| geometry | Corresponding width and height and coordinates |
| sizePolicy | Control size strategy |
| minimumSize | The smallest width and height |
| maximumSize | The largest width and height |
| font | Font |
| cursor | cursor |
| ... | ... |
PS: After setting minimumsize and Maximumsize to the same value, the size of the window is fixed.
The part in the bottom corner is the Resource Browser. The resource browser can add corresponding places such as picture materials, as background pictures of controls such as Label or Button.
Qt Designer's UI file
Use the Qt Designer design program interface, and then the file saved files are .UI format files. After saving and using software such as notepad, you can see the content of the .ui file as follows:
From the first line of the .UI file, we can see that the essence is a XML file. The UI files are stored in the relevant attributes of all controls in the main window. Use XML files to store UI files, which are highly readable and transplanted, so we can easily convert the .ui file to .py files, so that we could use the Python language to program on the GUI designed by the Python language.
5. PYQT5 Fasting Tutorial --- 3 Layout Management
Qt Designer layout:Getting started with PyQt5-3-Qt Designer layout
Use Qt Designer design interface:Use Qt Designer to design the interface
Booking Xue Dingzheng's Cat Brief Book:
Layout management
In Qt Designer, there are 4 layouts at the top of the toolbox. Separate
- Vertical layout
- Horizontal layout
- Grid layout
- Form layout
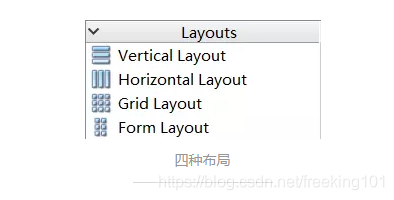
| Layout name | Layout meaning |
|---|---|
| Vertical (vertical) layout | The controls in the layout are arranged vertically in the order from top to bottom |
| Horizontal layout | The controls in the layout are arranged horizontally from left to right |
| Grid (grid) layout, Also called grid layout |
Put the control in the grid, then divide it into several lines and several columns, and place each window control in a suitable unit |
| Form (FORM) layout | The control is layout in the form in the form, the left column contains the label, and the right column contains the input control |
There are two ways to implement the layout in Qt Designer.
- pass Layout manager Layout
- pass Container Perform layout.
pass Layout manager Layout
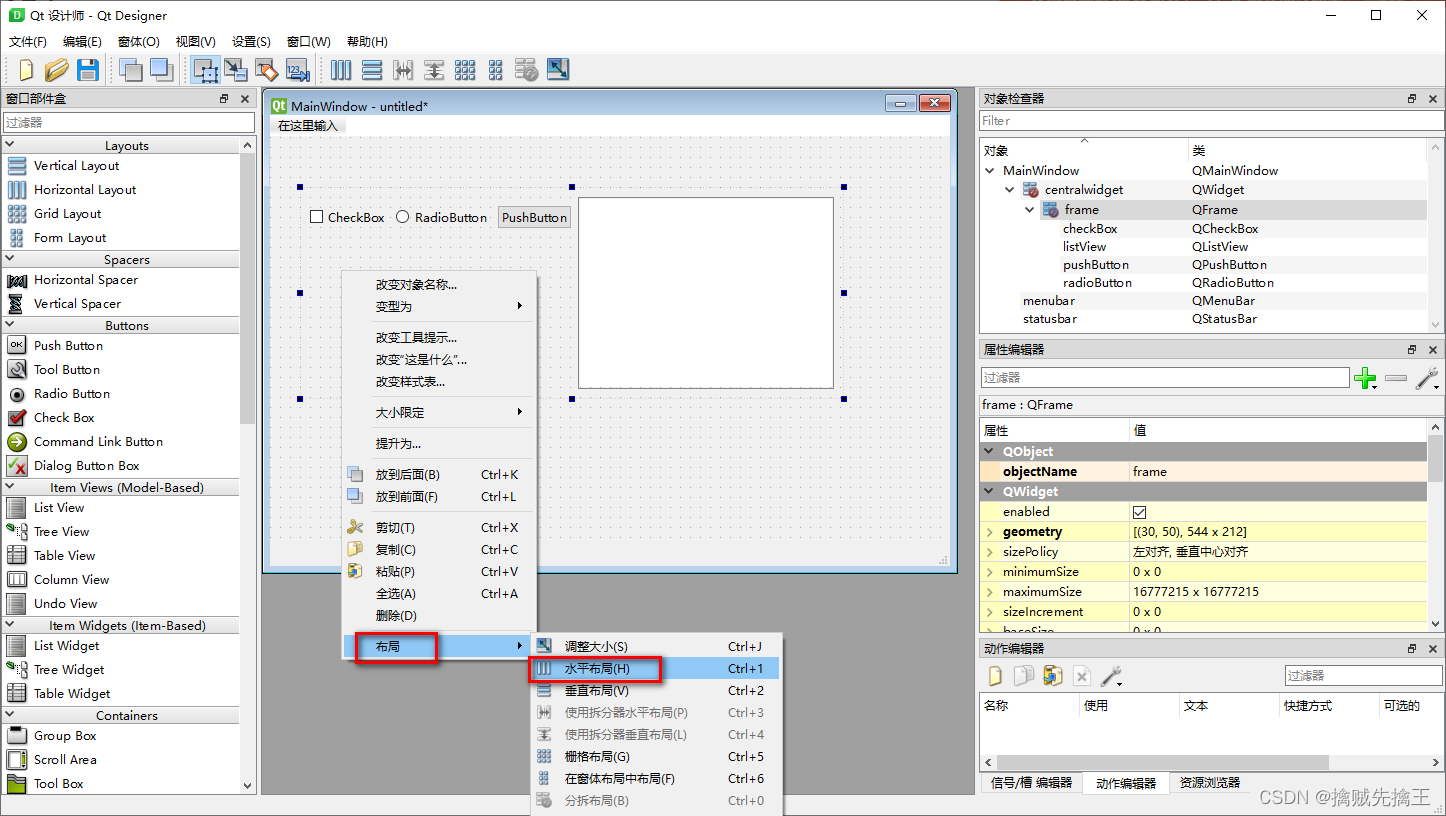
Drag some controls in the toolbox on the left, such as: buttons, labels, input boxes and other controls to the main window.
Because it was just dragged to the main window just now, the emissions of all controls were messy. At this time, we do not choose any control, right -click in the blank space, and find the layout of the latter layout at the bottom of the pop -up menu.
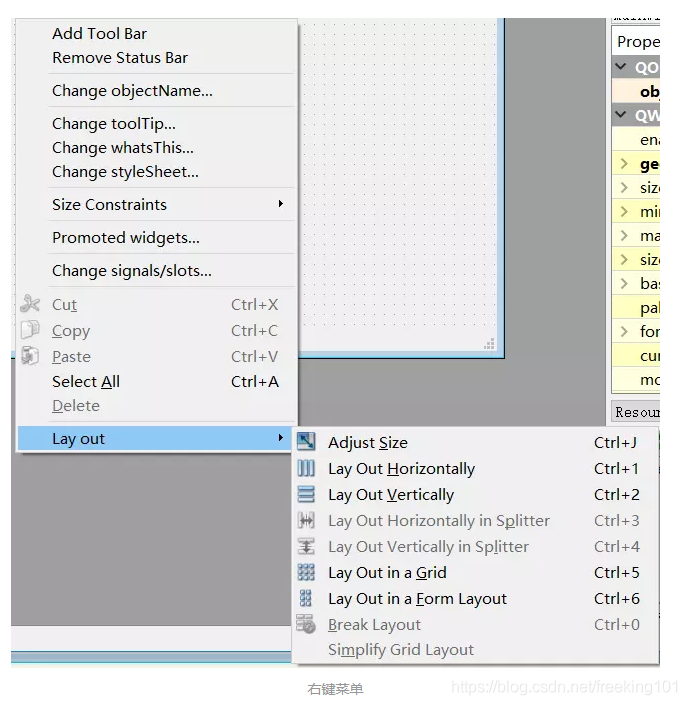
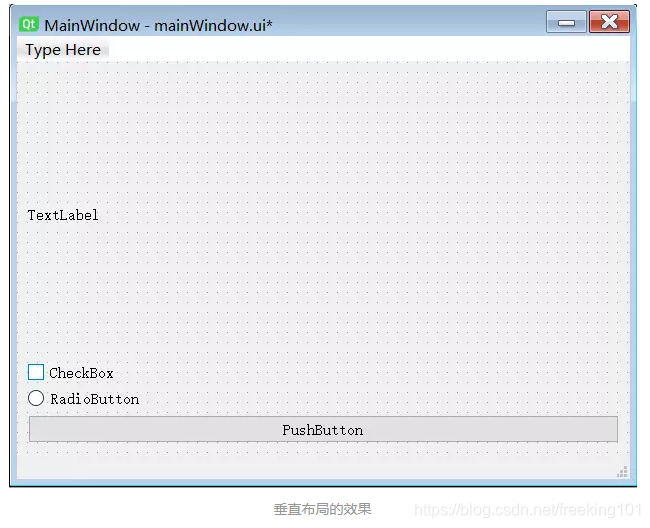
It can be seen that in the right -click menu, the layout can be specified and the shortcut key to the corresponding layout method. Here we choose Lay Out Vertically (vertical layout), and all controls in the entire main window are vertically arranged and arranged in an instant.
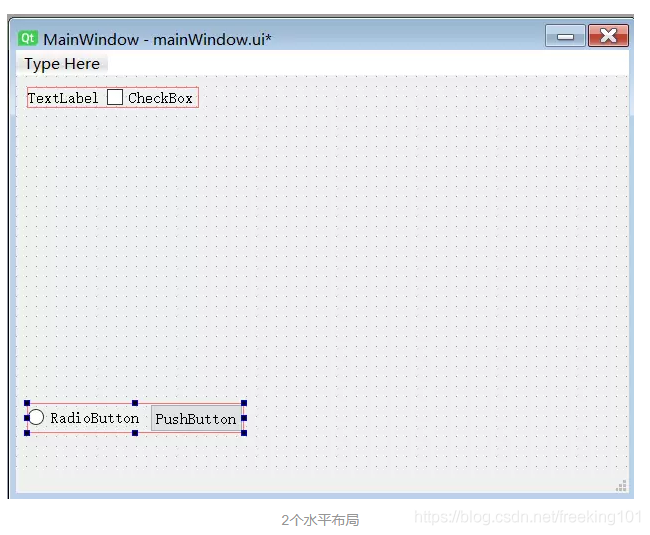
If you need to adjust the order of vertical layout, just press the control to be adjusted and drag it up and down. But this layout is aimed at the entire window, and sometimes we need to let different layouts have the inheritance of father -son relationships. Then you can't simply click on the blank place to lay out in a blank place.
Once again, click Right -click-> layout-> Disassembling layout ", and then select 2 controls that require horizontal layouts. After selecting, click right -click, and the horizontal layout. Select the other two controls and select the horizontal layout. At this time, the main window should be shown in the figure:
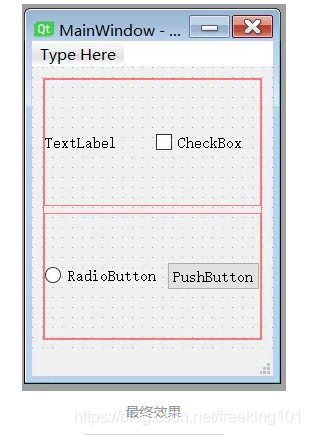
Finally, we select the two layouts and right -click vertical layout to arrange two horizontal layouts.
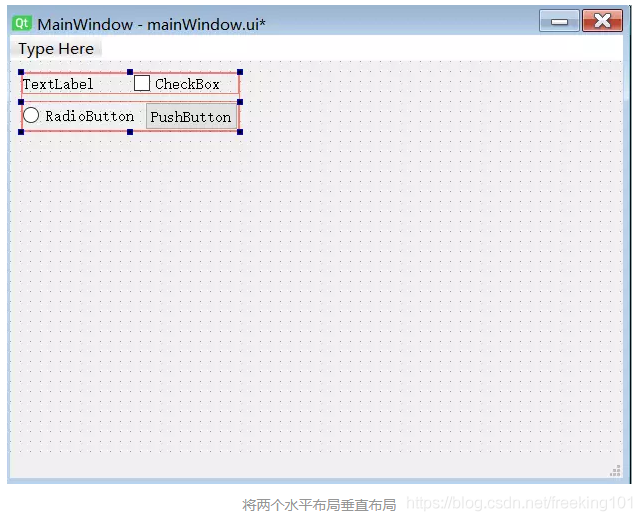
Finally, the vertical layout is used again in the blank area. In this way, even if we zoom in the window, the control in the entire window will make corresponding changes with the changes in the window.
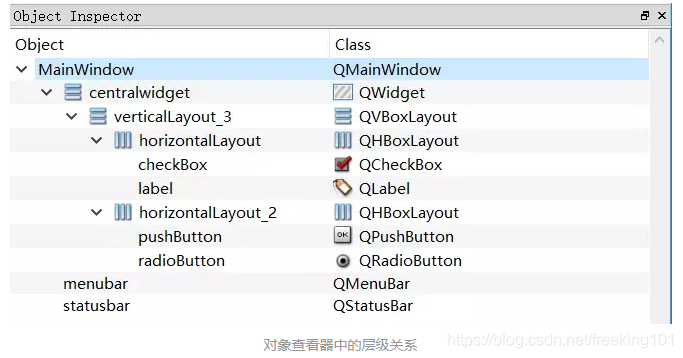
In the process of the above operations, our series of operations determine the father -son relationship (hierarchical relationship) of these objects. The hierarchical relationship can be seen intuitively in the object viewer.
Layout management Generate code
Save the layout to the .UI file and use pYUIC to .py file.
use container Layout
Container refers to a control that can accommodate other sub -controls. Use a container control to attribute all the controls in the container control to one category, thereby distinguishing from other controls. Of course, as mentioned above, the container can also lay out the control.
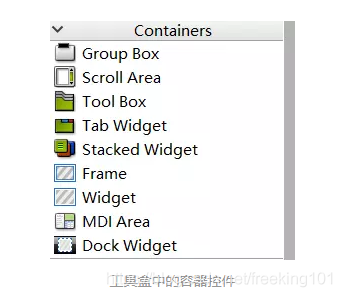
First, drag a Frame control from the container on the left to the main window, and then some other controls are dragged into the Frame. As shown below:
Select the blank place in the Frame, right -click-> layout-> horizontal layout, and will automatically arrange the control in Frame horizontally.

When we need to change the position of the Frame, we can directly drag Frame to the corresponding location, so that management is more convenient. The essence of the use of a container for layout is also using the container manager for layout.
Absolute layout
I learned the layout manager earlier. But the simplest layout is the GEOMETRY attribute value of the input control.
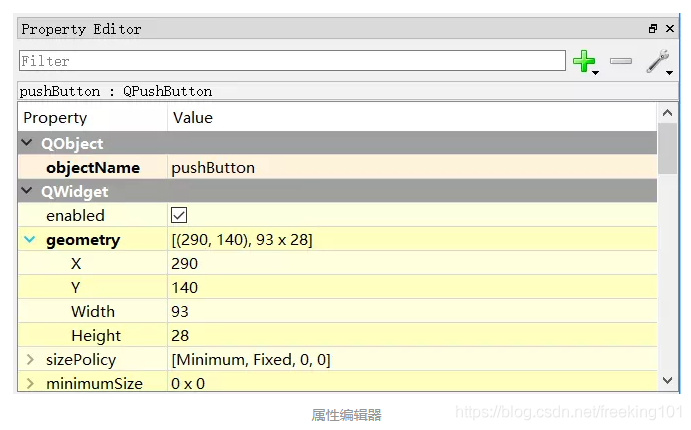
In the attribute editor, the X and Y values can be modified to place the controls in the corresponding position, and the width and height are modified to change the control height.
| name | value | meaning |
|---|---|---|
| X | 290 | 290px on the left of the main window at the upper left corner of the control |
| Y | 140 | 140px above the main window of the main window at the top of the control |
| Width | 93 | The width of the button is 93px |
| Height | 28 | The height of the button is 23px |
The above geometry attributes are as follows in the .py code:
self.pushButton = QtWidgets.QPushButton(self.centralwidget)
self.pushButton.setGeometry(QtCore.QRect(290, 140, 93, 28))
self.pushButton.setObjectName("pushButton")
It can be seen that the second line of the above code specifies the four values of the Geometry attribute through the setgeometry method. Through the above methods, we can lay out any control.
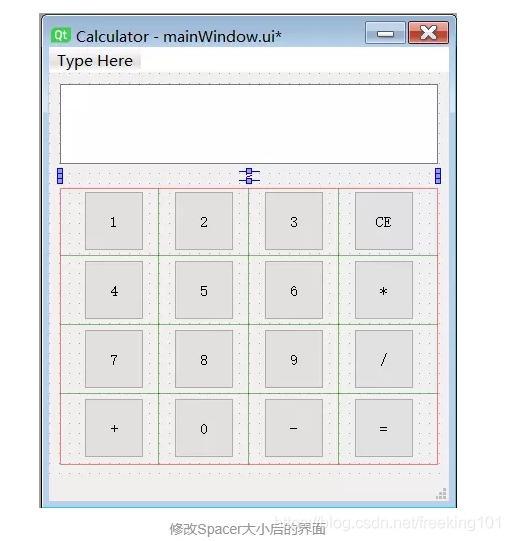
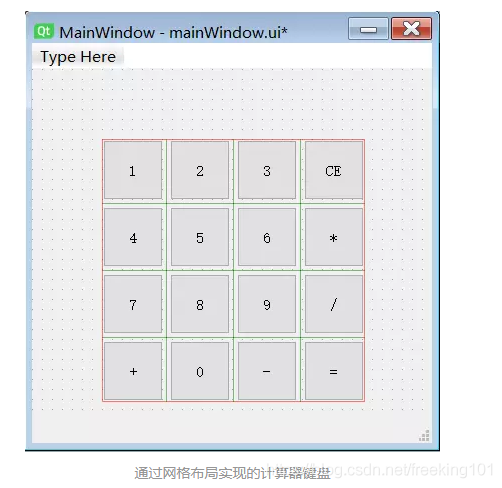
6. Designer actual combat --- calculator interface
Use grid layout (Grid Layout)
First analyze some buttons required by the integer calculator:
Digital keys: 10-9 in total.
Operations:+ - * / = CE total 6
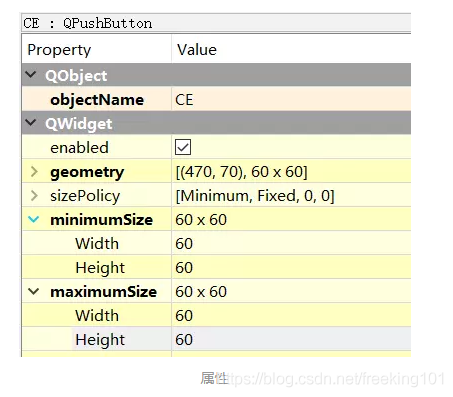
After creating 16 buttons in the main window of Designer, place it in the order of 4 lines and 4 columns.
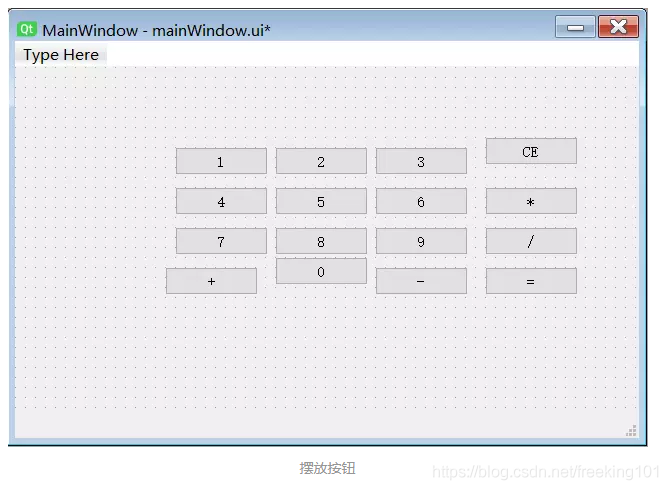
And the ObjectName in the modification button's attribute is a relatively name. For example, the ObjectName of Number 0 is set to NUM_0, and the ObjectName of the operator + is set to OP_PLUS. The modification of the display name of the button, double -click the corresponding button in the main window, can be modified quickly. Since the button in the calculator is square (usually a square), and do not want to change these buttons according to the size of the window, select 16 buttons in the entire window (use the left mouse button in the main window to drag out the selection box, select 16 buttons to select 16 buttons ) Find mininumsize and Maximumsize properties on the right. Click the arrow symbol on the left to expand the option to fix it to 60. This will not change the size of the button due to the zoom window.
After completing the corresponding operation of all buttons, we select 16 buttons, right -click, and use the grid layout to achieve the layout.
Use Spacer to increase blank interval
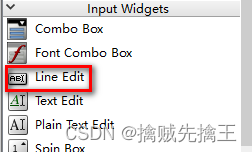
In the input control panel, drag a LINE EDIT control to the calculator window to display the input results and calculation results.
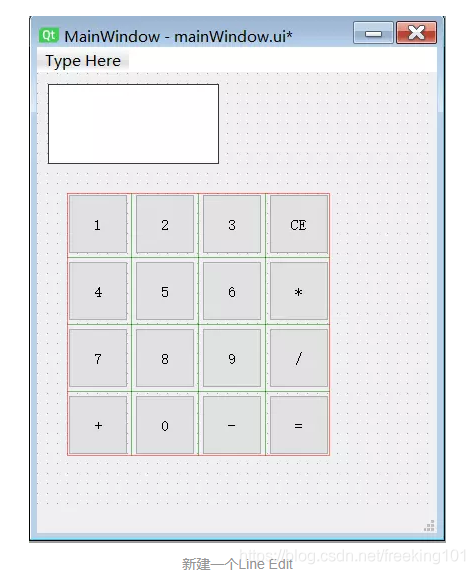
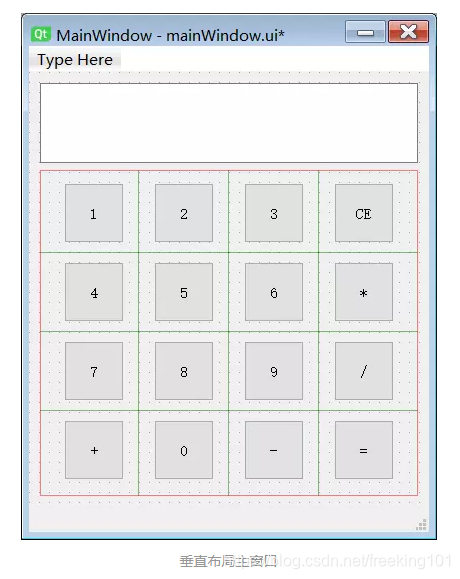
By right -click in the blank place, use Vertical Lay Out for the main window.
At this point, we realized the layout of a calculator. But the display box is too close to the button below. At this time, the Spacer control in the left toolbox needs to be used.
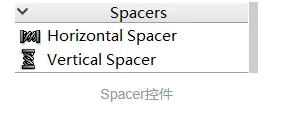
Spacer, as the name implies "Separator". You can separate the different controls in the layout as an example in the form of a place.
At this point, we dragged a Vertical Spacer to Line Edit and the keyboard below. Similarly, the Horizontal Spacer can also be used to separate the distance between controls horizontally.
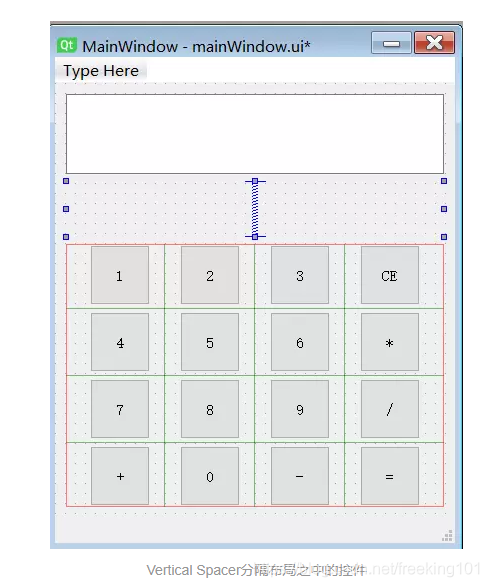
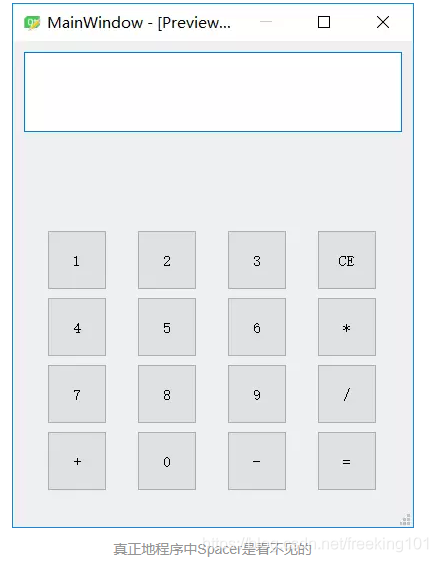
Although Spacer exists in the appearance of a blue -like spring in our QT Designer editor, Spacer is invisible in the real window.
But at this time, the size of the Spacer and the Line Edit are not what they want, and they cannot be dragged through the mouse. If you want to change these, you need to learn more about some attributes of these controls.
SizePolicy Size Strategy
In Designer, the size of the control can be changed. Each control has two sizes: Sizehint and Minisizehint. Sizehint is the size prompt; minisizehint is the minimum size. The size prompt is also the expected size of the control, and the minimum size is the minimum size that can be compressed to. SizePolicy is closely related to Sizehint and Minisizehint.
When the layout in the layout manager cannot meet the requirements, the SizePolicy attributes come in handy.
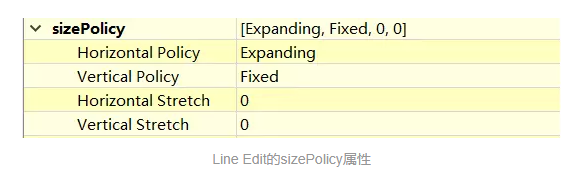
SizePolicy can achieve fine -tuning control. The CCP of Sizepolicy has the following levels and vertical strategies.

Parameter Description:
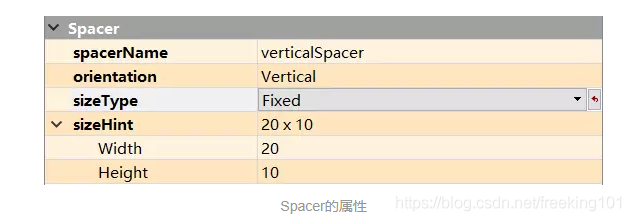
There are two attributes of Horizontal Stretch and Vertical Stretch under Sizepolicy's Horizontal Policy and Vertical Policy. Now find Spacer and modify the Height of its attributes to 10.
And modify its size to fixed. At this time, the spacing between LINE EDIT and the following keyboards on the main interface of the calculator on the left becomes smaller.