A brief introduction to Android virtual machine - ART, Dalvik, startup process analysis
The knowledge of Android virtual machine, I learned through "In-depth understanding of Android kernel design ideas", the content is particularly large (only one chapter, but there are 160 pages), feeling and Android development is somewhat biased, so many contents are not seriously Look, such as the EFL format, etc., here is just a few simple introductions that are more important to feel.
Virtual machine basics
Java VM
See "In-depth Understanding of Java Virtual Machines" for details.
LLVM
LLVM is called Low Level Virtual Machine, but it has nothing to do with virtual machines. The official definition is: The LLVM Project is a colection of modular and resuable compiler and toolchain technologies. That is, the value of LLVM is modular and reusable.
The LLVM framework looks like this:

Frontend: Responsible for analyzing source code, checking for errors, and then compiling the source code into an abstract syntax tree
Optimizer: Improve the efficiency of your code through a variety of optimization methods, to a certain extent independent of the specific language and target platform
Backend: Also known as the code generator, it is used to convert the aforementioned source code into the target foreground instruction set.
Modularity of LLVM:
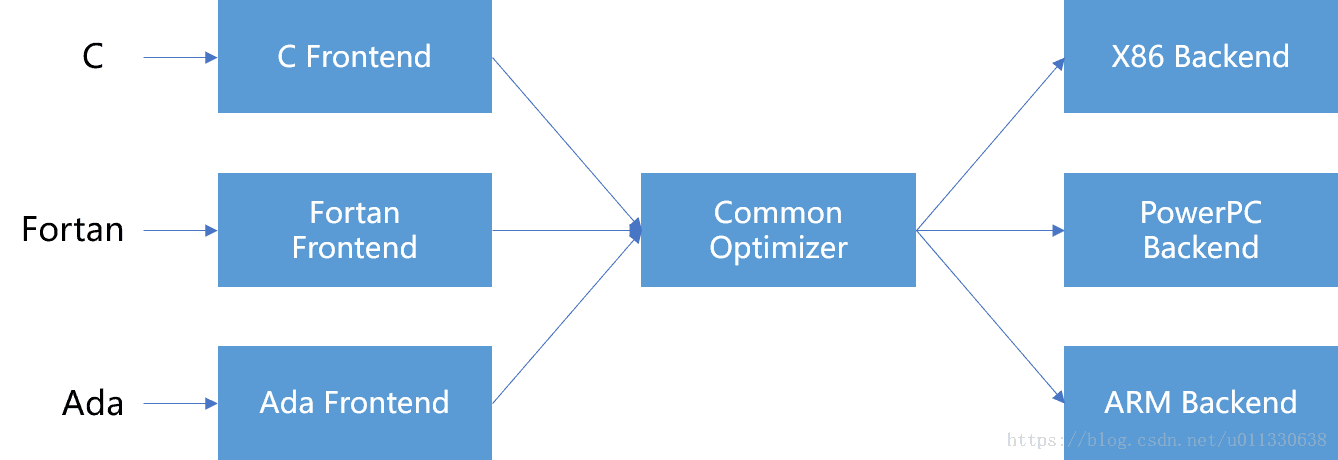
It can be seen that if you want the LLVM framework-based compiler to support a new language, all you have to do is implement a new Frontend, and the existing Optimizer and Backend can be reused. The key to the realization of the above capabilities lies in LLVM's Intermediate Representation (IR). IR can express various source code in a relatively independent way in the LLVM compiler (specifically in the Optimizer phase), which is a good divestiture of each The difference between different languages, and thus the reuse of modules.
The relationship between LLVM and Android can be referred to one answer from RednaxelaFX Great God:What do LLVM do in Android?
In short, starting with the Jellybean MR1 release, Google uses LLVM as an alternative to the Android toolchain and Android NDK, which can be used to compile C/C++ code in Android applications.
Classic garbage collection algorithm in Android
Whether it's Dalvik or Art in Android, the garbage collection algorithms they use are based on Mark-Sweep.
The trigger timing of the GC is:
-
GC_FOR_MALLOC. The program tries to allocate a new memory block when the heap memory is full.
-
GC_CONCURRENT, heap memory exceeds a certain threshold, triggering parallel GC events
-
GC_HPROF_DUMP_HEAP, the developer actively requested to create HPROF
-
GC_EXPLICIT, the program actively calls the gc() function to avoid this usage.
The battle between Art and Dalvik
Dalvik is a standard virtual machine before Android 4.4. For performance reasons, Dalvik's efforts include:
-
Multiple Class files are merged into one Dex file to save memory space
-
Dex files can be shared between multiple processes
-
Complete the bytecode verification before the application runs because the verification operation is time consuming
-
Optimized bytecode
-
Code shared by multiple processes cannot be edited at will, for security
However, since the birth of Android, it has been burdened with “the system is huge and the operation is slow.” Therefore, since Android 4.4, Art has officially entered the field of vision in the form of coexistence with Dalvik, and officially replaced Dalvik in Android Lollipop. s position.
Art has a significant performance advantage over Dalvik. The main reason is that the Dalvik virtual machine has to execute Dex data in an interpreter mode in most cases. Although JIT can improve efficiency to a certain extent, it is only for a small one. In some cases, the effect is limited; and the Art Virtual Machine uses AOT (Ahead Of Time) technology, which greatly improves performance.
The JIT in Dalvik only compiles some hot code into machine code during the running of the program, which also increases the burden on the CPU to some extent. AOT will translate the Java code into machine code for the target platform in advance. Although this means that the compilation time has increased, the build of the Android system is slow, so this sacrifice is worthwhile.
Art virtual machine overall framework
Whether it is Dalvik or Art, or new virtual machines that may appear in the future, the functions they provide will be encapsulated in a single library, and the JNI_GetDefaultVMInitArgs, JNI_CreateVM and JNI_GetCreatedJavaVMs interfaces need to be exposed. Users (such as Zygote) only need to follow A unified interface standard can control and use all types of virtual machines.
The core self-contained systems that make up the Android virtual machine include, but are not limited to, Runtime, ClassLoader System, Execution, Engine System, Heap Manager, and GC systems, JIT, JNI environments, and more.
Like the standard JVM, the class loader plays a very important role in the Android virtual machine. It can be divided into Boot ClassLoader, System ClassLoader, Dex ClassLoader, etc. All loaded classes and their constituent elements will be unified by ClassLinker. Management.
In addition to the way bytecode interpretation is performed, Art also supports direct execution of bytecode compiled machine code via AOT. There are two compile times for AOT: compile with Android ROM build, and compile when the program is installed (for third-party applications). Art introduced a new storage format, the OAT file, to store the compiled machine code. The loading of OAT machine code requires the basic capabilities of ELF.
In addition, due to the brains of the Dex conversion to OAT in the installation phase caused a certain waste of resources, from the Android N version, Art changed the previous OAT strategy - the program is no longer unified dex2oat installation, but changed It is determined by the actual operation of the program which parts need to be compiled into the local code, that is, the three positions of Interpreter, JIT and OAT are restored. On the one hand, this new change has greatly accelerated the installation speed of the program, and solved the problem that the user needs to go through a long wait when the system is updated; on the other hand, since the first startup of the program must be run through the interpreter, the Android N version must be adopted. The means (new interpreter, moving Verification forward, etc.) to ensure that the program's startup speed is not affected.
In addition to interpreting execution, the application will do JIT compilation in real time during the run - but its results will not be persisted. In addition, the virtual machine records the functions that the application has been executed during the dynamic run and outputs it to the profile file.
The AOT compile daemon will wake up when the system meets both the idle and charge states, and iteratively traverses the AOT optimization of the executing application. Since the number of functions participating in AOT is usually only a small part of the application code, the overall AOT result of the Android N version takes up much less space than the old version.
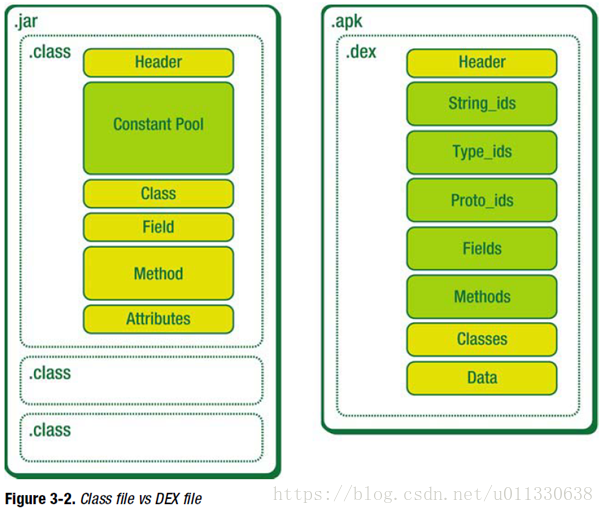
Dex bytecode
Comparison of Java class files and DEX files:
ELF file format
The biggest feature of the Art virtual machine is that it precompiles Dex into an oat file containing machine instructions via dex2oat, which significantly improves the execution efficiency of the program. The oat file itself is an extension of the Linux-based executable file format, ELF.
ELF files support at least 3 forms: Relocatable File, Executable File, Shared Object File.
A concrete example of a Relocatable File is the .o file, which is an intermediate file that is generated during compilation.
The Shared Object File is a dynamic link library, usually suffixed with ".so".
The feature of the static link library is that the address resolution of functions and variables is completed during the compilation and link phase of the program, making it an integral part of the executable program.
The dynamic link library does not need to be packaged into the executable at compile time, but waits for the latter to implement dynamic loading and relocation during the run phase. After the dynamic link library is loaded into memory, the operating system needs to perform dynamic join operations for it.
The processing of the dynamic link library is as follows:
-
At the compile stage, the program undergoes precompilation, compilation, assembly, and linking operations, resulting in an ELF executable. At the same time, the dynamic library that the program depends on will be recorded in the .dynamic section; the Linker required to load the dynamic library is indicated by .interp.
-
After the program runs, the system first finds the absolute path of the connector through the .interp section, and then gives control to it.
-
Linker is responsible for parsing the records in .dynamic and getting all the dynamic link libraries that the program depends on.
-
After the dynamic link library is loaded, the address of the export function contained in the memory can be determined. Linker uses a preset mechanism (such as GOT) to ensure that the program references to the external function can work normally, that is, complete Dynamic. Relocation
OAT
There are several file format suffixes associated with OAT:
-
.art, this file, also known as image, is generated by the dex2oat tool. It contains a lot of Dex files inside. It stores the loaded class information and some pre-created objects. Zygote will load the boot during startup. .art
-
.oat, generated by the dex2oat tool, which is stored internally by boot.oat
-
.odex, in Dalvik, .odex represents the optimized Dex file; there are also odex files in Art, but not the same as in Dalvik
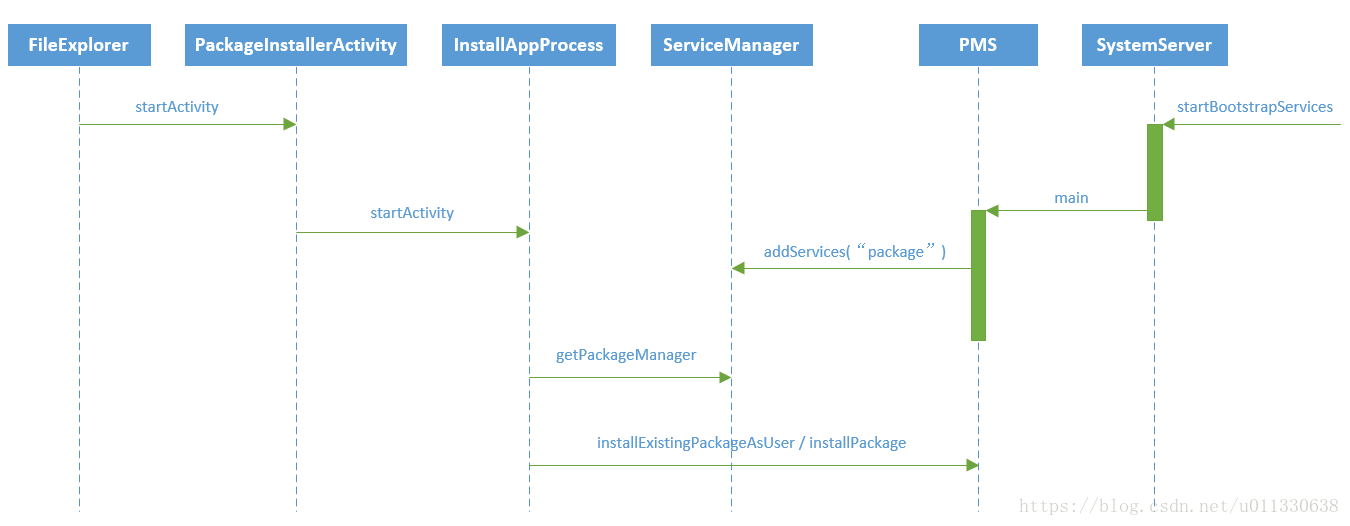
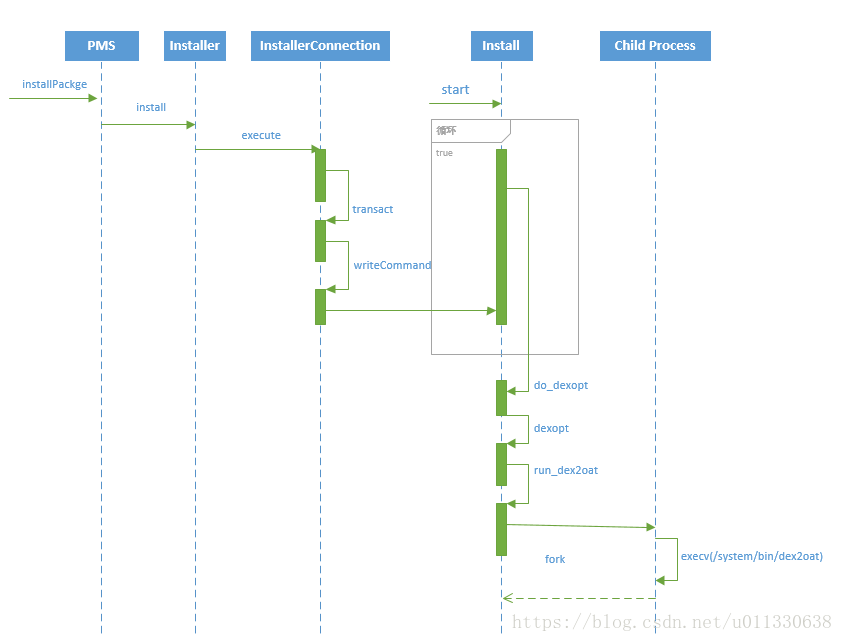
Application installation process:
Typical startup process for Android virtual machines
The general flow chart of the Android virtual machine startup is as follows:
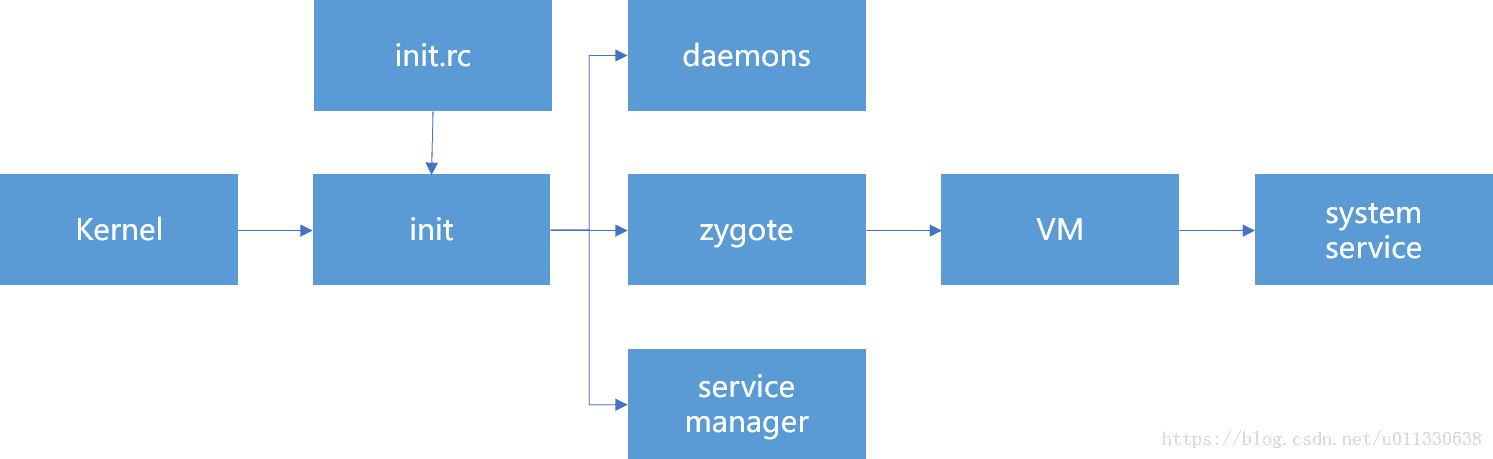
The following analysis of the specific code execution process, first look at the script init.rc and zygote related content:
service zygote /system/bin/app_process -Xzygote /system/bin --zygote --start-system-server
    class main
    socket zygote stream 660 root system
    onrestart write /sys/android_power/request_state wake
    onrestart write /sys/power/state on
    onrestart restart media
    onrestart restart netd
App_process is the vector of zygote whose main function is as follows:
int main(int argc, const char* const argv[])
{
    ...
    if (zygote) {
        runtime.start("com.android.internal.os.ZygoteInit",
                startSystemServer ? "start-system-server" : "");
    } else if (className) {
        ...
        runtime.start("com.android.internal.os.RuntimeInit",
                application ? "application" : "tool");
    } else {
        ...
    }
}
Runtime refers to AndroidRuntime:
void AndroidRuntime::start(const char* className, const Vector<String8>& options, bool zygote)
{
    JniInvocation jni_invocation;
         jni_invocation.Init(NULL); // Initialize the current runtime environment

    JNIEnv* env;
         If (startVm(&mJavaVM, &env, zygote) != 0) { // Start the virtual machine
        return;
    }

         onVmCreated(env); // The virtual machine is created successfully, and the callback function is executed to notify the caller.

    /*
     * Register native function
     */
    if (startReg(env) < 0) {
        ALOGE("Unable to register all android natives\n");
        return;
    }

    /*
           * Start executing the main function of the target object
     */
    char* slashClassName = toSlashClassName(className != NULL ? className : "");
    jclass startClass = env->FindClass(slashClassName);
    if (startClass == NULL) {
        ALOGE("JavaVM unable to locate class '%s'\n", slashClassName);
        /* keep going */
    } else {
                 / / Execute the main function
        jmethodID startMeth = env->GetStaticMethodID(startClass, "main",
            "([Ljava/lang/String;)V");
        if (startMeth == NULL) {
            ALOGE("JavaVM unable to find main() in '%s'\n", className);
            /* keep going */
        } else {
            env->CallStaticVoidMethod(startClass, startMeth, strArray);
#if 0
            if (env->ExceptionCheck())
                threadExitUncaughtException(env);
#endif
        }
    }

}
Before starting the virtual machine, you need to initialize the current running environment, which is implemented by JniInvocation::Init:
bool JniInvocation::Init(const char* library) {
    Library = GetLibrary(library, buffer); // Get the name of the virtual machine dynamic link library

         Handle_ = dlopen(library, kDlopenFlags); // Open virtual machine dynamic link library

    ...

         / / Find the three important interface implementations in the VM library
         // Whether it is ART, Dalvik, or other virtual machines in the future, these three interfaces need to be implemented. They are unified interface standards.
         // zygote controls Android's virtual machine through these 3 interfaces
    if (!FindSymbol(reinterpret_cast<void**>(&JNI_GetDefaultJavaVMInitArgs_),
                  "JNI_GetDefaultJavaVMInitArgs")) {
        return false;
    }
    if (!FindSymbol(reinterpret_cast<void**>(&JNI_CreateJavaVM_),
                  "JNI_CreateJavaVM")) {
        return false;
    }
    if (!FindSymbol(reinterpret_cast<void**>(&JNI_GetCreatedJavaVMs_),
                  "JNI_GetCreatedJavaVMs")) {
        return false;
    }

    return true;
}
The virtual machine can now be started and initialized, and the core work is done in startVm:
int AndroidRuntime::startVm(JavaVM** pJavaVM, JNIEnv** pEnv, bool zygote)
{
    ...
    if (JNI_CreateJavaVM(pJavaVM, pEnv, &initArgs) < 0) {
        ALOGE("JNI_CreateJavaVM failed\n");
        return -1;
    }
    return 0;
}
As you can see, it calls the JNI_CreateJavaVM interface found in JniInvocation::Init , which is used to create a virtual machine:
extern "C" jint JNI_CreateJavaVM(JavaVM** p_vm, JNIEnv** p_env, void* vm_args) {
  ...

  RuntimeOptions options;
     For (int i = 0; i < args->nOptions; ++i) { // parse all virtual machine options
    JavaVMOption* option = &args->options[i];
    options.push_back(std::make_pair(std::string(option->optionString), option->extraInfo));
  }

  bool ignore_unrecognized = args->ignoreUnrecognized;

     If (!Runtime::Create(options, ignore_unrecognized)) { // Create a Runtime runtime environment
    return JNI_ERR;
  }


  android::InitializeNativeLoader();
  Runtime* runtime = Runtime::Current();
     Bool started = runtime->Start(); // Start its managed virtual machine with Runtime
     If (!started) { // startup failed
    delete Thread::Current()->GetJniEnv();
    delete runtime->GetJavaVM();
    LOG(WARNING) << "CreateJavaVM failed";
    return JNI_ERR;
  }

  *p_env = Thread::Current()->GetJniEnv();
     *p_vm = runtime->GetJavaVM(); // Get the virtual machine example that has been started and pass it to the caller

  return JNI_OK;
}
After Runtime::Start has successfully started a virtual machine, it will be initialized by the Init function:
bool Runtime::Init(RuntimeArgumentMap&& runtime_options_in) {

  ...

     Heap_ = new gc::Heap(...); // Create heap management object

  ...

     Java_vm_ = JavaVMExt::Create(this, runtime_options, &error_msg); // Create a Java virtual machine object


  Thread::Startup();
     Thread* self = Thread::Attach("main", false, nullptr, false); // main thread attach

  if (UNLIKELY(IsAotCompiler())) {
    class_linker_ = new AotClassLinker(intern_table_);
  } else {
    class_linker_ = new ClassLinker(intern_table_);
  }

     If (GetHeap()->HasBootImageSpace()) { // Whether the current Heap contains a Boot Image (eg boot.art)
    bool result = class_linker_->InitFromBootImage(&error_msg);
    ...
  } else {

    if (runtime_options.Exists(Opt::BootClassPathDexList)) {
      boot_class_path.swap(*runtime_options.GetOrDefault(Opt::BootClassPathDexList));
    } else {
      OpenDexFiles(dex_filenames,
                   dex_locations,
                   runtime_options.GetOrDefault(Opt::Image),
                   &boot_class_path);
    }

    instruction_set_ = runtime_options.GetOrDefault(Opt::ImageInstructionSet);

    if (!class_linker_->InitWithoutImage(std::move(boot_class_path), &error_msg)) {
      LOG(ERROR) << "Could not initialize without image: " << error_msg;
      return false;
    }
    // TODO: Should we move the following to InitWithoutImage?
    SetInstructionSet(instruction_set_);
    ...
  }

  return true;
}
to sum up:
-
Android virtual machine is started when init.rc is parsed
-
Init.rc calls the start method of AndroidRuntime to start the Android virtual machine when parsing zygote
-
AndroidRuntime first initializes the runtime environment through JniInvocation::Init and finds three standard interfaces JNI_GetDefaultVMInitArgs, JNI_CreateVM and JNI_GetCreatedJavaVMs.
-
Then execute startVm. After this method is successfully executed, the Android virtual machine is actually started.
-
One of the standard interfaces found before the startVm internal call JNI_CreateVM
-
JNI_CreateVM internally created a Runtime runtime environment and started the virtual machine through Runtime
-
After the virtual machine is successfully started, the Runtime::Init method is called to initialize the virtual machine, including: creating a Java virtual machine, creating a Heap heap management object, loading the main thread, etc.
-
Finally, notify the virtual machine that it has been successfully created by the onVmCreated method.
Intelligent Recommendation

Analysis of the running process of Dalvik virtual machine
In the previous article, we analyzed the startup process of the Dalvik virtual machine in the Zygote process. After the Dalvik virtual machine is booted, that is, after each submodule is initialized a...
Android Dalvik virtual machine Dalvik instruction set - Smali assembly analysis
Command characteristics Dalvik specifies that the C language's calling convention is mimicked on the calling format. The syntax and helper of the Dalvik instruction have the following characteristics:...

Dalvik virtual machine & ART virtual machine
The difference between Dalvik virtual machine and Java virtual machine 1 The Java virtual machine runs Java bytecode, and the Dalvik virtual machine runs Dalvik bytecode. Traditional Java programs are...

android Dalvik virtual machine
forward from: Brief introduction In android5.0, instead of the Dalvik virtual machine ART runtime. Although the Dalvik virtual machine is no longer used, but it had the effect is indelible. Therefore,...

Android Dalvik virtual machine brief (the difference with the Java virtual machine and a brief implementation principle)
First look at the location of the Dalvik virtual machine in the Android system framework diagram: Article directory: First, the virtual machine brief Second, the Java virtual machine brief Third, Dalv...
More Recommendation

Analysis of Dalvik virtual machine process and thread creation process
We know that in the Android system, the Dalvik virtual machine is running on top of the Linux kernel. If we regard the Dalvik virtual machine as a machine, then it also has the concept of processes an...
ART and Dalvik virtual machine debugging GC
Dalvik State corresponds to the definition of the thread (Android4.4, libcore / libdvm / src / main / java / java / lang / VMThread.java) Dalvik virtual machine, every time GC content format print: co...

The difference between Dalvik and ART virtual machine
Dalvik is a Java virtual machine developed by Google to run on the Android platform. After Android is compiled, a dex file is generated.When running Java under the Dalvik virtual machine, the bytecode...
Dalvik virtual machine, Java virtual machine and ART virtual machine
First, the Java virtual machine 1. Java is Java bytecode. The traditional Java program is compiled, and the generated Java bytecode is stored in the class file. The Java virtual machine runs the progr...

Java virtual machine, Dalvik virtual machine and ART virtual machine
Abandoned Dalvik from Android 5.0, fully implementing Art. Dravik and Art of ART (1) Under Dalvik, applyEach time you run, you need to convert the bytecode to a machine code through an instant compile...