Steps to build Tomcat source code development environment with Intellij+Maven
Programming is very practical. It’s just like design patterns. In addition to reading various books and memorizing 23 design patterns, you also need to use them "deliberately" in actual work to deepen your understanding. Otherwise, I don't know why a certain design pattern was born.
For the learning of mature open source frameworks and containers, apart from looking at the source code, it seems that there is no way to start in practice-these guys are too mature and the encapsulation is very good. Most of the time we just use their interfaces and annotations and know how to configure it. It's okay; many people rarely develop and extend the framework in their work; if you want to commit to these successful projects, you can't start unless you have a deep understanding of the project. However, it is difficult to get a deep understanding by looking at the source code. For example, if you follow the most basic BeanFactory class diagram of Spring, you may still not be impressed by walking through various source books because there is no practice.
I personally feel that if we can use the source code to build a development environment in the IDE, repeatedly track the flow of the program through breakpoints and monitor variable values, it can effectively strengthen the understanding of the source code, and it is also a practical way to learn the source code.
This article talks about how to build a development environment for Tomcat source code. Take Tomcat 8.5.23 as an example. The operations of other versions are similar. There are many tutorials on the Internet that talk about this, but they still can’t run after they are built. The tutorial ignores some details. This article references, And corrected some places, more detailed steps.
Let me talk about the development environment first: The Tomcat project is built with Ant. I am not familiar with Ant. Using Maven is actually adding a pom.xml file to the root directory of the source code. Many tutorials use Eclipse to build a development environment. The author uses Intellij: I have used these two IDEs, each has its own advantages and disadvantages, but for source code learning, Intellij is recommended-for novices, the IDE imports various source code projects. What comes is a full screen error report (mainly project configuration, lack of dependency), there is no way to start, enthusiasm will be greatly affected. In this regard, I feel that the information provided by Intellij is more effective, and the suggested solutions are more targeted. In other words, using Intellij is more secure and there will be a certain degree of confidence that can be adjusted;Intellij comes with decompilation and source code download functions. When we are debugging at a breakpoint, if we enter the dependent package file (bytecode), Intellij can directly provide the decompiled file to continue single-step execution, and provide the option of downloading source code. Debugging is very convenient; while Eclipse needs to download plug-ins (Eclipse plug-in downloads and installations may not be successful and can be used), so some people on the Internet say that Eclipse has a lot of useless installations compared to Intellij, and you have to get useful ones yourself. IDE is just a tool, as long as it can complete functions for us, whichever is convenient and natural to use. To make a digression, I think novices have two basic obstacles from contact with programming to work on duty-pointers in the programming stage and memory management (not to mention that Java has no pointers, value transfer, and collection type transfer of immutable objects can bluff Quit many beginners); The development environment of the project phase is set up, especially the reference, management and project configuration of various dependent packages. Basically, beginners find it difficult to enter the problem description in Google. After a week, don’t When it comes to the problem to be solved, even the environment cannot be built up, especially for self-taught students who have no project experience. Of course, the latter becomes simpler in Java with the development of project construction tools and SpringBoot/Cloud, and the richness of network information.
The following describes the specific construction steps:
1. Download the Tomcat source package and (same version) package
Can reachhttp://tomcat.apache.org/Download directly from the official website. Take version 8.5.23 as an example. Download the Source Code Distributions from the source code and download the Core package. In fact, the package is only for catalina.home when starting the source project, so download the zip on the windows platform. There is no need to download the installer. Install it. As shown in Figure 1:

figure 1
If you want to contribute to tomcat commit, you can directly from github (https://github.com/apache/tomcat.git) Download the source code, but the corresponding software package should be downloaded from the official website in the latest beta version (currently 9.0.1)
2. Generate Maven project
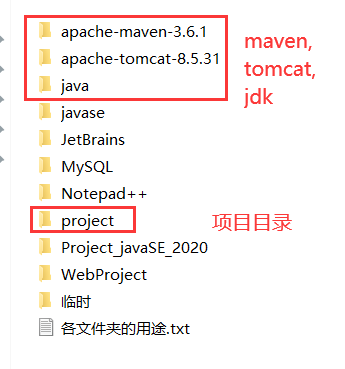
Decompress the source package and the software package separately. After decompression, the specific locations of the two are not important. I put them in a directory, as shown in Figure 2:
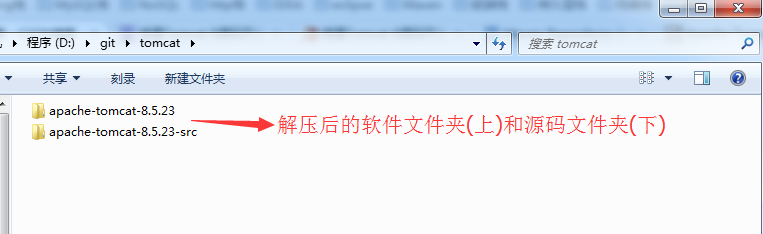
figure 2
Then enter the source code folder and create a new pom.xml file. The content of the pom file for version 8.5.23 is as follows:
<?xml version="1.0" encoding="UTF-8"?>
<project xmlns="http://maven.apache.org/POM/4.0.0"
         xmlns:xsi="http://www.w3.org/2001/XMLSchema-instance"
         xsi:schemaLocation="http://maven.apache.org/POM/4.0.0 http://maven.apache.org/xsd/maven-4.0.0.xsd">

    <modelVersion>4.0.0</modelVersion>
    <groupId>org.apache.tomcat</groupId>
    <artifactId>Tomcat8.5</artifactId>
    <name>Tomcat8.5</name>
    <version>8.5.23</version>

    <dependencies>
        <dependency>
            <groupId>junit</groupId>
            <artifactId>junit</artifactId>
            <version>4.12</version>
            <scope>test</scope>
        </dependency>
        <dependency>
            <groupId>org.easymock</groupId>
            <artifactId>easymock</artifactId>
            <version>3.4</version>
        </dependency>
        <dependency>
            <groupId>org.apache.ant</groupId>
            <artifactId>ant</artifactId>
            <version>1.10.1</version>
        </dependency>
        <dependency>
            <groupId>wsdl4j</groupId>
            <artifactId>wsdl4j</artifactId>
            <version>1.6.2</version>
        </dependency>
        <dependency>
            <groupId>javax.xml</groupId>
            <artifactId>jaxrpc</artifactId>
            <version>1.1</version>
        </dependency>
        <dependency>
            <groupId>org.eclipse.jdt</groupId>
            <artifactId>org.eclipse.jdt.core</artifactId>
            <version>3.13.0</version>
        </dependency>
    </dependencies>

    <build>
        <finalName>Tomcat8.5</finalName>
        <sourceDirectory>java</sourceDirectory>
        <testSourceDirectory>test</testSourceDirectory>
        <resources>
            <resource>
                <directory>java</directory>
            </resource>
        </resources>
        <testResources>
            <testResource>
                <directory>test</directory>
            </testResource>
        </testResources>
        <plugins>
            <plugin>
                <groupId>org.apache.maven.plugins</groupId>
                <artifactId>maven-compiler-plugin</artifactId>
                <version>2.3</version>
                <configuration>
                    <encoding>UTF-8</encoding>
                    <source>1.8</source>
                    <target>1.8</target>
                </configuration>
            </plugin>
        </plugins>
    </build>

</project>
Different versions of Tomcat depend on different packages, and the dependencies in the pom will also change, which can be analyzed in detail. articleTwo dependencies referenced in the pom:
<dependency>
    <groupId>ant</groupId>
    <artifactId>ant</artifactId>
    <version>1.7.0</version>
</dependency>

<dependency>
    <groupId>org.eclipse.jdt.core.compiler</groupId>
    <artifactId>ecj</artifactId>
    <version>4.5.1</version>
</dependency>
The ant package has been migrated to org.apache.ant. If the ant package is used, maven will not be able to download the jar. The ant in the local maven warehouse has not been downloaded to the jar package, as shown in Figure 3:
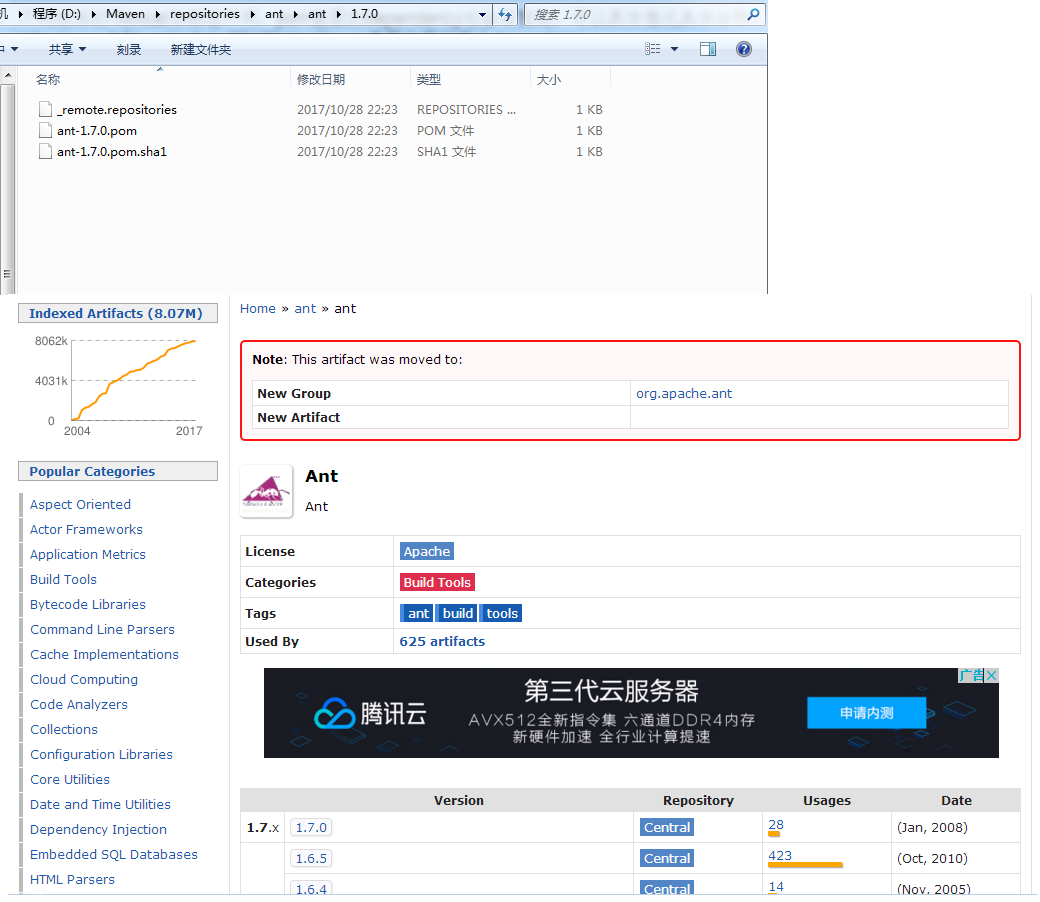
image 3
Here is a digression, when the maven project is imported into the IDE, the project will fail to build. In many cases, it will prompt that the class cannot be found. It may be that the download of the maven dependency package shown in Figure 3 has failed. It may be that the artifact has been downloaded. Migration may also be a network problem. If it is the latter, we need to delete the entire folder corresponding to artifactId in the maven warehouse (such as the folder represented by Figure 3), and then reimport the entire maven project. Sometimes changing the version of the artifactId is also effective.
Regardless, if importing a project fails, please follow the prompts (especially the package information where the error class is located) to the maven repositoryhttp://mvnrepository.com/Finding it can solve many problems.
The ecj package used only in the reference text will cause the classes of other packages in org.eclipse.jdt to fail to be queried. The error message is shown in Figure 4:

Figure 4
So we use the wholeThe core package of org.eclipse.jdt.In addition, there is a tutorial that says to change the file name of the build.properties.default file toBuild.properties can build the project successfully. We are a maven project here. There is no need to modify it. Keep it intact. You only need to change the file name if you are building with Ant.
3. (Optional) Generate git library
If it is a source code package downloaded from the official website, if you want to use git to manage the source code locally, you can create a git warehouse under git init under the source code folder. The content of the gitignore file in the source code package on the official website is relatively complete, but one more line is needed. The content is target/, which is used to ignore the class file output by maven.
4. Import the project into the IDE
Open Intellij—>Import Project—>Select Import Maven Project—>The folder is located in the source code folder—>Import.
After importing, directly building the project will report an error, as shown in Figure 5:

Figure 5
Because the pom I used contains the test project, and the CookieFilter class used by the class TestCookieFilter cannot be found, the solution is to comment out the entire TestCookieFilter, and the who studies the source code will care about the content of the unit test.
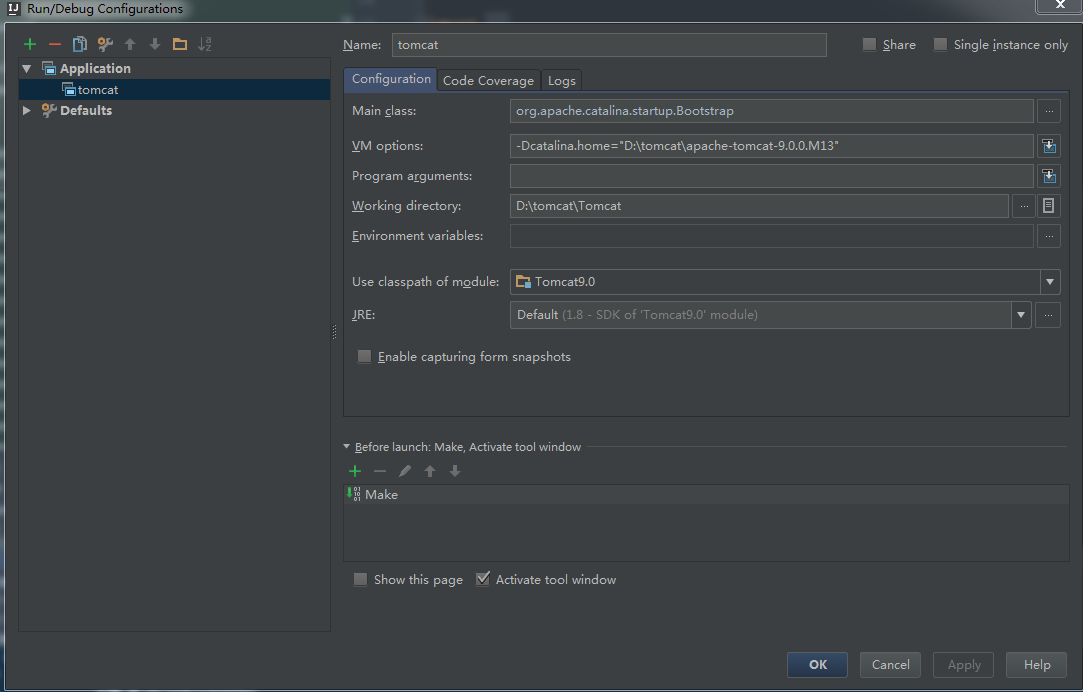
5. Configure startup parameters
At this point, all the error messages after the project has been imported have been resolved, and now the program entry and startup parameters need to be configured. Tomcat's program entry is in the org.apache.catalina.startup.Bootstrap class, from which we can catch the main function alive (familiar taste), but if we right-click on this class and run/debug Bootstrap.main(), an error will be reported, Check the Bootstrap.java source code, the static code block is as follows:
static {
	// Will always be non-null
	String userDir = System.getProperty("user.dir");

	// Home first
	String home = System.getProperty(Globals.CATALINA_HOME_PROP);
	File homeFile = null;

	if (home != null) {
		File f = new File(home);
		try {
			homeFile = f.getCanonicalFile();
		} catch (IOException ioe) {
			homeFile = f.getAbsoluteFile();
		}
	}

	if (homeFile == null) {
		// First fall-back. See if current directory is a bin directory
		// in a normal Tomcat install
		File bootstrapJar = new File(userDir, "bootstrap.jar");

		if (bootstrapJar.exists()) {
			File f = new File(userDir, "..");
			try {
				homeFile = f.getCanonicalFile();
			} catch (IOException ioe) {
				homeFile = f.getAbsoluteFile();
			}
		}
	}

	if (homeFile == null) {
		// Second fall-back. Use current directory
		File f = new File(userDir);
		try {
			homeFile = f.getCanonicalFile();
		} catch (IOException ioe) {
			homeFile = f.getAbsoluteFile();
		}
	}

	catalinaHomeFile = homeFile;
	System.setProperty(
			Globals.CATALINA_HOME_PROP, catalinaHomeFile.getPath());

	// Then base
	String base = System.getProperty(Globals.CATALINA_BASE_PROP);
	if (base == null) {
		catalinaBaseFile = catalinaHomeFile;
	} else {
		File baseFile = new File(base);
		try {
			baseFile = baseFile.getCanonicalFile();
		} catch (IOException ioe) {
			baseFile = baseFile.getAbsoluteFile();
		}
		catalinaBaseFile = baseFile;
	}
	System.setProperty(
			Globals.CATALINA_BASE_PROP, catalinaBaseFile.getPath());
}
The code details are not detailed. The main logic of this static code block is that when the JVM loads Bootstrap.class, it will read the path represented by the catalina.home variable set by the system as the Tomcat installation path. If catalina.home is not set when the project is started, the current path (that is, the path where the project is located, for us is the tomcat source folder) will be used as the tomcat installation path(If the working path of tomcat is not set at the same time, that is, catalina.base, then catalina.base will be set to catalina.home, which is the current path. The difference between home and base, you can find another article, it is explained very clearly )。
Obviously our source code path is definitely not the tomcat installation path. Because there is no lib/ required for tomcat startup in the source code folder, and whether other configurations (conf/, logs/, temp/, webapps/, work/, etc., which are related to catalina.base) are consistent with the software version. This is why we need to download the tomcat software package while downloading the source code, which is used to specify catalina.home (and indirectly specify catalina.base) when we start the source project.
Configure the startup parameters as shown in Figure 6, 7, and 8:

Image 6

Figure 7

Figure 8
Then run or debug under the newly created startup configuration, as shown in Figure 9:

Picture 9
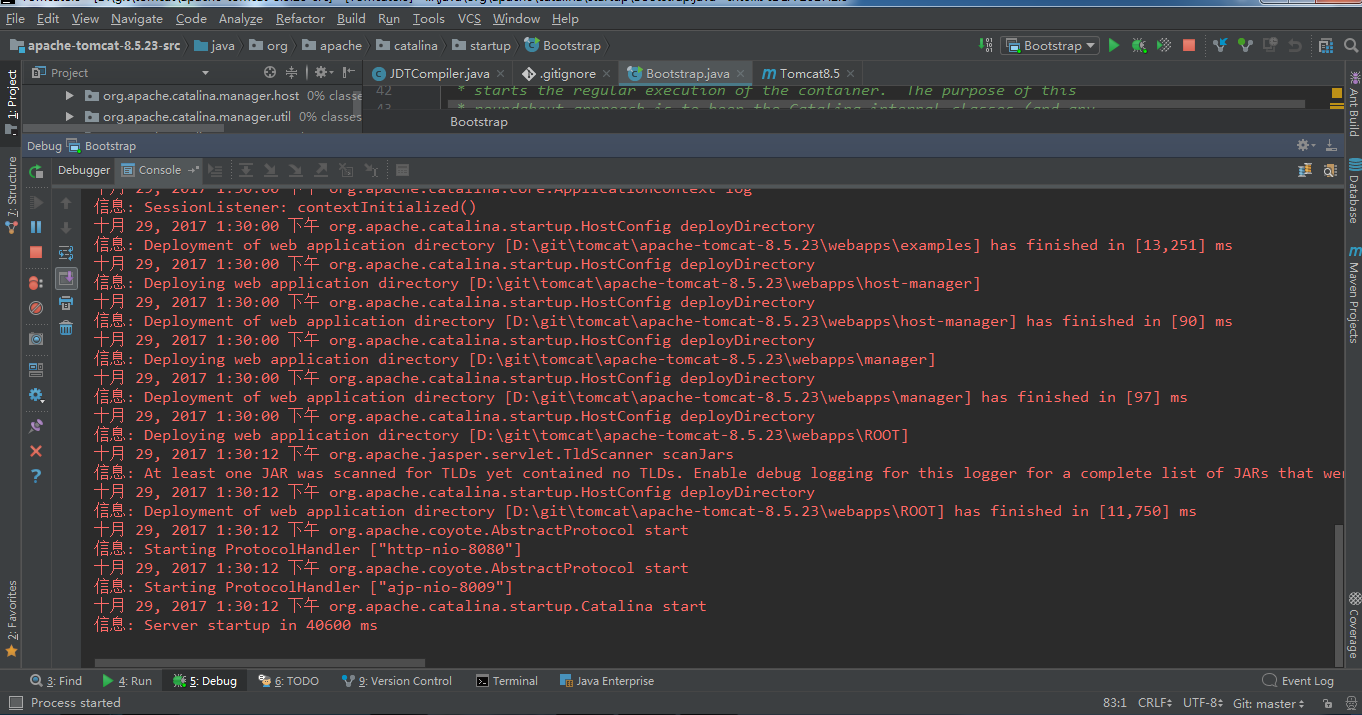
The console shows startup, as shown in Figure 10:
Picture 10
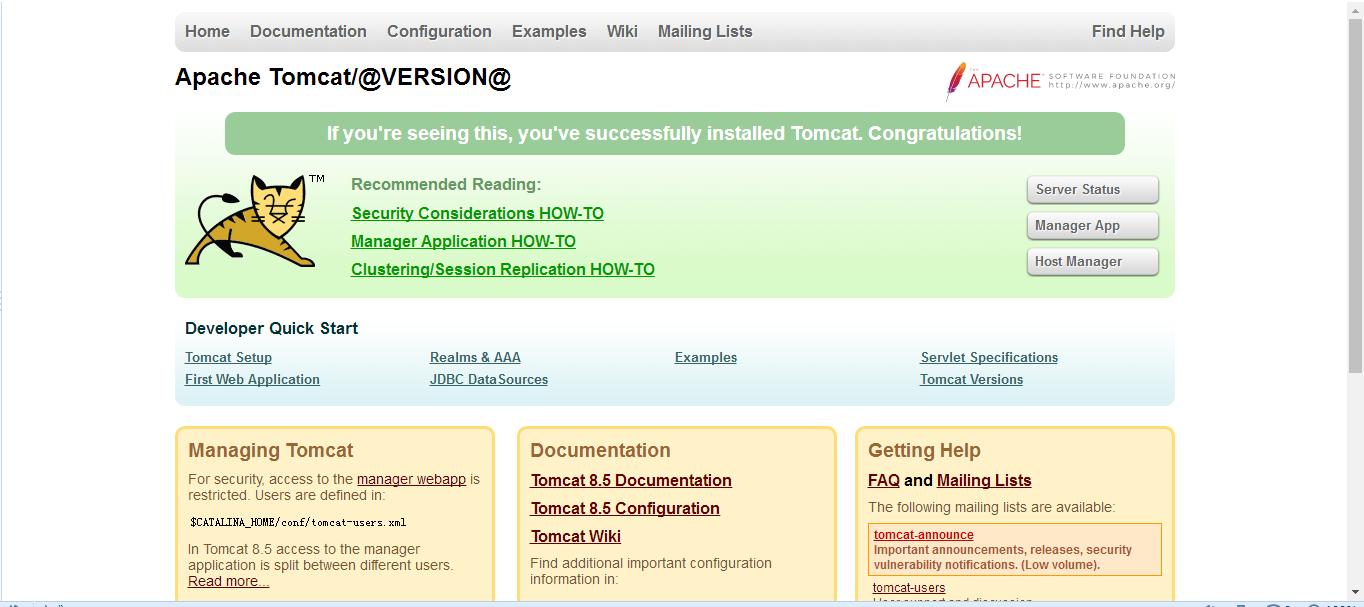
Open the browser and enter 127.0.0.1:8080 to display the tomcat welcome interface, as shown in Figure 11:
Picture 11
You're done, then you can enjoy the tomcat source code. The configured Tomcat source code development environment has been uploaded to my Github: https://github.com/FlowerL/tomcat8.5-src-dev.git. You can download and import Intellij directly.
Under the source code, nothing is secret!
Intelligent Recommendation
ubantu (linux) build development environment (JDK/intellij idea/maven)
One/JDK installation 1. Download the JDK corresponding to the system, unzip it, and copy it to /usr/lib/jvm 2. Open the /etc/profile file and add at the end 3. Verify that the installation configurati...

Jmeter secondary development environment to build ---- JMeter source code imported to Intellij IDEA
I recently learned how to import jmeter source code into Intellij IDEA, which paves the way for jmeter secondary development plug-ins. Environment: Windows10 jdk1.8, Intellij IDEA 2017.3, jmeter5.0 1 ...
Java troubles web development environment construction steps (IDEA, Tomcat, Maven)
1 Introduction Tomcat : An open source WEB server Maven: JavaWeb software project management tools, third-party jar packages can be defined by coordinates, which greatly simplifies project development...
eclipse build Tomcat source code analysis environment
Recently achieve the underlying tomcat very interested to find out the bottom of the tomcat, certainly the first step is to download the source code, and thus be carried out step by step instructions ...
Build Tomcat 6 source code reading environment
Recently relatively empty and a little want to start reading Tomcat source code, the latest version of Tomcat has to 9, but I chose 6 to read I think: For the analysis of open source projects to achie...
More Recommendation
TOMCAT source code analysis - build environment
TOMCAT source code analysis-build environment Build source code Download the official source code enterTOMCAT official websiteDownload TOMCAT 9 source code Note to downloadSource Code DistributionsThe...
Local build Tomcat Source Code Development
2019 Unicorn Enterprise Heavy Recruitment Python Engineer Standard >>> This is my referenceRecord of Tomcat development environments locally, pro test 1, fromhttp://tomcat.apache.org/Download...

Intellij idea to build the source code reading environment Spring
Intellij idea to build the source code reading environment Spring Download Spring Source Download and install the tool Gradle Spring compile source code Spring Source https://github.com/spring-project...

Spark source code using IntelliJ Idea to build reading environment
First,Official websitedownloadspark-1.6.0Source, the use intellij IDEA will import source import, choose to use maven to build the project, I use the development kit isjdk1.7.0_03withscala-sdk-2.10.4A...
Intellij IDEA + Gradle build Spring source code environment
purpose How to use Gradle to build Spring source code environment in Intellij IDEA. step 1 Download the Spring source code First, you need to install the git client on your computer, then create a new...