[Training test process record] SSD: Single Shot Detector for scene text detection
Introduce the use of SSD model for scene text detection. Example data set: COCO-Text.
Compilation part:
1. Error when compiling with cuda8
/usr/include/boost/property_tree/detail/json_parser_read.hpp:257:264: error: ‘type name’ declared as function returning an array
Solution: Because the gcc version is too low, upgrade to 5.3 to solve it.
sudo add-apt-repository ppa:ubuntu-toolchain-r/test
sudo apt-get update

sudo apt-get install software-properties-common

sudo apt-get install gcc-5 g++-5

cd /usr/bin

sudo rm gcc

sudo ln -s gcc-5 gcc

sudo rm g++

sudo ln -s g++-5 g++
Recompile to solve
2. make: *** [.build_release/lib/libcaffe.so.1.0.0-rc3] error
Solution:
sudo apt-get install libopenblas-devData set preparation part:
Use coco-text data set
1. Format the coco-text data set into the pascal_voc data set format, the format method is detailed in the blog:[Training Test Process Record] Text-Detection-with-FRCNThe second part in: preparing the data set, I won't repeat it here.
2. Rename formatted_dataset to VOC2007 and put it under the folder $home/data/VOCdevkit.
3. Create data in Imdb format:
cd $CAFFE_ROOT
# Create the trainval.txt, test.txt, and test_name_size.txt in data/VOC0712/
./data/VOC0712/create_list.sh
# You can modify the parameters in create_data.sh if needed.
# It will create lmdb files for trainval and test with encoded original image:
#   - $HOME/data/VOCdevkit/VOC0712/lmdb/VOC0712_trainval_lmdb
#   - $HOME/data/VOCdevkit/VOC0712/lmdb/VOC0712_test_lmdb
# and make soft links at examples/VOC0712/
./data/VOC0712/create_data.sh
Note:
1. Modify the data set path under create_list.sh and create_data.sh
create_list.sh:
#root_dir=$HOME/data/VOCdevkit/
 root_dir="Change to your own data set directory'
sub_dir=ImageSets/Main
bash_dir="$(cd "$(dirname "${BASH_SOURCE[0]}")" && pwd)"
for dataset in trainval test
do
  dst_file=$bash_dir/$dataset.txt
  if [ -f $dst_file ]
  then
    rm -f $dst_file
  fi
  #for name in VOC2007 VOC2012
     #Here only the VOC2007 folder
  for name in VOC2007
  do
    if [[ $dataset == "test" && $name == "VOC2012" ]]
    then
      continue
create_data.sh:
cur_dir=$(cd $( dirname ${BASH_SOURCE[0]} ) && pwd )
root_dir=$cur_dir/../..

cd $root_dir

redo=1
#data_root_dir="$HOME/data/VOCdevkit"
data_root_dir="Change to your own data set directory"
dataset_name="VOC0712"
mapfile="$root_dir/data/$dataset_name/labelmap_voc.prototxt"
anno_type="detection"
Since there are only two types of background and text, it is changed to:
item {
  name: "none_of_the_above"
  label: 0
  display_name: "background"
}
item {
  name: "text"
  label: 1
  display_name: "text"
}
Training part:
# It will create model definition files and save snapshot models in:
#   - $CAFFE_ROOT/models/VGGNet/VOC0712/SSD_300x300/
# and job file, log file, and the python script in:
#   - $CAFFE_ROOT/jobs/VGGNet/VOC0712/SSD_300x300/
# and save temporary evaluation results in:
#   - $HOME/data/VOCdevkit/results/VOC2007/SSD_300x300/
# It should reach 77.* mAP at 120k iterations.
python examples/ssd/ssd_pascal.py
Solution: You need to replace 4952 with the number of test pictures. For example, the number of test sets for coco-text is 840.
#Evaluate on whole test set.
#num_test_image = 4952
num_test_image = 840
test_batch_size = 8
# Ideally test_batch_size should be divisible by num_test_image,
# otherwise mAP will be slightly off the true value.
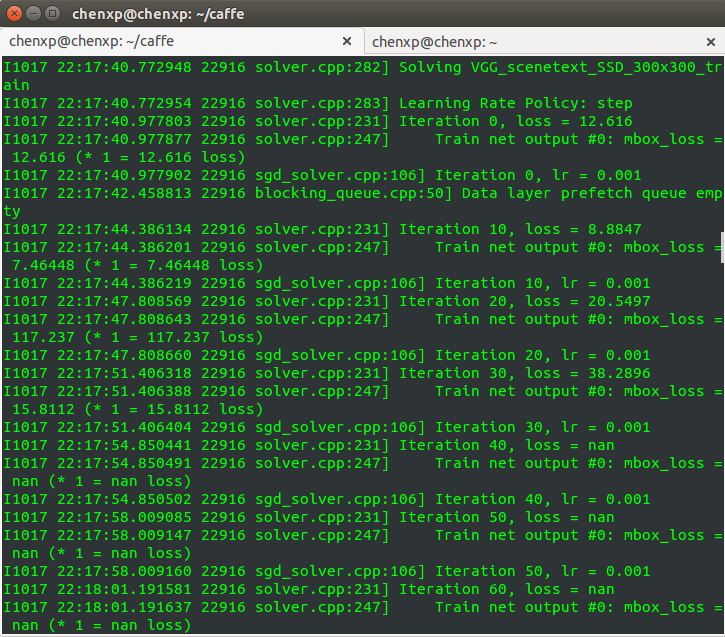
test_iter = int(math.ceil(float(num_test_image) / test_batch_size))Question 2: loss = nan
Due to the scene text data set, the loss generated by the initial iteration is particularly large. When I trained myself to iteration 40, it began to become Loss = nan.
Reason: gradient explosion. The gradient becomes very large, making the learning process difficult to continue.
General measures: reduce the base_lr of solver.prototxt by at least one order of magnitude. If there are multiple loss layers, you need to find out which loss layer caused the gradient explosion, and reduce the loss_weight of this layer in train_val.prototxt, instead of reducing the general base_lr. reference:Reasons why Loss becomes nan when using caffe training
Solution:
Change base_lr to 10 times the original. Modify the lines 229 and 232 of /examples/ssd/ssd_pascal.py to change 0.004 to 0.0004 and 0.00004 to 0.000004.
# If true, use batch norm for all newly added layers.
# Currently only the non batch norm version has been tested.
use_batchnorm = False
lr_mult = 1
# Use different initial learning rate.
if use_batchnorm:
   #base_lr = 0.0004
    base_lr = 0.00004
else:
    # A learning rate for batch_size = 1, num_gpus = 1.
    #base_lr = 0.00004
base_lr = 0.000004Question 3: OpenCV Error: Assertion failed
OpenCV Error: Assertion failed ((scn == 3 || scn == 4) && (depth == CV_8U || depth == CV_32F)) in ipp_cvtColor, file /home/user1/opencv-3.1.0/modules/imgproc/src/color.cpp, line 7646
terminate called after throwing an instance of 'cv::Exception'
what(): /home/user1/opencv-3.1.0/modules/imgproc/src/color.cpp:7646: error: (-215) (scn == 3 || scn == 4) && (depth == CV_8U || depth == CV_32F) in function ipp_cvtColor

*** Aborted at 1482480286 (unix time) try "date -d @1482480286" if you are using GNU date ***
PC: @ 0x7f7e541abcc9 (unknown)
*** SIGABRT (@0x3e900004df8) received by PID 19960 (TID 0x7f7e227fd700) from PID 19960; stack trace: ***
@ 0x7f7e541abd40 (unknown)
@ 0x7f7e541abcc9 (unknown)
@ 0x7f7e541af0d8 (unknown)
@ 0x7f7e54f61535 (unknown)
@ 0x7f7e54f5f6d6 (unknown)
@ 0x7f7e54f5f703 (unknown)
@ 0x7f7e54f5f922 (unknown)
@ 0x7f7e4d12fca0 cv::error()
@ 0x7f7e4d12fe20 cv::error()
@ 0x7f7e4b574c89 cv::ipp_cvtColor()
@ 0x7f7e4b57e4d4 cv::cvtColor()
@ 0x7f7e5600758a caffe::AdjustSaturation()
@ 0x7f7e5600c77a caffe::RandomSaturation()
@ 0x7f7e5600ce96 caffe::ApplyDistort()
@ 0x7f7e561dfeac caffe::DataTransformer<>::DistortImage()
@ 0x7f7e561c7beb caffe::AnnotatedDataLayer<>::load_batch()
@ 0x7f7e560abc29 caffe::BasePrefetchingDataLayer<>::InternalThreadEntry()
@ 0x7f7e55ff39f0 caffe::InternalThread::entry()
@ 0x7f7e4abf9a4a (unknown)
@ 0x7f7e4678a182 start_thread
@ 0x7f7e5426f47d (unknown)
@ 0x0 (unknown)
Aborted (core dumped)
Solution: Add'force_color':True, to train_transform_param on line 175 of /examples/ssd/ssd_pascal.py
reference:OpenCV Error: Assertion failed #353
train_transform_param = {
        'mirror': True,
        'mean_value': [104, 117, 123],
       #added
	'force_color': True,
        'resize_param': {
                'prob': 1,
                'resize_mode': P.Resize.WARP,
                'height': resize_height,
                'width': resize_width,
                'interp_mode': [
                        P.Resize.LINEAR,
                        P.Resize.AREA,
                        P.Resize.NEAREST,
                        P.Resize.CUBIC,
                        P.Resize.LANCZOS4,
                        ],
                },
Question 4: Check failed: mean_values_.size() == 1
F1203 16:07:24.865304 12717 data_transformer.cpp:621] Check failed: mean_values_.size() == 1 || mean_values_.size() == img_channels Specify either 1 mean_value or as many as channels: 1
*** Check failure stack trace: ***
    @     0x7f6168187daa  (unknown)
    @     0x7f6168187ce4  (unknown)
    @     0x7f61681876e6  (unknown)
    @     0x7f616818a687  (unknown)
    @     0x7f61689df73d  caffe::DataTransformer<>::Transform()
    @     0x7f61689e0993  caffe::DataTransformer<>::Transform()
    @     0x7f61689ebcdb  caffe::DataTransformer<>::Transform()
    @     0x7f61689ebd98  caffe::DataTransformer<>::Transform()
    @     0x7f61689ebe3e  caffe::DataTransformer<>::Transform()
    @     0x7f616887005b  caffe::AnnotatedDataLayer<>::load_batch()
    @     0x7f616884f6dc  caffe::BasePrefetchingDataLayer<>::InternalThreadEntry()
    @     0x7f61689a1445  caffe::InternalThread::entry()
    @     0x7f615e23ba4a  (unknown)
    @     0x7f615729c184  start_thread
    @     0x7f6166aabbed  (unknown)
    @              (nil)  (unknown)
test_transform_param = {
        'mean_value': [104, 117, 123],
        'force_color': True,
        'resize_param': {
                'prob': 1,
                'resize_mode': P.Resize.WARP,
                'height': resize_height,
                'width': resize_width,
                'interp_mode': [P.Resize.LINEAR],
                },
        }
F0616 16:54:55.034394 3070141376 cudnn_conv_layer.cpp:53] Check failed: status == CUDNN_STATUS_SUCCESS (4 vs. 0) CUDNN_STATUS_INTERNAL_ERROR
Reason: insufficient memory
Solution: Reduce batch_size. For example, here I reduced the training batch_size from 32 to 8, and the modification is in lines 338 and 339 of /examples/ssd/ssd_pascal.py.
#Divide the mini-batch to different GPUs.
#batch_size = 32
#accum_batch_size = 32
batch_size = 8
accum_batch_size = 8
iter_size = accum_batch_size / batch_size
solver_mode = P.Solver.CPU
device_id = 0
Question 6:Check failed: label_to_name_.find(label) !=lable_to_name_.name() Cannot find label: 2 in the label map
F1027 detection_output_layer.cu:143] Check failed: label_to_name_.find(label) !=lable_to_name_.name() Cannot find label: 2 in the label map
This is caused by changing the category from 21 to 2.
Solution:
1. Change num_classes in line 269 of examples/ssd/ssd_pascal.py from 21 to 2.
# MultiBoxLoss parameters.
# num_classes = 21
num_classes = 2
share_location = True
background_label_id=0
train_on_diff_gt = True
normalization_mode = P.Loss.VALID
code_type = P.PriorBox.CENTER_SIZE
ignore_cross_boundary_bbox = False
mining_type = P.MultiBoxLoss.MAX_NEGATIVE
neg_pos_ratio = 3.
2. Change num_classes in line 277 in examples/ssd/score_ssd_pascal.py from 21 to 2.
# MultiBoxLoss parameters.
# num_classes = 21
num_classes = 2
share_location = True
background_label_id=0
train_on_diff_gt = True
normalization_mode = P.Loss.VALID
code_type = P.PriorBox.CENTER_SIZE
ignore_cross_boundary_bbox = False
mining_type = P.MultiBoxLoss.MAX_NEGATIVE
neg_pos_ratio = 3.
After changing the py file, train.prototxt, test.prototxt, and num_classes in deploy.prototxt in the following directories will also change:
caffe/jobs/VGGNet/VOC0712/SSD_300x300
caffe/jobs/VGGNet/VOC0712/SSD_300x300_score
caffe/models/VGGNet/VOC0712/SSD_300x300
caffe/models/VGGNet/VOC0712/SSD_300x300_score
Intelligent Recommendation

SSD (Single Shot MultiBox Detector): draw the loss and accuracy curves of the training process
For standard Caffe drawing loss, accuracy curve see this blog, written in detail"Caffe draws the training process loss, accuracy curve", While drawing the loss and accuracy curves when train...
SSD target detection (Single Shot MultiBox Detector) (1)
SSD target detection (Single Shot MultiBox Detector) (1) 1. Overview of SSD target detection 1.1 The routine of SSD The full name of SSD is Single Shot MultiBox Detector, which is a stunning work publ...

【Target Detection】 SSD Paper Understanding Single Shot Detector
Summary SSD algorithm: 1. Discretize the output space of the bounding box into a series of default boxes. These default boxes have different aspect ratios and sizes at the pixel positions ...

【Paper Notes】 Object Detection Series SSD: Single Shot MultiBox Detector
paper:https://arxiv.org/abs/1512.02325 code:https://github.com/weiliu89/caffe/tree/ssd Summary of a sentence: SSD is the one-stage object detector, it directly predicts the probability that each defau...

Summary of pytorch code of SSD (single shot multibox detector) for target detection
Code address:Click to open the link(https://github.com/amdegroot/ssd.pytorch) This is someone's reading notes: in the medium,Click to open the link(https://towardsdatascience.com/learning-note-single-...
More Recommendation
SSD target detection algorithm (Single Shot MultiBox Detector)
Previously writtenRCNNThe series of target detection algorithms are to first generate some assumed bounding boxes, and then use CNN to extract features on these bounding boxes, and then pass a classif...

SSD (Single Shot MultiBox Detector) target detection combat
This article will not elaborate on the principle and network structure of the SSD target detection algorithm, you can refer to itAuthor papersAnd two other studentsPaper reading: SSD: Single Shot Mult...
SSD: Signle Shot Detector for text detection in natural scenes
Preface Before i was Paper reading: SSD: Single Shot MultiBox Detector In, talked about the latest Object Detection algorithm. Since SSD is used to detect objects, can SSD be used to detect text in na...

SSD: Single Shot MultiBox Detector (SSD: Single Shot MultiBox Detector)
SSD: a multi-bounding box detector that looks only once Author: WeiLiu, DragomirAnguelov, DumitruErhan, ChristianSzegedy, ScottReed, Cheng-YangFu, AlexanderC.Berg Unit: UNCChapelHill, ZooxInc.GoogleIn...

SSD: Single Shot MultiBox Detector training KITTI data set (2)
Preface In the previous article, the blogger spent a lot of time explaining how to make KITTI raw data into a format that can be trained by SSD step by step, and then you can use related caffe code to...