How to turn the PyTorch model to the RKNN model (SSD -based target detection algorithm)
tags: RKNN pytorch Target Detection
How to convert to the RKNN model
1. First create a new Python environment
First create a new Python environment, such as using Anaconda. If the previous Python environment is used, there may be some Python libraries and RKNN libraries that are not compatible with RKNN libraries and cause crazy errors! Intersection Intersection
2. Choose a RKNN-TOOLKIT
Select RKNN-Toolkit, which is greater than 1.3, because the previous version of 1.3 needs to convert the PyTorch model to the onnx of the Caffe model, and then convert it to RKNN; the version supports PyTorch directly to RKNN after 1.3.
The address is as follows: https://github.com/rockChip-linux/rknn-toolkit/releases, I chose RKNN-Toolkit1.7, there will be four compressed files under it under it

Among them, PACKAGES uses instructions and Example, etc., and the source code is RKNN-Toolkit1.7's wheels.
3. Configuration environment
In the RKNN-Toolkit-1.7.0 \ DOC \ Rockchip_quick_start_RKNN_TOOLKIT_V1.7.0_CN.PDF, there is a system configuration guide for each system. As shown in the figure below, install it specified in PyTorch or TensorFlow (best installation). > 1.6

Fourth, PyTorch's .ptH weight file to contain a model framework (mine is SSD model) .pt file
You need to modify the code by yourself
def export_pytorch_model():

  net = models.resnet18(pretrained=True)#E NET

  net.eval()

  trace_model = torch.jit.trace(net, torch.Tensor(1,3,224,224))#Tensor also needs to be modified according to your own model

  trace_model.save('./resnet18.pt')
For example, my modification is as follows:
    model_path = 'Weight file path (.pth)'
    label_path = 'Data set label path'
    class_names = [name.strip() for name in open(label_path).readlines()]

    export_pytorch_model(model_path,class_names)
def export_pytorch_model(model_path,class_names):

    net = create_mobilenetv1_ssd_lite_025extra(len(class_names),  width_mult=0.25 ,is_test=True)
    device = torch.device("cpu")

    net=net.to(device)

    net.load(model_path)

    net.eval()

    example = torch.rand(1, 3, 300, 300)#Input size
    example = example.to(device)

    trace_model = torch.jit.trace(net, example)#This function does not support the TORCH <1.6, my TORCH version is 1.6
    trace_model.save('./models/ssd.pt')#save route
5. .pt files turned to .rknn file
(1) The first method
This step only needs to modify a few parameters, as shown in the figure below:
if __name__ == '__main__':
model_path = 'Weight path'
label_path = 'Tag path'
class_names = [name.strip() for name in open(label_path).readlines()]
export_pytorch_model(model_path,class_names)
model = 'models/ssd.pt'
input_size_list = [[3,300,300]]#Input model only accepts fixed size input
# Create RKNN object
rknn = RKNN()
# pre-process config
print('--> config model')
rknn.config(mean_values=[[0,0,0]], std_values=[[255,255,255]], reorder_channel='0 1 2')
#For the input data is the three -channel (CIN0, CIN1, CIN2) data, after the pre -processing, the output data is (COUT0, COUT1, COUT2). The calculation process is as follows:
#COUT0 = (CIN0 -M0)/S0, COUT1 = (CIN1 -M1)/S0, COUT2 = (CIN2 -M2)/S0, where Mean_values = [[m0, m1, m2]]]
#Std_values = [[s0, s1, s2]]. Generally, use mean_values = [[0,0,0]], std_values = [[255, 255,255]] to be normalized to [0, 1]
#Between mean_values = [[0,0,0]], std_values = [[128, 128,128]] to normalize the input data to [-1, 1]; in other cases you need to calculate it yourself! Intersection Intersection Intersection
#Reorner_Channel: It means whether to adjust the order of the image channel. ‘0 1 2’ indicates that according to the input pass
#In order to reason, such as RGB when entering the picture input, then the input layer is passed to the input layer according to the order of the RGB;
#1 0 'means that the input will be transformed into a channel. For example, the passage sequence of the channel is RGB during the input.
#Profinned to the input layer. Similarly, the order of the channel when the input is BGR will be converted to RGB and then passed to the input layer.
print('done')
# Load pytorch model
print('--> Loading model')
ret = rknn.load_pytorch(model=model, input_size_list=input_size_list)
if ret != 0:
print('Load pytorch model failed!')
exit(ret)
print('done')
# Build model
print('--> Building model')
ret = rknn.build(do_quantization=False)
if ret != 0:
print('Build pytorch failed!')
exit(ret)
print('done')
# Export rknn model
print('--> Export RKNN model')
ret = rknn.export_rknn('models/ssd.rknn')
if ret != 0:
print('Export ssd.rknn failed!')
exit(ret)
print('Export ssd.rknn success!')
rknn.release()
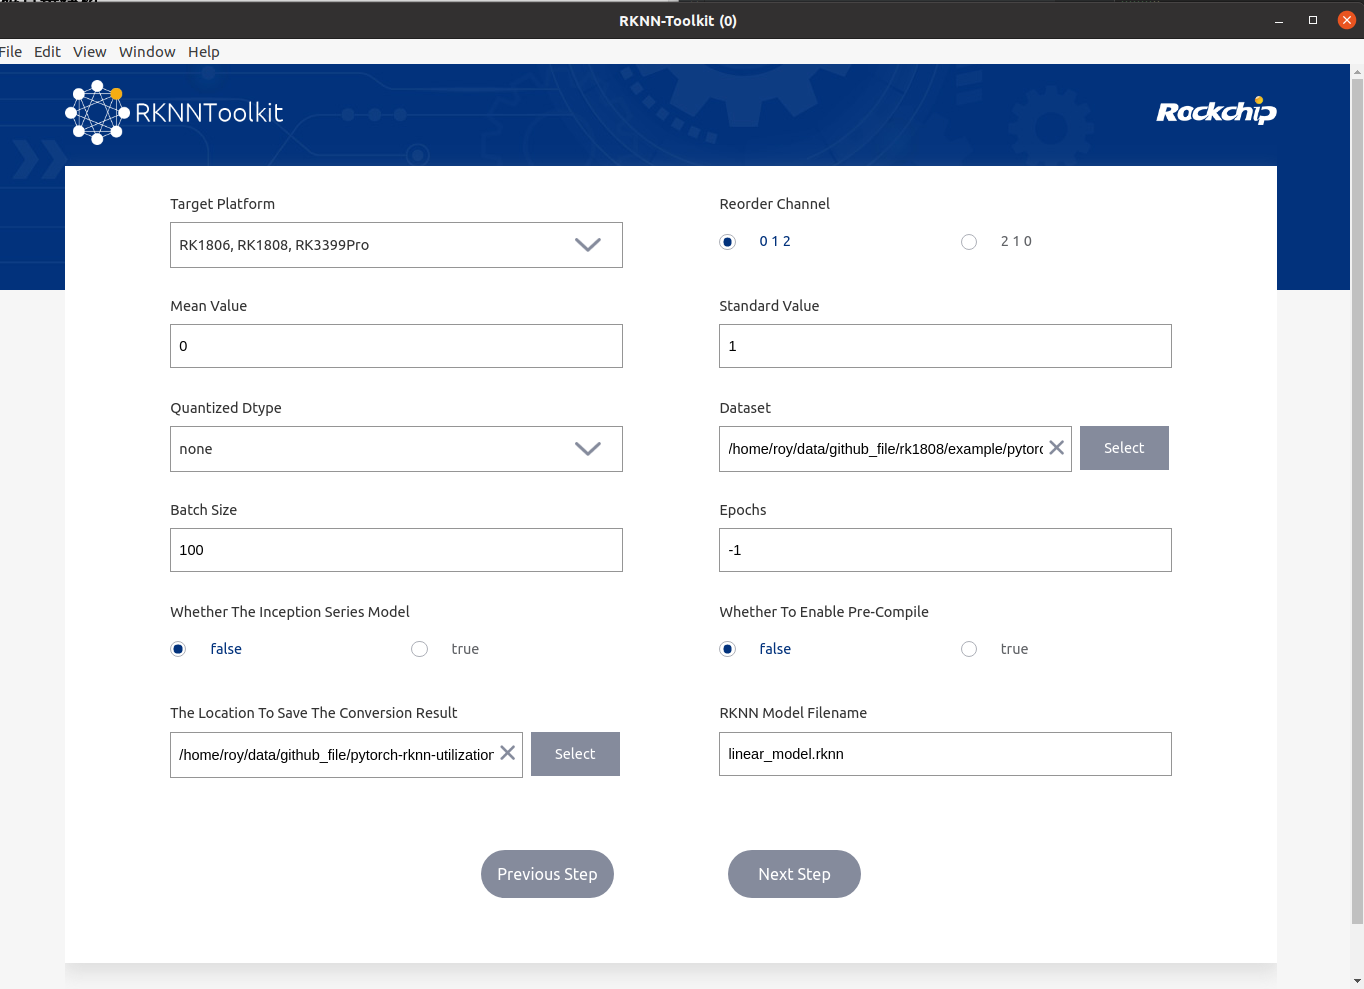
(2) The second method: the visualization program that comes with RKNN (very friendly !!!)
In the rknn-time-1.7.0 \ doc \ rockchip_user_guide_rknn_toolkit_visualization_v1.7.0_cn.pdf, it introduces how to use the visual program.
Use the following commands in a well -equipped environment to open the visualization program
python -m rknn.bin.visualization

Select the pytorch model and enter the following interface

Some of these parameters are the same as the parameters in (1). As for the quantification type, I don't know much about it, so I chose None; the size of the Batch Size is 100. During quantification, the amount of data fed for each batch will be determined according to this parameter to correct the quantitative results. If the amount of data in DataSet is less than 100, the parameter value will automatically adjust to the amount of data in DataSet (useless, the premise of this parameter setting is that you need to perform RKNN reasoning. If you just want to export the RKNN model, data set and data set and Batch size just fill in one casually).
The complete code is as follows:
import numpy as np
from rknn.api import RKNN
import torch
from vision.ssd.mobilenetv1_ssd_lite_025extra import create_mobilenetv1_ssd_lite_025extra#Network path

def export_pytorch_model(model_path,class_names):

    net = create_mobilenetv1_ssd_lite_025extra(len(class_names),  width_mult=0.25 ,is_test=True)
    device = torch.device("cpu")

    net=net.to(device)

    net.load(model_path)

    net.eval()

    example = torch.rand(1, 3, 300, 300)
    example = example.to(device)

    trace_model = torch.jit.trace(net, example)
    trace_model.save('./models/ssd.pt')


def show_outputs(output):
    output_sorted = sorted(output, reverse=True)
    top5_str = '\n-----TOP 5-----\n'
    for i in range(5):
        value = output_sorted[i]
        index = np.where(output == value)
        for j in range(len(index)):
            if (i + j) >= 5:
                break
            if value > 0:
                topi = '{}: {}\n'.format(index[j], value)
            else:
                topi = '-1: 0.0\n'
            top5_str += topi
    print(top5_str)


def show_perfs(perfs):
    perfs = 'perfs: {}\n'.format(perfs)
    print(perfs)


def softmax(x):
    return np.exp(x)/sum(np.exp(x))


if __name__ == '__main__':


    model_path = 'models/ws0.25tmax400extra0.25/mb1-ssd-lite-025extra-Epoch-399-Loss-3.2293308803013394.pth'
    label_path = 'models/voc-model-labels.txt'
    class_names = [name.strip() for name in open(label_path).readlines()]

    export_pytorch_model(model_path,class_names)

    model = 'models/ssd.pt'
    input_size_list = [[3,300,300]]#Input model only accepts fixed size input

    # Create RKNN object
    rknn = RKNN()

    # pre-process config
    print('--> config model')
    rknn.config(mean_values=[[0,0,0]], std_values=[[255,255,255]], reorder_channel='0 1 2')
    print('done')

    # Load pytorch model
    print('--> Loading model')
    ret = rknn.load_pytorch(model=model, input_size_list=input_size_list)
    if ret != 0:
        print('Load pytorch model failed!')
        exit(ret)
    print('done')

    # Build model
    print('--> Building model')
    ret = rknn.build(do_quantization=False)
    if ret != 0:
        print('Build pytorch failed!')
        exit(ret)
    print('done')

    # Export rknn model
    print('--> Export RKNN model')
    ret = rknn.export_rknn('models/ssd.rknn')
    if ret != 0:
        print('Export ssd.rknn failed!')
        exit(ret)
    print('Export ssd.rknn success!')


    rknn.release()
xport rknn model
print(‘–> Export RKNN model’)
ret = rknn.export_rknn(‘models/ssd.rknn’)
if ret != 0:
print(‘Export ssd.rknn failed!’)
exit(ret)
print(‘Export ssd.rknn success!’)
rknn.release()
Intelligent Recommendation

Reverberation of SSD Target Detection Model: DSSD
Introduction After the SSD model came out in 2015, the development of end-to-end target detection models was popular. Subsequent Yolo v2 has taken its application in the visual field of the industry t...

Detailed explanation of target detection model SSD
Target detection consists of two independent tasks, ie classification and positioning. The R-CNN series target detector consists of two phases, namely the regional proposal network and classification ...

SE-SSD 3D Target Detection Model Adaptation
SE-SSD 3D Target Detection Model Adaptation 1, environmental adaptation 2, data preparation Data set download God link Data set preparation: DET3D environment installation Kitti data set ready PS (ver...
Detailed introduction to SSD target detection network model
Detailed introduction to SSD target detection network model Detailed introduction and summary of R-CNN, Fast RCNN and Faster RCNN algorithms Detailed introduction and summary of YOLO series (YOLOv1-YO...
SSD-single stage target detection model
SSD motivation The one stage detection method after YOLOv1 wants to solve the problem of insufficient recall of small targets in the single stage of Yolo, and then there is SSD. Method summary SSD use...
More Recommendation
RKNN calls the Pytorch model (2) - converted to the RKNN model and reasonabate
Transformation through rknn's own graphical interface Quantification When reasoning, the RKNN model will standardize the input data, that is, this is not to change the data. Since the input is not a g...
YOLO model turn RKNN model code memo
Turn RKNN model memo ...
Train your target detection model with yolov4 - Based on Pytorch Implementation
1. First download the YOLOV4 model file,click to download 2, prepare the data set Create a Projects / YOLO folder in the same-level directory that downloads well in the YOLOV4 folder, then put your ow...

Filtering target detection model based on TORCHVISION 0.3 (Pytorch official tutorial)
In this tutorial, we will fine-tune the pre-trained Mask R-CNN models that have been trained in Penn-Fudan database. It contains 170 images and 345 examples. We will use it to illustrate how to use ne...
SSD: Run your first SSD model for target detection
Case 1: Test only This case is suitable for you just want to test the SSD, use a few of your own graphs to test, get the results, and do not train the model yourself. Code 1 Instructions: My environme...