caffe Ubuntu
Caffe is the third installation configuration, why is the third time it? Because I really underestimated the depth of learning required for hardware. Mononuclear first time I configured on my notebook, CPU only ... As a result, sample data ran four hours, but also how to play? The second on the desktop as the desktop comparison low, I5 processor core 4 without the NVIDIA GPU. I put someone trained model downloaded, and then himself tested and found really successful, and my heart little excited ~ However, when my own model train, I train seven days ..... the key is still running seven days .....
I thought, my poor we going to force his own pocket to buy a server? How that is possible. Fortunately, the teacher is very good, I found a server - is now finally time to show their talents labor.
The entire configuration process is very long ah, pit and more, there is no foundation of Linux do not come, you will crash. I made reference to several posts, each post is basically more or less the problem, the end of the article, I will leave predecessors articles address, be respect and thank them for their help to me. Well, here we cut to the chase!
computer setup:
system:Ubuntu16.04 GPU: NVIDIA Corporation GM107GL [Quadro K620] (Note: In linux bylspci | grep -i vgaView)
Caffe deep learning introductory tutorial
Under Ubuntu 16.04 Matlab2014a + Anaconda2 + OpenCV3.1 + Caffe installation
Under Ubuntu 16.04 system configuration CUDA7.5 Caffe Tutorial
Caffe mounted under Ubuntu 14.04 64bit
Caffe in depth learning framework under compile and install Ubuntu
Caffe + Ubuntu 14.04 64bit + CUDA 6.5 Configuration Description
Ubuntu 16.04 installed on Caffe
Caffe configuration Concise Guide (Ubuntu 14.04 / CUDA 7.5 / cuDNN 5.1 / OpenCV 3.1)
Ubuntu installation Caffe (CPU only) on 16.04
Installation process
1. Installation related dependencies
1 sudo apt-get install libprotobuf-dev libleveldb-dev libsnappy-dev libopencv-dev libhdf5-serial-dev protobuf-compiler
2 sudo apt-get install --no-install-recommends libboost-all-dev
3 sudo apt-get install libopenblas-dev liblapack-dev libatlas-base-dev
4 sudo apt-get install libgflags-dev libgoogle-glog-dev liblmdb-dev
2. Install the NVIDIA drivers
(1) query NVIDIA drivers
First Quguan networkhttp://www.nvidia.com/Download/index.aspx?lang=en-usCheck for yourself and download the video card driver:
Driver file extension should be .run is the end of. We need to move this file under the home directory, because here we have to switch to the text interface, if your ~ / download below, we have no way to download the catalog (no Chinese input method, and the Chinese all garbled)


FIG 2 FIG input graphics model graphics driver search results
My video card model is Quadro K620, the system is linux 64 bits in accordance with the requirements of the option to click search. Figure 2 is the search results, click on the download just fine.
After I downloaded the driver file is: NVIDIA-Linux-x86_64-375.20.run
(2) install the driver
In the input terminal:sudo gedit /etc/modprobe.d/blacklist.conf
After entering the password in the last line withblacklist nouveauHere is the Ubuntu comes with the graphics driver blacklist.
Enter in a terminal:sudo update-initramfs -u
Restart the computer -
Particular attention here, first install the graphics driver is switched to the text interface (press Ctrl + Alt + F1 ~ F6). Therefore, after starting the computer, to enter text interface.
Then, enter the commandsudo service lightdm stop
You can now install the driver, the first to enter the home directorycd ~Then:sudo ./NVIDIA-Linux-x86_64-375.20.run, Follow the prompts step by step ~
When finished, restart the computer again.
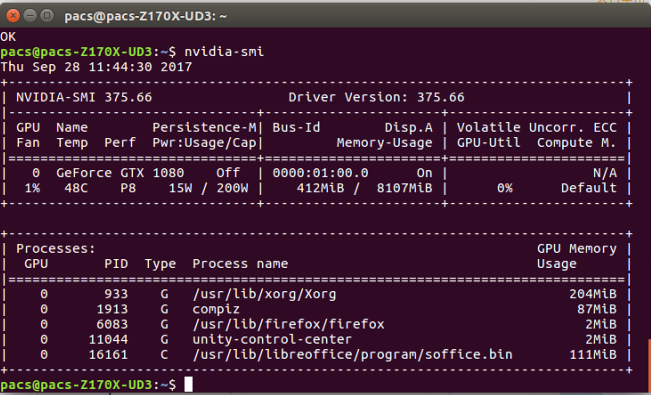
Enter the following verification after completion of the installation:sudo nvidia-smiIf a list of GPU list information indicates that the driver installation was successful. As shown below:

3. Install CUDA

(2) Execute the following command after download is completed:
1 sudo chmod 777 cuda_8.0.44_linux.run
2 sudo  ./cuda_8.0.44_linux.run
Note: There will be executed after a series of prompts you to confirm, but note that there is a let you choose whether to install nvidia367 drive, be sure to select No:
Install NVIDIA Accelerated Graphics Driver for Linux-x86_64 367.48?
Because we have a more front nvidia367 new installation, so do not choose to install here. The rest of the default or directly select Yes.
(3) the environment variable configuration
Open ~ / .bashrc file:sudo gedit ~/.bashrc
Writes the following to ~ / .bashrc tail:
1 export PATH=/usr/local/cuda-8.0/bin${PATH:+:${PATH}}
2 export LD_LIBRARY_PATH=/usr/local/cuda8.0/lib64${LD_LIBRARY_PATH:+:${LD_LIBRARY_PATH}}
(4) testing of samples CUDA
1 cd /usr/local/cuda-8.0/samples/1_Utilities/deviceQuery
2 make
3 sudo ./deviceQuery
If some of the information on the GPU is displayed, the installation was successful.

4. Configuration cuDNN
cuDNN is GPU accelerated computing DNN library.
First Quguan networkhttps://developer.nvidia.com/rdp/cudnn-downloadDownload cuDNN, you need to register an account to download. Download the version number in the following figure:

After decompressing download cuDNN5.1:
sudo tar -zxvf ./cudnn-8.0-linux-x64-v5.1.tgz
CuDNN5.1 include directory after entering decompression, do the following command line:
cd cuda/include
sudo cp cudnn.h / usr / local / cuda / include # copy the header file
Then enter the dynamic files in the lib64 directory and copy the link:
cd ..
cd lib64
sudo cp  lib * / usr / local / cuda / lib64 / # copy dynamic link library
cd /usr/local/cuda/lib64/
sudo rm -rf libcudnn.so libcudnn.so.5        # Delete the original files dynamically
sudo ln -s libcudnn.so.5.0.5 libcudnn.so.5    # Generate soft convergence
sudo ln -s libcudnn.so.5  libcudnn.so # generate soft link
5. Installation opencv3.1
From the official website (http://opencv.org/downloads.html) Download Opencv, and unzip it to where you want to install, unzip to assume that the / home / opencv.
1 unzip opencv-3.1.0.zip
2 sudo cp ./opencv-3.1.0 /home
3 sudo mv opencv-3.1.0 opencv
Pre-installation preparation, compilation create folders:
cd ~/opencv
mkdir build
cd build
Configuration:
1 sudo apt install cmake
2 sudo cmake -D CMAKE_BUILD_TYPE=Release -D CMAKE_INSTALL_PREFIX=/usr/local ..
Compile:
sudo make -j8
-j8 shows parallel computing, computer set according to their configuration, the computer can be arranged relatively low or no improvement and digital, direct input make.
Problems may occur:


among them, #if !defined (HAVE_CUDA) || defined (CUDA_DISABLER)||(CUDART_VERSION>=8000)We modified.
These are just the opencv compile successfully, will not opencv install, run the following command to install:
sudo make install
Further details please continue reading on the next exciting content:
Intelligent Recommendation
Note the mounting caffe ubuntu
General dependencies CUDA: Install by apt-get or the NVIDIA .run package. The NVIDIA package tends to follow more recent library and driver versions, but the installation is more m...
Ubuntu 16 Caffe compiled
installation git Compile Modify Makefile.config Verify successful compilation Returned the following results, the installation was successful ...
Ubuntu 14.04 installation caffe
Only supports CPU mode The first experiment MNIST Final results show...
Ubuntu-Caffe environment to build
NVIDIA graphics Quguan network (http://www.nvidia.com/Download/index.aspx?lang=en-us) Query GPU driver suitable as Driver installation Delete the original drive: sudo apt-get purge nvidia-* Adding thi...

Ubuntu installation caffe problem
1. ./include/caffe/common.hpp:5:27: fatal error: gflags/gflags.h: No such file or directory Solution: sudo apt-get install libgflags-dev Tip: E: Unable to locate the package libgflags-dev Solved:...
More Recommendation
Ubuntu 18.04 install CAFFE
Ubuntu 18.04 can be installed directly through the pre-compiled version of the system built-in caffe 1. Install the driver 2. Install CUDA 3. Install CUDNN 4. Install CAFFEhttp://caffe.berkeleyvision....
Ubuntu install Caffe
1. Install dependent packages To install the next steps or dependent packages necessary for the environment, enter the following commands in order: 2. Install caffe First clone under the path you want...

ubuntu caffe configuration
ubuntu16.04+caffe some tips: 1. Caffe does not support Python 3.6 very much and will report a very serious error. At present, no solution has been found on the Internet: Dynamic module does not define...
ubuntu caffe c++ interface
Create a new directory dir, create files test.cpp, CMakeLists.txt test.cpp is your own c++ file #include<caffe/caffe.hpp> and so on CMakeLists.txt content The next step is in the current directo...

Caffe installation in Ubuntu
[One]Hardware and system introduction: 1.1. Graphics card (getforce 10 series--GTX10xx, such asGTX1060) The type of graphics card used in this solution isGTX1060Of course allGetforce 10 series---GT...