"In-depth analysis of IPv6 (3rd edition)"-2.5 manual configuration of IPv6 protocol
This section excerpt from the asynchronous community "in-depth analysis IPv6 (3rd Edition)" Chapter 2 of the book, Section 2.5, author: [US] Joseph Davies more chapters can be accessed Yunqi community "Asynchronous community" public No. View.
2.5 Manually configure IPv6 protocol
Unlike IPv6 in Windows XP and Windows Server 2003, the IPv6 protocol in Windows Server 2012, Windows Server 2008 R2, Windows Server 2008, Windows 8, Windows 7 and Windows Vista has been installed and enabled by default. The goal of the Windows IPv6 protocol is to achieve automatic configuration. For example, the local link address used for communication between nodes on the link can be automatically configured. If there is an IPv6 router or an ISATAP router in the host subnet, the host can use the received router advertisement information to automatically configure other addresses, default routers, and other configuration parameters.
Users can also manually configure IPv6 addresses and other parameters in Windows as follows.
- Internet Protocol Version 6 (TCP/IPv6) component properties: Just as users can configure IPv4 settings through the Internet Protocol Version 4 (TCP/IPv4) component properties under the "Network Connections" folder, they can now also use Internet Protocol Version 6 (TCP/IPv6) component properties to configure IPv6 settings. The series of dialog boxes for configuring IPv6 are very similar to the corresponding IPv4 configuration dialog boxes. However, Internet Protocol Version 6 (TCP/IPv6) component properties only provide the basic configuration of IPv6.
- Windows PowerShell: You can use the Windows PowerShell commands Set-NetIPAddress, Set-NetIPInterface, Set-NetIPv6Protocol, Set-NetNeighbor, and Set-NetRoute to configure (only applicable to computers running Windows Server 2012 or Windows 8).
- Netsh.exe tool: You can configure IPv6 settings in the interface ipv6 text command of the Netsh.exe tool. The netsh interface ipv6 command provides a complete IPv6 configuration scheme.
Although the usual IPv6 hosts do not need to be manually configured, IPv6 routers must be configured manually.
2.5.1 "Configure IPv6 through the properties of Internet Protocol Version 6 (TCP/IPv6)
To manually configure the IPv6 protocol through the "Network Connections" folder, you can follow the steps below.
1. In the network connection folder, right-click the connection or network adapter you want to configure, and then click the "Properties" option.
2. In the "Networking" tab of the connection or network adapter properties, double-click Internet Protocol Version 6 (TCP/IPv6) in the list under "This Connection Use The Following Items".
Windows will display the "Internet Protocol Version 6 Properties" dialog box. Figure 2-3 shows an example of this dialog box.

General tab
In the "General" tab of the "Internet Protocol Version 6 (TCP/IPv6) Properties" dialog box, you can configure as follows.
- Obtain an IPv6 address automatically (Obtain an IPv6 address automatically): Specify the connection or network adapter to automatically obtain an IPv6 address. The process of obtaining this address is achieved through stateful or stateless address automatic configuration.
- Use the following IPv6 address: Specify the IPv6 address and default gateway of this connection or network adapter to obtain through manual configuration. -IPv6 address (IPv6 address): Provide a blank space to enter the IPv6 unicast address. You can also specify more IPv6 addresses through the "Advanced TCP/IP Setting" dialog box.
- Subnet prefix length: Provide a blank space to enter the subnet prefix length of the IPv6 address. For common IPv6 unicast addresses, this value should be set to 64, which is the default value.
- Default gateway: Provide a blank space to enter the default gateway of the IPv6 unicast address.
- Obtain DNS server address automatically (Obtain DNS server address automatically): The IPv6 address of the designated DNS server is obtained through automatic acquisition. The process of obtaining this address is achieved through stateful or stateless address automatic configuration (DHCPv6).
- Use the following DNS server address: Specify the IPv6 addresses of the preferred and alternate DNS servers for this connection or network adapter to obtain through manual configuration.
- Preferred NDS server: Provide a blank space to enter the IPv6 address of the preferred DNS server.
- Alternate DNS server: Provide a blank space to enter the IPv6 address of the alternate DNS server. You can also set more DNS servers through the "Advanced TCP/IP Setting" dialog box.
Advanced TCP/IP Setting
In the "General" tab, click the "Advanced" button to enter the "Advanced TCP/IP Settings" dialog box. This dialog box is very similar to the "Advanced TCP/IP Settings" dialog box of the Internet Protocol Version 4 (TCP/IPv4) component. The difference between the two is that there is no WINS tab (IPv6 does not use NetBIOS and Windows Internet Naming Service [WINS ]) and the "Options" tab (TCP/IP filtering only applies to IPv4 traffic). For IPv6, the "Advanced TCP/IP Settings" dialog box has "IP Settings" and "DNS" tabs. Figure 2-4 shows an example of the "IP Settings" tab.
In the "IP Settings" tab, you can configure the following.
- Multiple IPv6 addresses (click the [Add] button under the IP address [IP address]): For each unicast IPv6 address, you must specify the IPv6 address and subnet prefix length. The "Add" button can only be used when "Use the following IPv6 address" in the "General" tab of the "Internet Protocol Version 6 (TCP/IPv6) Properties" dialog box is selected.
- Multiple default gateways (click the Add [Add] button under [Default gateways]): Each default gateway must specify the IPv6 address of a gateway, and specify the metric of the default route associated with it should be manually The setting is still based on the speed of the connection or adapter.
- Route metric: For routes related to the configuration of IPv6 addresses or default gateways, you can also set whether to use a specified metric value or to determine the metric value by the speed of the connection or adapter.
Figure 2-5 shows an example of the DNS tab.
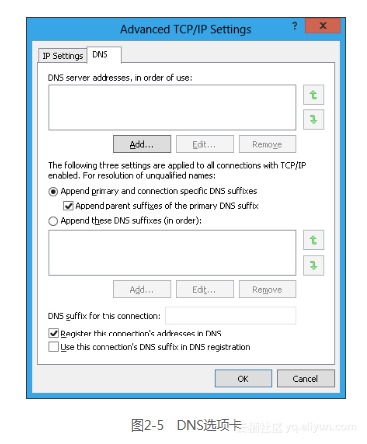
In the DNS tab, users can configure the following.
The IPv6 address of the DNS server (click the DNS server address, and the "Add" button under [DNS server addresses, in order of use]) is arranged in the order of use.
Preferred and designated connection DNS suffix, domain name registration and authorization behavior. These settings are the same as in IPv4.
2.5.2 Configure IPv6 with Windows PowerShell
The Windows PowerShell command line of Windows 2012 and Windows 8 can also configure IPv6 address, default gateway and DNS server.
Configure address
Configure the IPv6 address can use the command New-NetIPAddress to achieve. For example, if you want to configure the IPv6 unicast address 2001:db8:290c:1291::1 on the interface named "Wired Ethernet Connection", you must use the following command:
New-NetIPAddress –InterfaceAlias "Wired Ethernet Connection" –IPAddress 2001:db8:290c:1291::1
Add default gateway
Configure the default gateway can be achieved by using the command New-NetRoute. For example, if you want to add a default route on the interface named "Wired Ethernet Connection", that is, set the next address to fe80::2aa:ff:fe9a:21b8, you must use the following command:
New-NetRoute–DestinationPrefix::/0–InterfaceAlias "Wired Ethernet Connection" –NextHop fe80::2aa:ff:fe9a:21b8
Add DNS server
Configuring the IPv6 address of the DNS server can be achieved using the command Set-DnsClientServerAddress. For example, if you want to add a DNS server with the IPv6 address 2001:db8:99:4acd::8 on the interface named "Wired Ethernet Connection", you must use the following command:
Set-DnsClientServerAddress -InterfaceAlias "Wired Ethernet Connection"
-ServerAddresses 2001:db8:99:4acd::8
Comment
This section will only describe how to add addresses, default gateways, and DNS servers through commands in the Windows PowerShell command line. In addition, the Windows PowerShell command line has many other commands for configuring IPv6 settings and IPv6 components.
2.5.3 Configure IPv6 with Netsh.exe tool
Users can also configure the IPv6 address, default gateway and DNS server by using commands in the form of netsh interface ipv6 in the command line.
Configure address
Configure the IPv6 address by using the command netsh interface ipv6 add address. The command syntax is as follows.
netsh interface ipv6 add address [interface=] Interface NameorIndex [address=] IPv6 Address [/PrefixLength] [[type=] unicast|anycast] [[validlifetime=] Time|infinite] [[preferredlifetime=] Time|infinite] [[store=] active|persistent]
- interface: The name or interface number of the connection or adapter.
- address: The IPv6 address to be added, followed by the subnet prefix length (optional, the default value is 64).
- type: The type of IPv6 address, which can be unicast (default) or anycast.
- validlifetime: The lifetime of the address remains valid. The value of survival time can be expressed in days, hours, minutes and seconds (such as 1d2h3m4s). The default value is infinite.
- preferredlifetime: The lifetime of the address retention selection. The survival time value can be expressed in days, hours, minutes, and seconds. The default value is infinite.
- store: How to store IPv6 addresses. It can be active (the address will disappear when the system restarts) or persistent (the address will remain after the system restarts). The latter is the default value.
For example, if you want to configure the IPv6 unicast address 2001:db8:290c:1291::1 on the interface named "Local Area Connection", let this address be valid for a long time and be in the selected state, and the address will be after the system restart Still reserved, use the following command:
netsh interface ipv6 add address "Local Area Connection" 2001:db8:290c:1291::1
Add default gateway
You can configure the default gateway by using the command netsh interface ipv6 add route, and add a default route (::/0). The command syntax is as follows.
netsh interface ipv6 add route [prefix=]::/0 [interface=] InterfaceNameorIndex [[nexthop=] IPv6Address] [[siteprefixlength=] Length] [[metric=] MetricValue] [[publish=]no|yes|immortal] [[validlifetime=]Time|infinite] [[preferredlifetime=]Time|infinite] [[store=]active|persistent]
- prefix: IPv6 address prefix and prefix length of the default route. If it is another route, replace ::/0 with the address prefix/prefix length.
- interface: The name or interface number of the connection or adapter.
- nexthop: The IPv6 address of the neighboring router when the destination prefix is not on the local link.
- siteprefixlength: If the destination prefix refers to the local link, the user can specify the length of the address prefix assigned to the site to which this IPv6 node belongs. This is optional.
- metric: Set the priority value when using routing. The smaller the value, the better the route will be.
- publish: If the device acts as an IPv6 router, this option can set the following: whether the subnet prefix corresponding to the route is included in the route advertisement, and whether the lifetime of the prefix is unlimited (immortal option).
- validlifetime: The lifetime for the route to remain selected. The survival time value can be expressed in days, hours, minutes, and seconds. The default value is infinite.
- preferredlifetime: The lifetime of the route being selected. The survival time value can be expressed in days, hours, minutes, and seconds. The default value is infinite.
- store: How the route is stored. It can be active (the address will disappear when the system restarts) or persistent (the address will remain after the system restarts). The latter is the default value.
For example, if you want to add a default route on the interface named "Local Area Connection" and set the next hop address to fe80::2aa:ff:fe9a:21b8, use the following command:
netsh interface ipv6 add route ::/0 "Local Area Connection" fe80::2aa:ff:fe9a:21b8
Add DNS server
Configure the IPv6 address of the DNS server by using the command netsh interface ipv6 add dnsserver. The command syntax is as follows.
netsh interface ipv6 add dnsserver [name=] Interface Name [[address=] IPv6Address] [[index=] Preference Value]
- name: The name of the connection or adapter.
- address: The IPv6 address of the DNS server.
- index: The priority of the DNS server address.
By default, the DNS server will be added to the end of the DNS server list. If the index number is specified, the DNS server will be placed in the corresponding position in the list, and other DNS servers will be moved back accordingly.
For example, if you want to add a DNS server with an IPv6 address of 2001:db8:99:4acd::8 on the interface named "Local Area Connection", use the following command:
netsh interface ipv6 add dnsserver "Local Area Connection" 2001:db8:99:4acd::8
Comment
This section will only describe how to use Netsh commands to add addresses, default gateways, and DNS servers. In addition, there are many Netsh commands for configuring IPv6 settings and IPv6 components. If the reader needs the entire configuration command set, please refer to the "Help" and "Support" of the Windows system.
Intelligent Recommendation
Input.GetAxis("") Input.GetAxisRaw("")
Input.GetAxis Get axis static function GetAxis (axisName : string) : float Descriptiondescription Returns the value of the virtual axis identified by axisName. Returns the value in the ...
Bean quot
Bean's reference statement First of all, this series of blog refers to the oil pipeSpring Expression LanguageTeaching videoReferencing BeansAnd write. start This episode is a simple look at how to use...
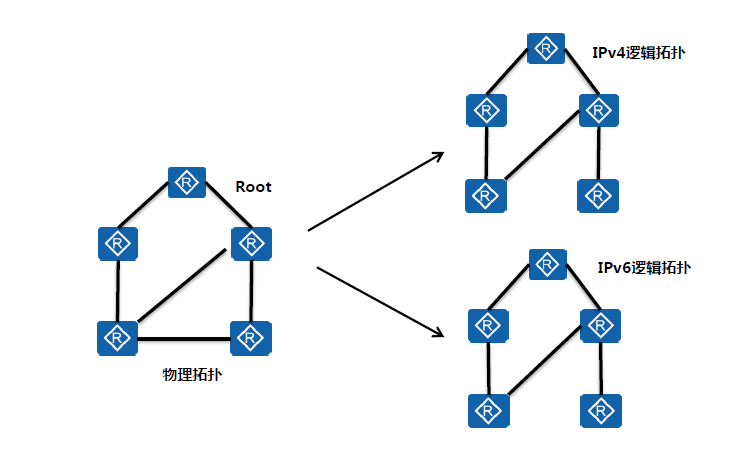
023B-IPv6 routing protocol-IS-IS IPv6
Article Directory Overview of ISIS Agreement IS-IS IPv6 Extended TLV type IPv6 Reachability TLV IPv6 Interface Address TLV(1) IS-IS ST single topology ST single topology disadvantages IS-IS support fo...
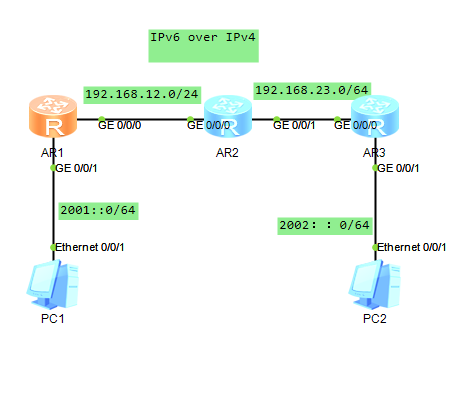
IPv6 over IPv4 manual tunnel configuration
1. Network topology diagram Link: https://pan.baidu.com/s/1QHtOl2Uyi47neJLqHlv21Q Extraction code: 8888 eNSP Link: https://pan.baidu.com/s/1wP0vHim4yqVV0bc0wmzhFw Extraction code: 8888 2. Network requ...

No configuration files have been created. To create a new profile, use the "Mail" icon in the "Control Panel"
Right click on the desktop_Send to _Mail recipient appears "No configuration file created. To create a new configuration file, please use the "Mail" icon in the "Control Panel"...
More Recommendation
curl: (1) Protocol "https" not supported or disabled in libcurl
curlIt is an open source file transfer tool that uses URL syntax to work in command line mode. The default installation does not support the https protocol. Because the https protocol is an encrypted ...
IPv6 configuration
IPv6 operating system configuration IPv6 type Reference link Precondition Check if the IPv6 module is loaded Configure /etc/sysctl.conf Configure /etc/modprobe.d/disable_ipv6.conf Centos7.* operating ...
HCL configuration IPv6 routing protocol experiment
Experiment goal Complete this experiment. The following goals should be achieved. Master how to configure RIPng on the router; Master how to view the IPv6 routing table; Master how to configure OSPFv3...
How to represent the Spring Security "custom-filter" using Java configuration?
A value-seeking thing seeing outside the network. What is the equivalent Java configuration for the Spring Security tag? I tried http.addFilter( new MyUsernamePasswordAuthenticationFilter() ) where th...

ipv6
Simply record ipv6 study notes First ipv4 header and ipv6 header comparison, ipv6 header is much simpler There is no concept of subnet (network segment) in ipv6, and there is no concept of broa...