Use python's netCDF4 library to read .nc files and create .nc files
tags: python netCDF4 .nc Read create
Use python netCDF4 library to read .nc files and create .nc files
1 Introduction
.nc (Network Common Data Format) file is a commonly used data format in meteorology. The library used for reading .nc on python is the netCDF4 library. The specifics of this library will be introduced below. method.
Installation is simple:
pip install netCDF4
.nc file introduction reference link: https://blog.csdn.net/wildand/article/details/88899718
2. Reading of .nc files
#Import nc library
import netCDF4 as nc

 filename = '2017-06-15_2017-06-17.nc' # .nc file name
 f = nc.Dataset(filename) #Read the .nc file and transfer it to f. At this time f contains all the information of the .nc file
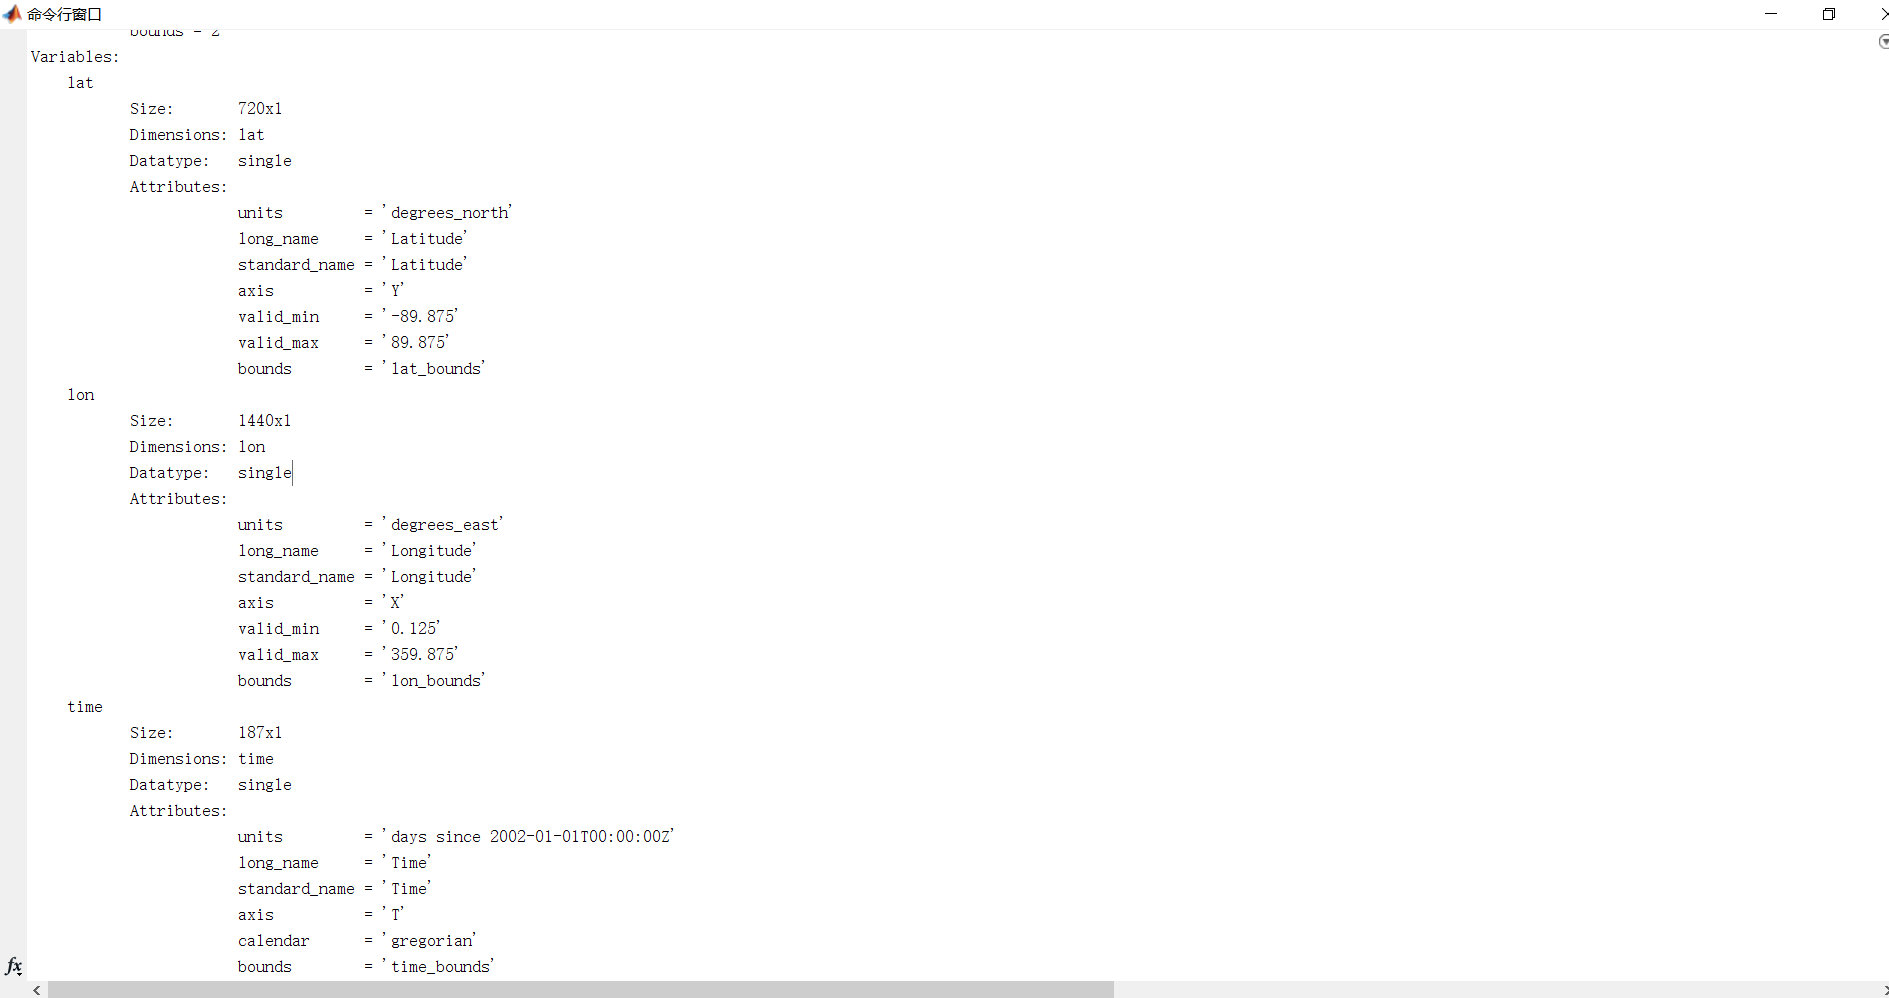
#step1: View all variables of the .nc file and all the information of the variables (dimension size, unit, etc.)
all_vars = f.variables.keys() #Get all variable names
 print(len(all_vars)) #length is 18

 all_vars_info = f.variables.items() #Get all variable information
 print(type(all_vars_info)) #The output is: odict_items. Convert it into a list here
 print(len(all_vars_info)) #length is 18
 all_vars_info = list(all_vars_info) #The information of each variable at this time is one of the lists
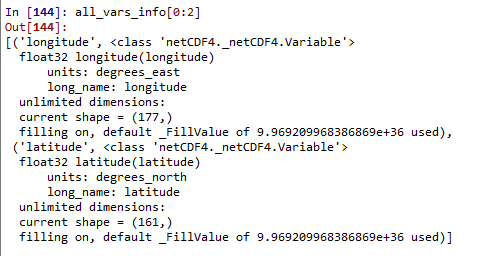
As shown in the figure: Include latitude, longitude, time, and other variable names

Take a look at the information of the first two variables of all_vars_info, as shown below, the information such as shape unit name float32 fillvalue is displayed
#step2: View a single variable of the .nc file and all the information of the variable (dimension size, unit, etc.)
If you are interested in a variable (known variable name), and want to view the information of this variable, get the data of this variable, the method is as follows:
#We want to view the information of ’u’
var = 'u'
 var_info = f.variables[var] #Get variable information
 var_data = f[var][:] #Get variable data
print(var_info)
print(var_data.shape)

 #It is convenient to convert to an array
 print(type(var_data)) #<class'numpy.ma.core.MaskedArray'> The variable arrays of .nc files are all Masked arrays
 var_data = np.array(var_data) #Convert to np.array array
The output is as follows:

**Note:** After completing the above operations, remember to close the file
f.close() #Close the file. If the file is closed, operations such as f.variabels.items() will not work.
3. Creation of nc file
#step1: Create a file
f_w = nc.Dataset('hecheng.nc','w',format ='NETCDF4') #Create a file with the format .nc and the name ‘hecheng.nc’
#step2: Write some basic information
Each variable in the .nc file has dimension information, for example, var=‘u’ above, the dimension is 1237161*177. The various dimensions here are not arbitrarily defined, but are related to basic variable information.
For example, [12,37,161,177] = [time,level,latitude,longitude], the first dimension is time information, followed by vertical layer information, latitude and longitude information.
So, we have to write some basic information first: time, vertical layer, latitude, longitude
#timeLatitude is 12. Note that the second parameter represents the dimension, but it must be an integer, which means that only one basic single dimension information can be created.
 #If you want to create a variable dimension>1 later, it must be a combination of the previous single dimensions. Will be introduced later.

 #Determine the dimensional information of the basic variables. Relative to each axis of the coordinate system (x, y, z)
f_w.createDimension('time',12)
f_w.createDimension('level',37)
f_w.createDimension('lat',161)
f_w.createDimension('lon',177)

 ##Create variables. The parameters are: ‘Variable Name’, ‘Data Type’, and ‘Basic Dimension Information’
f_w.createVariable('time',np.int,('time'))
f_w.createVariable('level',np.int,('level'))
f_w.createVariable('lat',np.float32,('lat'))
f_w.createVariable('lon',np.float32,('lon'))

 #Write the data of variable time. The dimensions must be consistent with the definition.
time = np.array([0,6,12,18,0,6,12,18,0,6,12,18])
f_w.variables['time'][:] = time

 #Create a new multi-dimensional variable and write data,
f_w.createVariable( 'u', np.float32, ('time','level','lat','lon'))
var_data = np.ones(shape=(12,37,161,177), dtype = np.float32)
f_w.variables[var][:] = var_data
Close file
f_w.close()
You can also write information such as fill_value

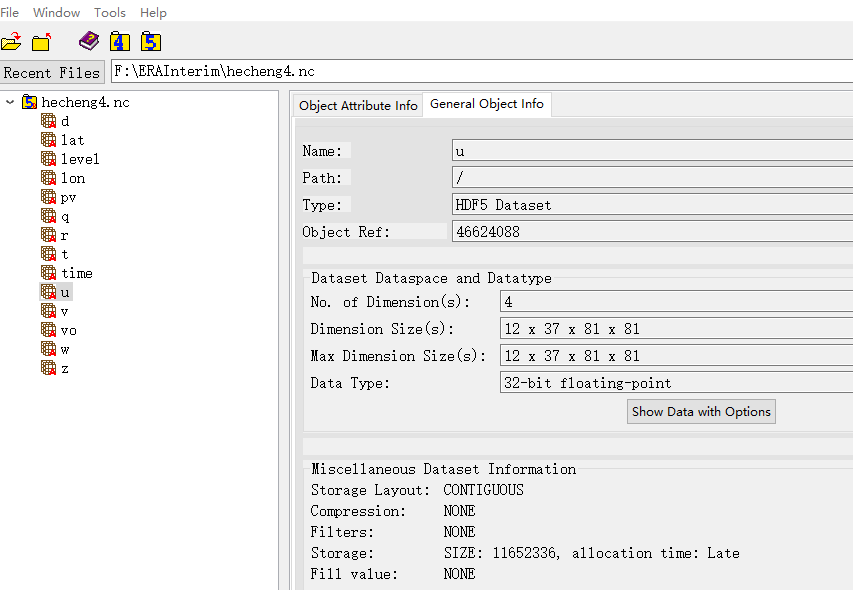
After creating it in the above way, open it with some visualization software, and the result is as shown above.
#step3: Create a group
As shown in the figure above, all variables are in parallel positions. If there are too many variables, it will be more convenient to put variables of the same type in the same group.
Let’s see an example:
f_w = nc.Dataset('haha4.nc','w',format = 'NETCDF4')

f_w.createDimension('time',12)
f_w.createDimension('level',37)
f_w.createDimension('lat',161)
f_w.createDimension('lon',177)

f_w.createVariable('time',np.int,('time'))
f_w.createVariable('level',np.int,('level'))
f_w.createVariable('lat',np.float32,('lat'))
f_w.createVariable('lon',np.float32,('lon'))

time = np.array([0,6,12,18,0,6,12,18,0,6,12,18])

f_w.variables['time'][:] = time
f_w.variables['level'][:] = level

f_w.createVariable( 'q', np.float32, ('time','level','lat','lon'))
var_data = np.ones(shape=(12,37,161,177), dtype = np.float32)
f_w.variables['q'][:] = var_data

 #Create a group with the name'wind'
group1 = f_w.createGroup('wind')

group1.createVariable( 'u', np.float32, ('time','level','lat','lon'))
var_data = np.ones(shape=(12,37,161,177), dtype = np.float32)
group1.variables['u'][:] = var_data

group1.createVariable( 'v', np.float32, ('time','level','lat','lon'))
var_data = np.zeros(shape=(12,37,161,177), dtype = np.float32)
group1.variables['v'][:] = var_data

 group1.close # Close the group, note that there are no brackets here

f_w.close()
The results of the creation are as follows:
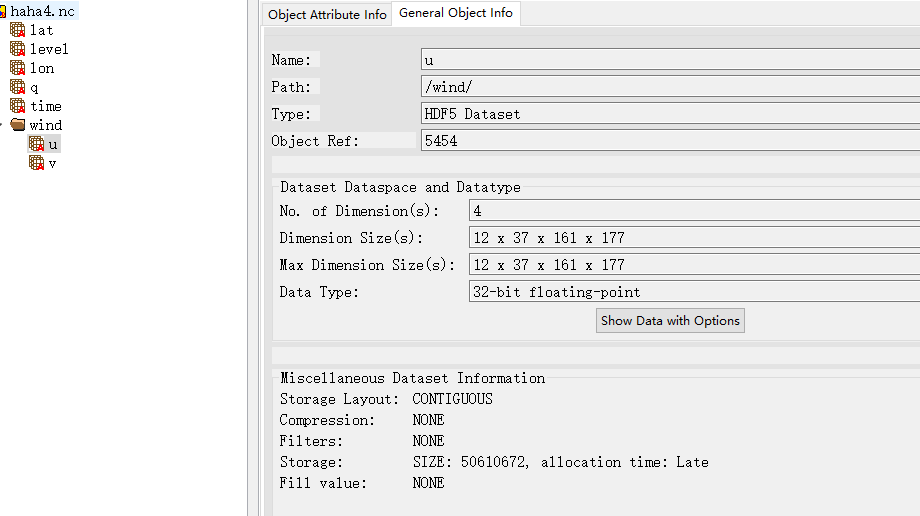
Look, the group information is out
**#step4: View the information of the .nc file with group **
f1 = nc.Dataset('haha5.nc')
 vars = f1.variables.keys() #odict_keys(['time','level','lat','lon','q']) Cannot see groups information
 #Pass the following command
 group_name = f1.groups.keys() #Get the group name, the output is: odict_keys(['wind'])
Use the following commands to see the information of the variables in the group.
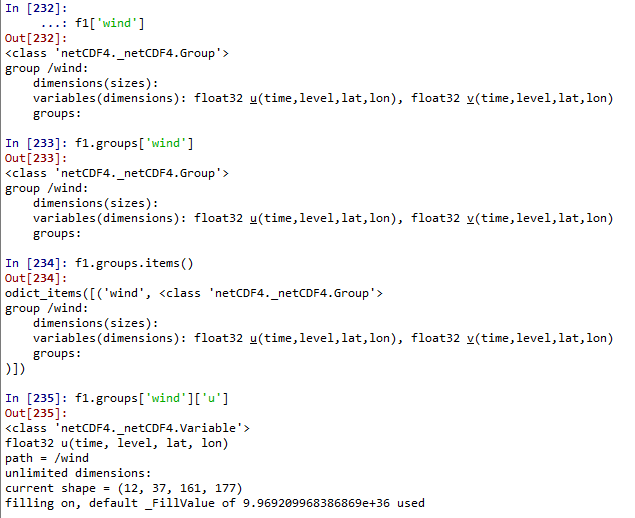
#Get the data of the variables in the group
group_var_data = f1['wind']['u'][:]
print(group_var_data.shape)  #(12, 37, 161, 177)
4. Summary
In addition to .nc files, there are also hdf files commonly used in meteorology. Both formats are similar, but I prefer .hdf format files
There will be an opportunity to introduce the read and write operations of .hdf files later.
Intelligent Recommendation

Read nc files using netcdf library
Article Directory Preface 1. Netcdf library acquisition and configuration under VS 2. *. NC4 data acquisition Summarize Preface NetCDF is the full name of network Common Data Format, which is an array...
Matlab read NC files
Matlab read NC files Continued ......
Netcdf4 -Create a NC file (2)
Simply display to create a NC file and add data. If you don’t understand, you can read the introduction part of the chapter. Display code part...

Use Python to read and write VIIRS data in NetCDF4 (.nc) format
Main tools for use: First introduce the data storage mode of the Netcdf4 format, which is a multi-dimensional data format, a data collection in the form of an array organization. Can be used directly ...
More Recommendation
Learn notes_nCL_ Read the variables in nc files_ how to make NC files
Due to the large number of files, it is not convenient to use MATLAB in supercomputing, so I have to bow to the NCL forces The purpose is to perform the first step of the relevant results in the super...
Netcdf - Create a NC file and add data for other NC files
Direct assignment of new NC files created with NC files with data Code display or Assign files to new variables, the effect is the same Code display Xiao Bai Orchuang, only personal practice or warm a...
Use matlab to transfer NC files to TIF files
Convert NC files to TIF files using Matlab Article catalog Convert NC files to TIF files using Matlab First, what is the NC file? Second, what is the TIF file? 2. Direct code First, what is the NC fil...

nc usage 2, use nc to transfer files and directories
Method 1, Demonstration of file transfer (first start receiving command) It is more convenient to use nc to transfer files, because there is no need to input passwords like scp and rsync. Send a rpm f...
Read the basic operation of the .nc file (NetCDF meteorological data file) using the Python (Netcdf4 library)
NetCDF (Network Common Data Form) Network Universal Data Format is a description and encoding standard for data-oriented and data shared by network sharing. Currently, Netcdf is widely used in many fi...