Custom View Paint-PathEffect
tags: android PathEffect Paint
setPathEffect(PathEffect effect)
The setPathEffect method sets the display style for the specified Path. The PathEffect class has no specific implementation. Its effect depends on its six subclasses:

The renderings are as follows:
CornerPathEffect
Constructor:
CornerPathEffect(float radius)
The function of this class is to connect the angles between the various connecting line segments of the Path with a circle with a specified radius in a smoother way, similar to the effect of arcs and tangents (STROKE or FILL style).
Sample code:
val cornerPathEffect = CornerPathEffect(24f)
mPaint.pathEffect = cornerPathEffect
canvas?.drawPath(path, mPaint)
Now specify that the radius of the arc of the included angle between the two line segments is 24f, and the connecting point of the two lines of the polyline is no longer an acute angle or a radian:

DashPathEffect
Constructor:
DashPathEffect(float[] intervals, float phase)
The function of this class is to dash the line segments on the Path. If you want to draw a dotted line, you can use this class. among them:
- intervals: The interval array must contain an even number of entries (>= 2), the even index specifies the "on" interval, which is a solid line, and the odd index specifies the "off" interval, which is blank.
- The function of phase is to offset the start of the specified length, but the total length is unchanged.
For phase, how do you understand this offset? In the interval array, the effect of the dotted line is realized. The sum of all elements in the interval is the length of a set of dotted lines, and the entire drawing is composed of N sets of these dotted lines. The default is to draw from the starting index again, which is a solid line. When the phase is specified, it will offset the dotted line by the specified length, where to start drawing instead of the starting index.
Now draw two dashed lines, and set the solid line and the blank to 40px. In order to observe the effect of the offset, the first dashed line has no offset, and the offset of the second dashed line is 100f:
val dashPathEffect = DashPathEffect(floatArrayOf(40f, 40f), 0f)
mPaint.pathEffect = dashPathEffect
canvas?.drawPath(path, mPaint)

path.offset(0f, 120f)
val dashPathEffectPhase = DashPathEffect(floatArrayOf(40f, 40f), 100f)
mPaint.pathEffect = dashPathEffectPhase
canvas?.drawPath(path, mPaint)
As can be clearly seen from the figure below, the effect of the second dashed line is different from the first dashed line. Since the offset of the second dashed line is 100f, after calculation, the second dashed line should be drawn from the beginning Start drawing at 20f of the solid line.
If the phase value is changed dynamically, the drawing of the path will produce an animation effect.
override fun onDraw(canvas: Canvas?) {
    super.onDraw(canvas)

    val dashPathEffect = DashPathEffect(floatArrayOf(40f, 40f), 0f)
    mPaint.pathEffect = dashPathEffect
    canvas?.drawPath(path, mPaint)

    path.offset(0f, 120f)
    val dashPathEffectPhase = DashPathEffect(floatArrayOf(40f, 40f), mPhase)
    mPaint.pathEffect = dashPathEffectPhase
    canvas?.drawPath(path, mPaint)


    mPhase++

    if (mPhase == 40f) {
        mPhase = 0f
    }

    invalidate()
}
DiscretePathEffect
Constructor:
DiscretePathEffect(float segmentLength, float deviation)
The function of this class is to break up the line segments of the Path, so that the break up effect occurs on the basis of the original path.
among them:
- segmentLength: Specify the maximum segment length
- deviation: Specify the amount of deviation
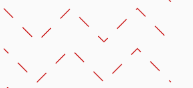
Now create a DiscretePathEffect, the maximum length of the broken line segment is 96px, and the deviation is 16f:
val discretePathEffect = DiscretePathEffect(96f, 16f)
mPaint.pathEffect = discretePathEffect
canvas?.drawPath(path, mPaint)
When drawing, the line segment will not be drawn according to the path, but the coordinate distribution of the original line segment will be broken up, and at the same time it will be offset within the specified range, which may cause more vertices than the original line segment, or The original line segment has few break points, and the actual effect is random.

SumPathEffect
Constructor:
SumPathEffect(PathEffect first, PathEffect second)
This class will implement the superimposition effect of two PathEffects. It accepts two specified PathEffects. It will perform independent performance of the PathEffect effects, and then simply overlap the two effects to display.
Now create a CornerPathEffect instance, and then create a DashPathEffect instance with the interval array [10f, 10f], and pass them to the SumPathEffect instance:
val cornerPathEffect = CornerPathEffect(64f)
val dashPathEffect = DashPathEffect(floatArrayOf(40f, 40f), 0f)
val sumPathEffect = SumPathEffect(cornerPathEffect, dashPathEffect)
mPaint.pathEffect = sumPathEffect
canvas?.drawPath(path, mPaint)
In fact, the effects of the two dashed lines are shown, more like two PathEffects displayed together, but they are relatively independent.

ComposePathEffect
Constructor:
ComposePathEffect(PathEffect outerpe, PathEffect innerpe)
This class is similar to SumPathEffect and will also achieve the combined effect of PathEffect. The difference is that it first draws innerpe and then outerpe. It first displays innerpe, and then increases the effect of outerpe on the basis of innerpe.
Use the two DashPathEffects used in the SumPathEffect example to pass to ComposePathEffect:
val dashPathEffectPhase = DashPathEffect(floatArrayOf(30f, 30f), 0f)
val dashPathEffect = DashPathEffect(floatArrayOf(40f, 40f), 0f)
val composePathEffect = ComposePathEffect(dashPathEffectPhase, dashPathEffect)
mPaint.pathEffect = composePathEffect
canvas?.drawPath(path, mPaint)
Its effect is obviously different from SumPathEffect. It is a dashed line at first, and a smooth treatment is made at the intersection. It is more like a chemical reaction between two PathEffects. The effect is a mixed effect of the two of them, not alone. existing.

PathDashPathEffect
It is similar to the DashPathEffect class, and also draws a dashed line, the difference is:
- Its solid line is no longer a line, but a specified Path graphic
- The distance of the blank is specified, it no longer accepts an interval array like DashPathEffect
Constructor:
PathDashPathEffect(Path shape, float advance, float phase, PathDashPathEffect.Style style)
The meaning of each parameter:
- shape: the path of the filled shape
- advance: the distance between each graphic
- phase: offset
style is the value of the enumeration PathDashPathEffect.Style
- Style.ROTATE: The graphic conversion at the line segment connection is rotated to an angle consistent with the movement direction of the next segment.
- Style.MORPH: The graphic will be connected to the next section with deformation such as stretching or compression
- Style.TRANSLATE: The graphic will be connected to the next paragraph by position translation.
Before using PathDashPathEffect, first specify a Path path to draw a solid line figure, for example, the following figure draws a triangle:
val shape = Path()
shape.lineTo(0f, 30f)
shape.lineTo(30f, 30f)
shape.lineTo(0f, 0f)
Now create an instance of PathDashPathEffect and pass the Path just created to it:
val pathDashPathEffect = PathDashPathEffect(shape, 45f, 0f, PathDashPathEffect.Style.ROTATE)
mPaint.pathEffect = pathDashPathEffect
canvas?.drawPath(path, mPaint)

path.offset(0f, 160f)
val pathDashPathEffect1 = PathDashPathEffect(shape, 45f, 0f, PathDashPathEffect.Style.MORPH)
mPaint.pathEffect = pathDashPathEffect1
canvas?.drawPath(path, mPaint)


path.offset(0f, 160f)
val pathDashPathEffect2 = PathDashPathEffect(shape, 45f, 0f, PathDashPathEffect.Style.TRANSLATE)
mPaint.pathEffect = pathDashPathEffect2
canvas?.drawPath(path, mPaint)
Effect picture:

If you find my article useful to you, please feel free to like and comment. Your support will encourage me to continue creating!
Intelligent Recommendation
Custom View-Paint brush
Foreword In the previous articleCustom control-Canvas canvas, We also see how to use Paint. Paint is also a powerful tool class, this article will introduce in detail. There are also many APIs in Pain...
Custom View Paint and Canvas
After learning the custom View, I always wanted to make a whole blog about the knowledge involved in the custom View process. The following is the process of the custom View. Today I will briefly talk...

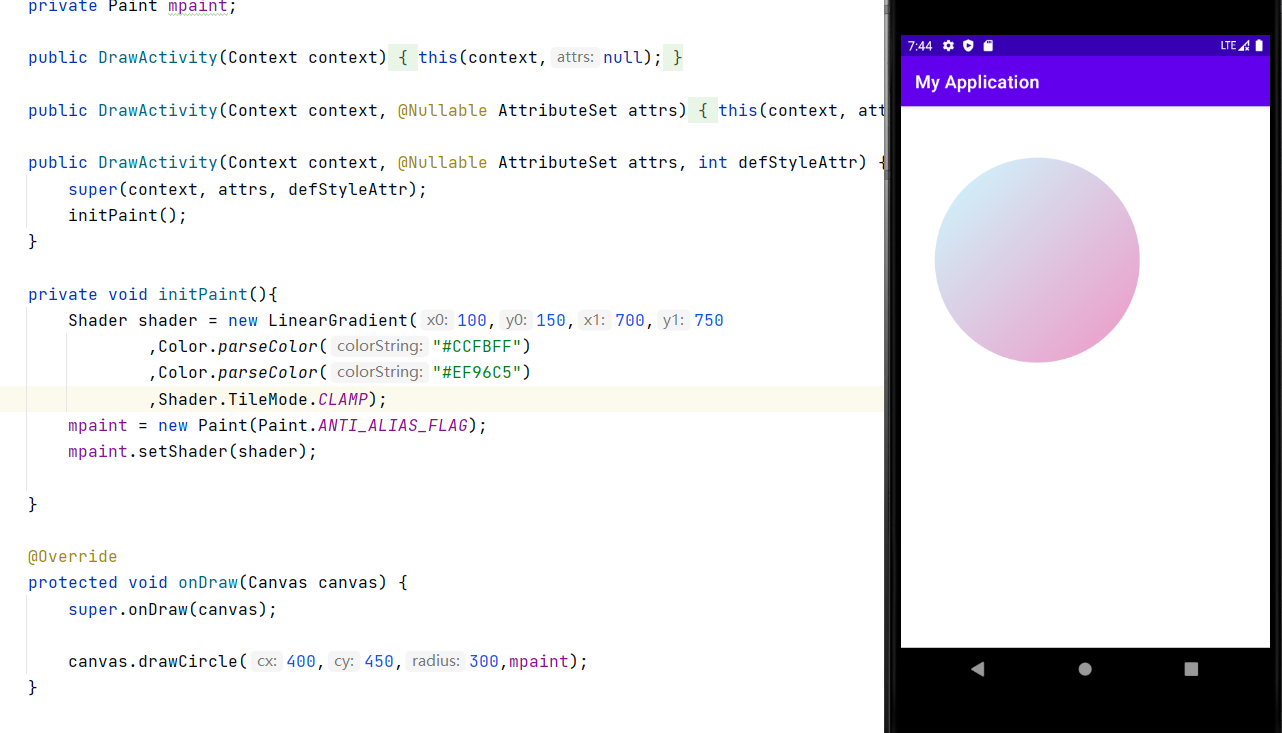
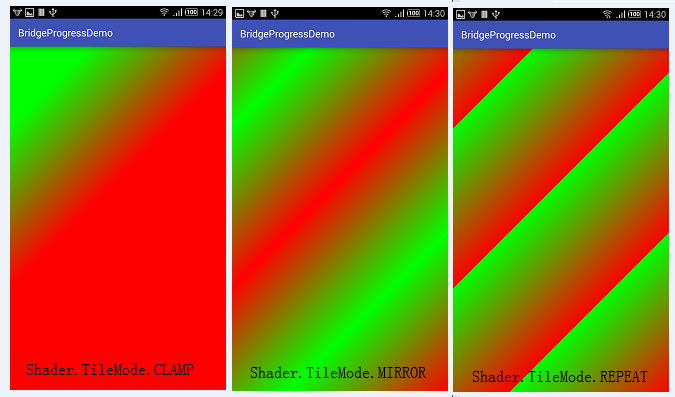
Custom View Paint-LinearGradient
LinearGradient LinearGradient is called linear rendering, which means that the shader uses linearly changing colors for rendering. To achieve this effect: LinearGradient has two constructors: LinearGr...

Custom View Paint-Basic
Custom View has great flexibility, as long as you dare to think, you can always draw it. Since it is painting, you always need tools, that is the familiar brush-Paint. As the saying goes, a worker mus...
Custom View – Take Paint
useCanvas of drawXXX() Method coordination Paint several common methods can achieve the most common drawing requirements; if you only know how to draw basic drawing, Paint The complete mastery of the ...
More Recommendation
Detailed Explanation of Paint for Custom View
Android provides various tools for drawing 2D graphics, such as Canvas, Point, Paint, and Rectangles. These tools can be used to draw directly on the interface. In the custom view, we often use Canvas...
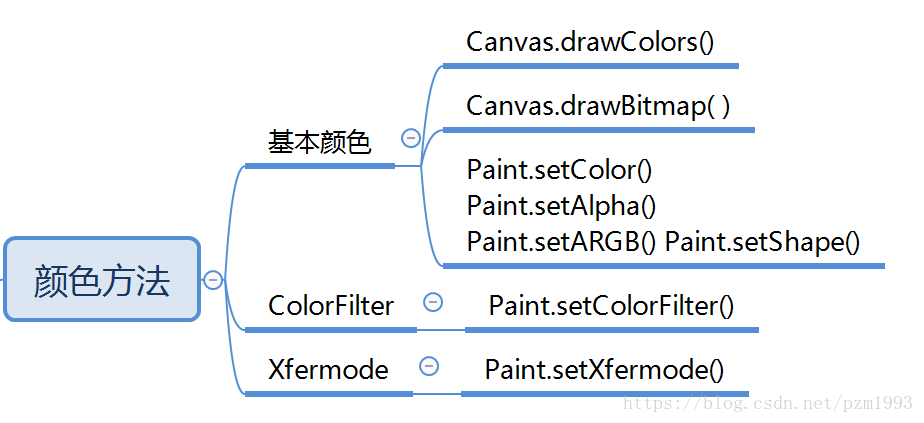
Custom view-color processing of Paint
Foreword This article introduces Paint's treatment of colors, and alsoCustom control-Paint brush Supplement. The treatment of colors here is divided into the following: Put together setShape, SetColoF...

Custom View-Paint Detailed Explanation
Previous This article gives a preliminary introduction to the custom single View and has a concept of the drawing process. This article will give a detailed introduction to the Paint part. In the prev...
android custom view--Paint and Canvas
The demo mainly understands some simple operations of custom view drawing in onDraw() If the English is very good, you can directly read the official documents: Canvas official website address &...