Develop Arduino with PlatformIO in vscode
tags: Software skills
Article catalog
- Getting Started with Platformio IDE on Vscode
-
- table of Contents
- Install Visual Studio Code for Windows, MacOS or Linux (VSCODE)
- Install Platformio IDE package for VSCODE
- Launch Platformio on vscode for the first time
- PIO menu
- Create a new project (ESP32 or ESP8266)
- Decrypt Platformio.ini file
- Compile from PlatformIO
- Check if the development board is detected correctly
- Upload the program to the development board (Arduino, ESP8266, ESP32, STM32 ...)
- common problem
- How to disable PlatformIO extensions?
- Migrate the project from Arduino IDE to Platformio
- Platformio IDE (vscode) uses third-party libraries
Reference address:
- https://diyprojects.io/install-ide-platformio-extension-visual-studio-code-vscode-windows-32-bit-linux/#.YGaJ48hfgdU
- https://diyprojects.io/migrate-project-arduino-ide-platformio-esp32-esp8266-esp01#.YGaK1MhfgdU
Getting Started with Platformio IDE on Vscode

table of Contents
- Install Visual Studio Code for Windows, MacOS or Linux (VSCODE)
- Install Platformio IDE package for VSCODE
- Launch Platformio on vscode for the first time
- PIO menu
- Decrypt Platformio.ini file
- Compile from PlatformIO
- Check if the development board is detected correctly
- Upload the program to the development board (Arduino, ESP8266, ESP32, STM32 ...)
- common problem
- How to disable PlatformIO extensions?
- Do you have questions about this topic?
PlatformIO is an alternative product of Arduino ID, which can be more common way for microcontrollers to develop connections or code. PlatformIO is not a code editor, which is a set of tools (toolchain), forms for Microsoft Visual Studio Code (or vscode) and Github (also Microsoft!) Atom plug-in. Vscode is a lightweight free code editor for Windows, Macos, Linux (32 or 64-bit).
PlatformIO can be used as many code editors (Atom,CLion,CodeBlocks,Eclipse,Emacs,NetBeans,Qt Creator,Sublime Text,Vim,Visual Studio,VSCode)ofPlugin. No matter what the publisher is, the function is the same. I chose Microsoft Visual Studio Code, which is a fast, free cross-platform editor. you choose !
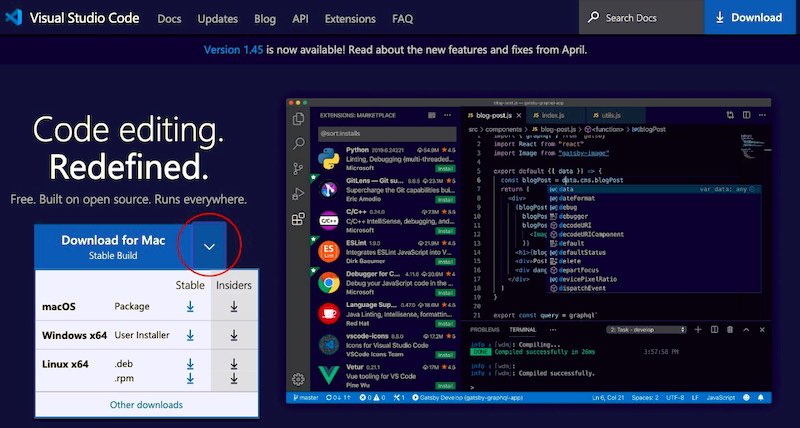
Install Visual Studio Code for Windows, MacOS or Linux (VSCODE)
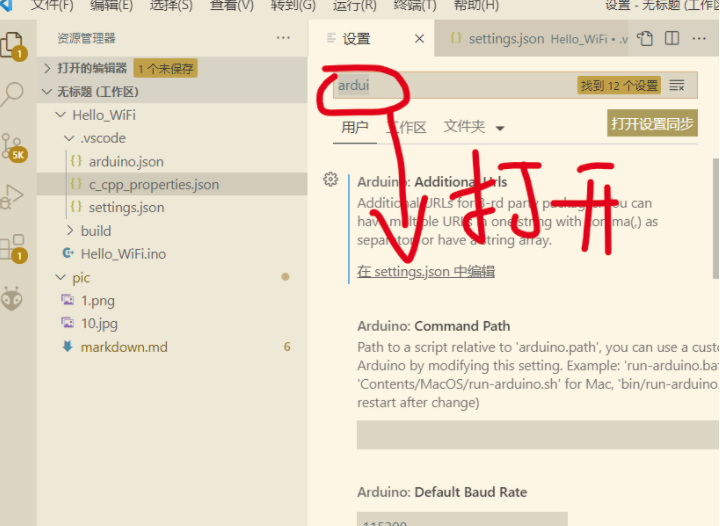
Turn toVSCODE official pageThe version that is suitable for your environment is installed below.
- Windows: Installer OU ZIP
- macOS:dmg
- Linux 32-bit: .deb ,.rpm ,.tag.gz
- Linux 64-bit: .deb ,.rpm, .tag.gz
1
Install Platformio IDE package for VSCODE
Vscode has an extension manager (plugin) that opens by viewing-> extended menu or directly from the icon in the sidebar.
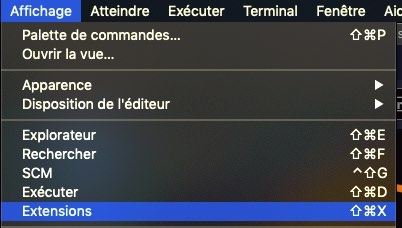
The working principle of VScode is very similar to Sublime Text (good idea is often replicated ...), you can also use the CTRL + P key key (or CMD + P in MacOS) to call the extension manager.
Enter PlatformIO in the Search field.
Click Install to start installing plugins and dependencies.
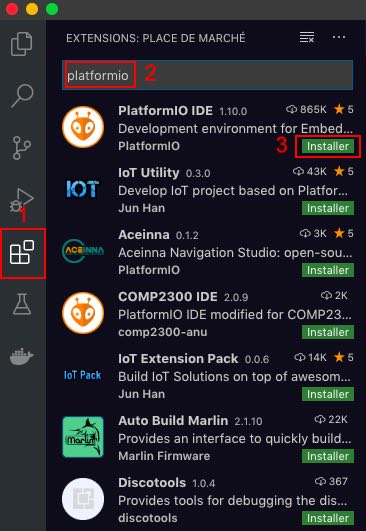
Please note that some of the official project icons used by some extension program developers may be confused. You can trust the extension. Embedded, Internet of Things, Arduino, ARM MBED, Le Xin (ESP8266 / ESP32), AVR, RISC-V, STM32, PIC32, NRF51 / NRF52, MSP430, MCS-51 (8051), FPGA, Freertos, ESP-IDF, CMSIS, SPL
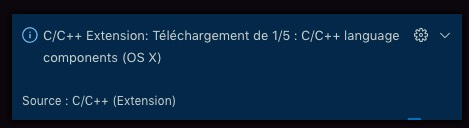
The installation process is done in the background when you find vscode. The window below the screen allows you to track the smooth progress of the installation. This is rare, but if you encounter the installation problem (or crash), you only need to restart the VSCode to resume the installation process.
By the way, VSCode's operation is very similar to Sublime Text (good idea is often replicated ...), you can also call the extension manager using the combination key Ctrl + P (or CMD + P under MacOS).
Launch Platformio on vscode for the first time
At the end of the installation, you do not need to restart the editor. The PIO home page is open in the new tag Tab. This page greatly slows down the speed of VSCode, but it doesn't help. I suggest that you open its feature when you disable the startup when you are starting.
A new icon in the form of ant head will appear in the sidebar APPEARS. It provides access to all features of the PIO. We will introduce them later.
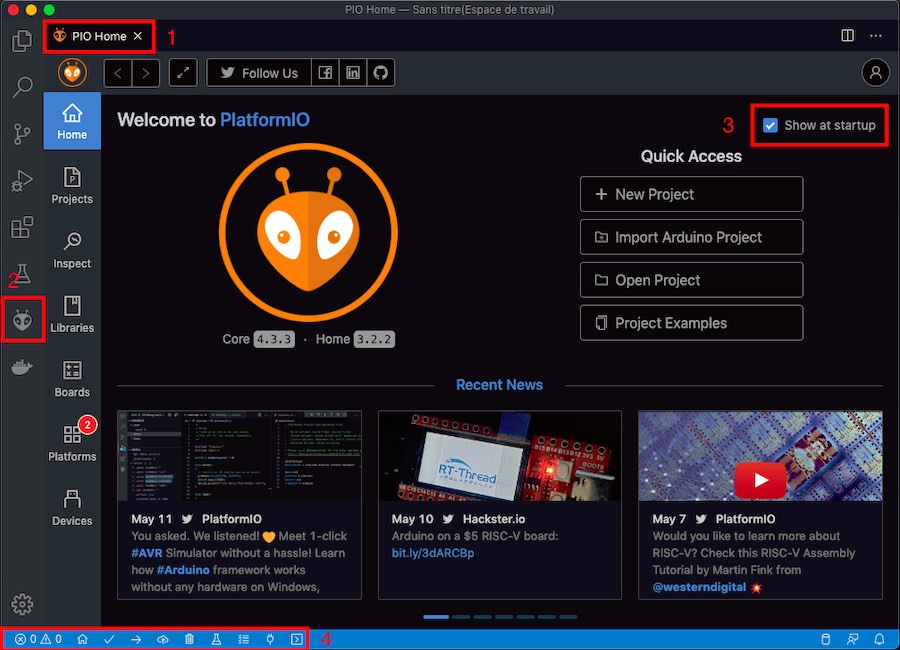
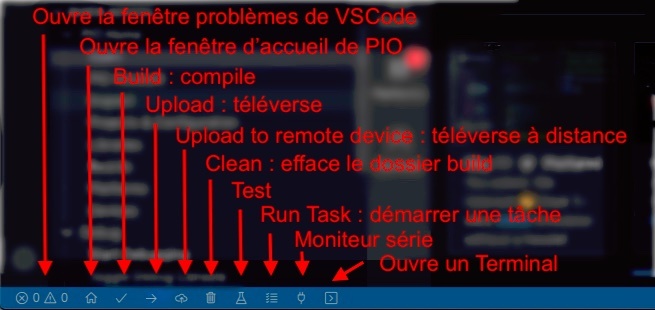
Finally, the mini toolbar appears at the bottom of the screen. It is a streamlined version of the PIO menu Light. It combines the following features
- Error indicating compilation problem
- The home page opens the PIO home window. Useful when you want to import or create new projects
- Build compiles project code. Allow you to check the error
- Upload compile and upload the project. Detection is automatic, but can also specify port in the configuration file
- Uploaded to the remote device IDEM, but on the remote MCU. Need a PIO account (free or limited PIO account)
- Clear will delete the build folder. If you have any questions, please don't hesitate. There is no impact on the source code of the project
- Test the test code before compiling
- Run the task will open the vscode command panel
- Serial monitor opens a serial monitor
- The terminal opens the terminal directly in the VSCode or Power Shell of Windows. We directly locate the foundation of the project
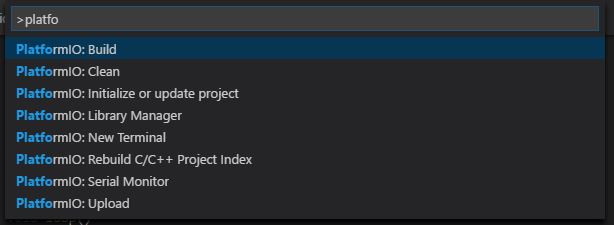
For users who like to use keyboard shortcuts, you can call palettes with a combination key Ctrl + Shift + P (CMD + ↑ + P) on MacOS.
Then enter keyword platformio to display all available commands.
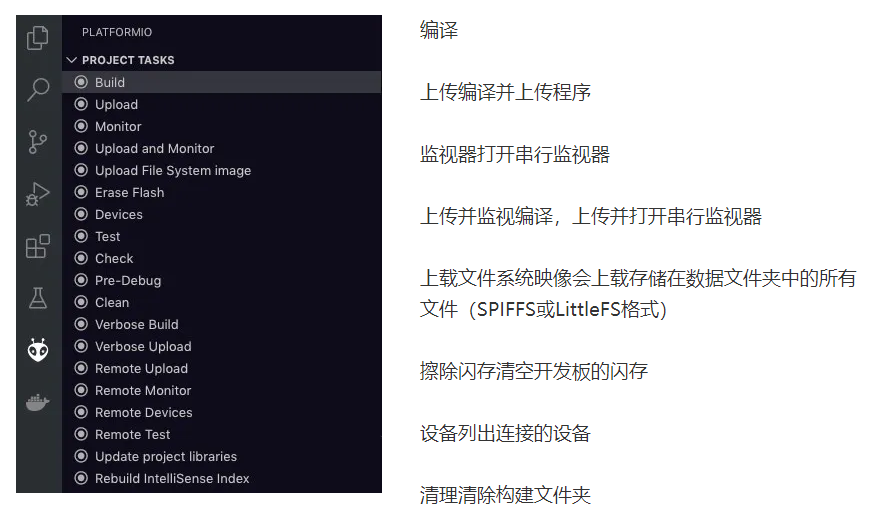
PIO menu
Let's go back to the PIO menu, which is the easiest and most complete method using PIO. Always access it from the sidebar. It combines all the features of the PIO.
The following is the most useful command:
Create a new project (ESP32 or ESP8266)
It is time to continue to study a small example.
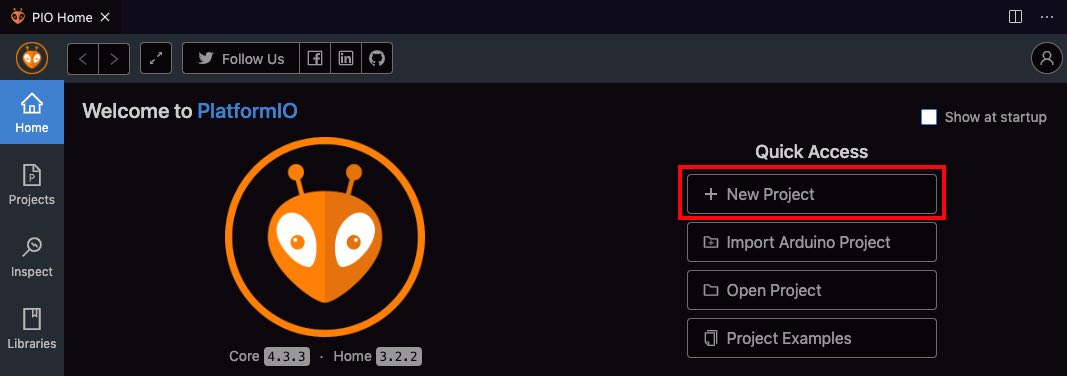
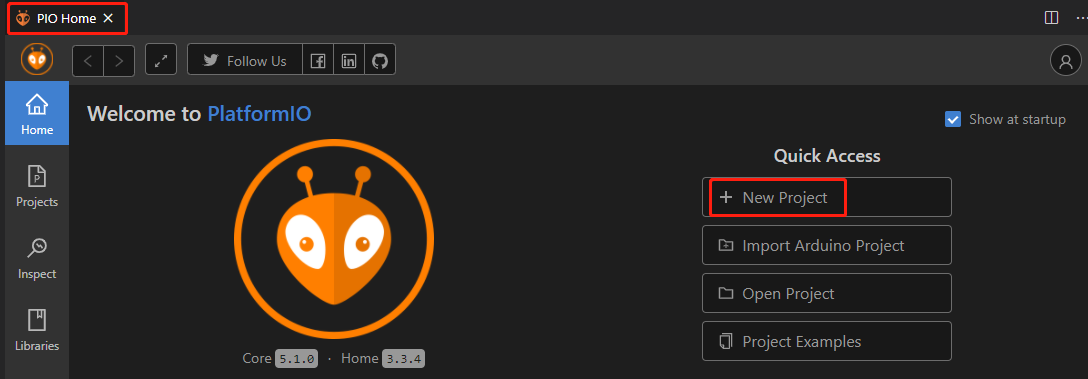
Open the PIO main window (if necessary), then click + New Project to open the wizard used to create a project
Name the project, then select the development board from the list. This list is impressive.
You can filter the development board in the first letters (D1 Mini) of the manufacturer, the first letter (D1 Mini) of the development board, type (ESP32, ESP8266 ...).
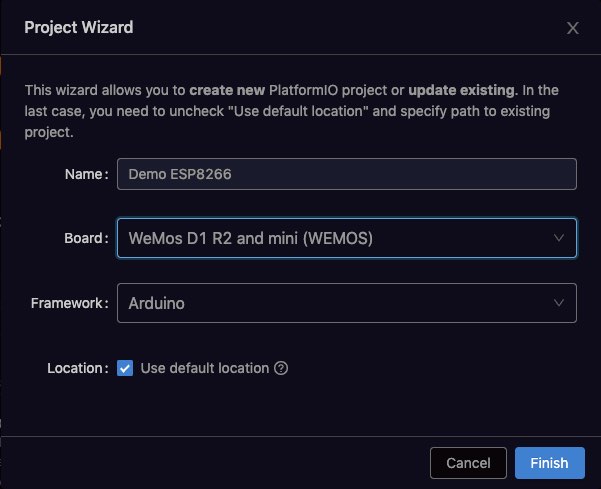
Arduino will be selected. You can choose another framework, but in this case you must reference the latter documentation.
Finally, select the directory for creating a project. If "use the default location",Documents / PlatformIO / ProjectsCreate a project in the folder. The directory name will be the name of the project.
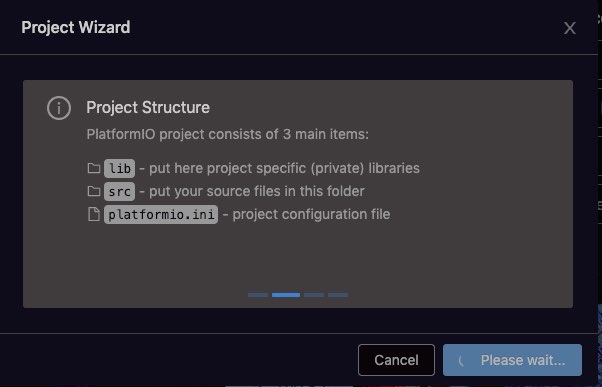
Clickcarry outInitialization of starting projects. This operation lasts only a few seconds.
:
Note: Do not use special characters that may interfere with the compiler
You can now access the project from the resource manager
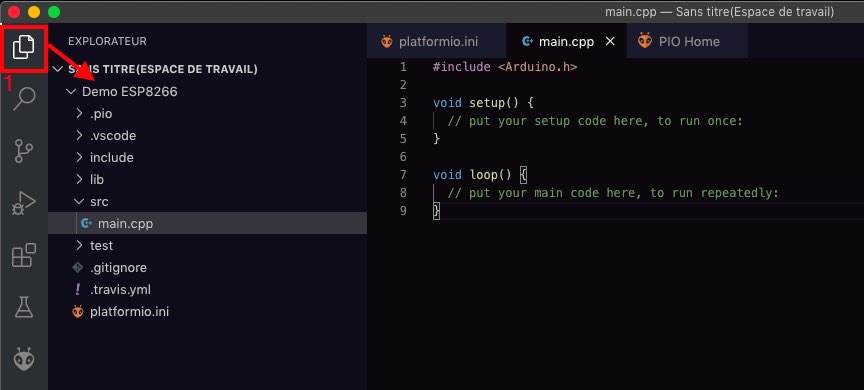
This folder contains several folders and profiles.
- .pio is a built-in (hidden) folder. These are binaries generated by the compiler. Create a subfolder by the target (developing board)
- LIB is a folder that will be in the library required in it. This can better manage version issues from one item to another project. On the other hand, pay attention to the consumption of disk space.
- SRC This folder contains the source code for your project. This is your work profile
- Platformio.ini is a PIO configuration file
WARNING, you must never intervene (delete, modify, move) folders and platformio.ini files, otherwise you will no longer be able to compile your project.
Open the main.cpp file located in the SRC (Source) folder. As you can see, the Arduino.H library must be declared when developing Arduino code in PIO.
#include "Arduino.h"

void setup(){
}

void loop(){
}
Replace the code to flash code and save your changes
#include "Arduino.h"

void setup() {
   // initialize digital pin LED_BUILTIN as an output.
   pinMode(LED_BUILTIN, OUTPUT);
}

// the loop function runs over and over again forever
void loop() {
   digitalWrite(LED_BUILTIN, HIGH); // turn the LED on (HIGH is the voltage level)
   delay(1000); // wait for a second
   digitalWrite(LED_BUILTIN, LOW); // turn the LED off by making the voltage LOW
   delay(1000); // wait for a second
}
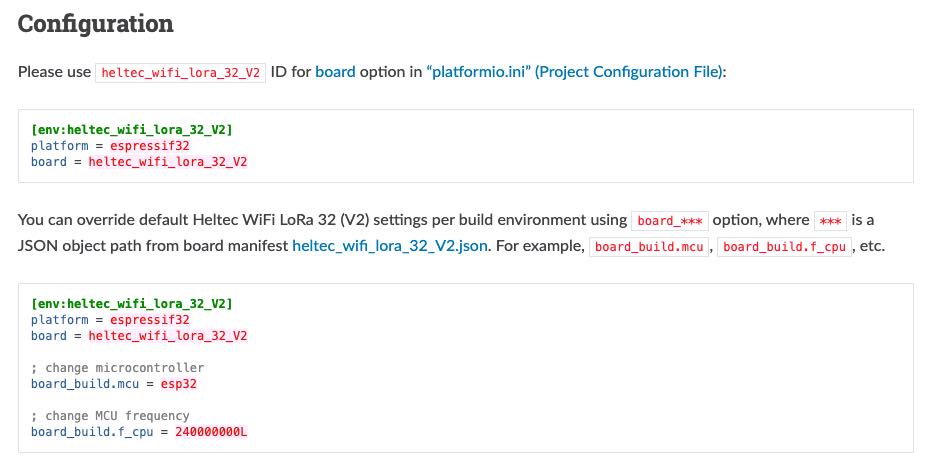
Decrypt Platformio.ini file
Let us now understand how to decrypt the Platformio.ini profile located in the root directory.
The advantage of PIO is to compile the same code (project) as much goal (development board, MCU) as needed. The configuration of each board is made, the block is in the key ENV: starts between parentheses, such as [ENV: ESP12E] of Lolin D1 Mini.
You need three parameters to completely define the board:
- The platform corresponding to the SOC used in the motherboard (ESP32, ESP8266, Atmel AVR, STM32 ...). Complete list here
- Plate development board. Full list can be found here
- The framework will run the software environment of the project code. Note that each SOC is only compatible with a limited number of frameworks. You can find a list here.
[env:esp12e]
platform = espressif8266
board = esp12e
framework = arduino
Then we can specify other parameters, for example
UPLOAD_PORT specifies the COM port
- / Dev / ttyUSB0 serial port based on Linux (or MacOS) system
- COM3 serial port on Windows
- 192.168.0.13 IP address for wireless update via WiFi (OTA)
UPLOAD_SPEED Specifies the Bud Rate Transmission Speed
Monitor_Speed Serial Monitor Speed
here hasMore choices
To add a new development board, I suggest you fromOfficial WikiRetrieve the configuration of the board instead of using the configuration wizard. More than 850 developing boards have been listed.
youNo needYou can find a LORA connection function.Heltec ESP32The developer is related to the correct setting, which has 2 versions.
12
Compile from PlatformIO
Now everything is ready, you can start build from the PIO menu
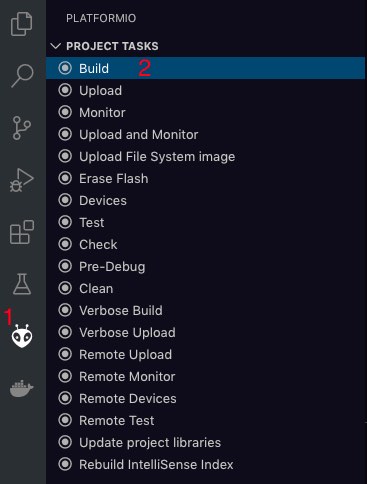
Or from the tool panel

For some reason, I still can't perform test and code verification (check) and display an error message.
Unlike Arduino IDE, these libraries must be installed before compiling. As long as the dependency is correctly indicated in the INI file, PIO will process everything.
The terminal opens below the code and indicates the compilation schedule. The compilation time is the same as the Arduino IDE.
If everything goes well, you should receive the news of [Success]
Linking .pio/build/esp12e/firmware.elf
Retrieving maximum program size .pio/build/esp12e/firmware.elf
Checking size .pio/build/esp12e/firmware.elf
Building .pio/build/esp12e/firmware.bin
Advanced Memory Usage is available via "PlatformIO Home > Project Inspect"
RAM: [=== ] 32.7% (used 26816 bytes from 81920 bytes)
Flash: [== ] 24.6% (used 257212 bytes from 1044464 bytes)
Creating BIN file ".pio/build/esp12e/firmware.bin" using ".pio/build/esp12e/firmware.elf"
======================================================== [SUCCESS] Took 32.26 seconds ====
copy
Check if the development board is detected correctly
On Arduino IDE, just go to the Tools -> Port menu to find if the development board has been detected.
The equivalent function can be used on the PIO. Open the PIO home page and open the Device tab. These boards will automatically detect and appear in the list (here for the Mac). If this is not this, use the "Refresh" button to force the test device.
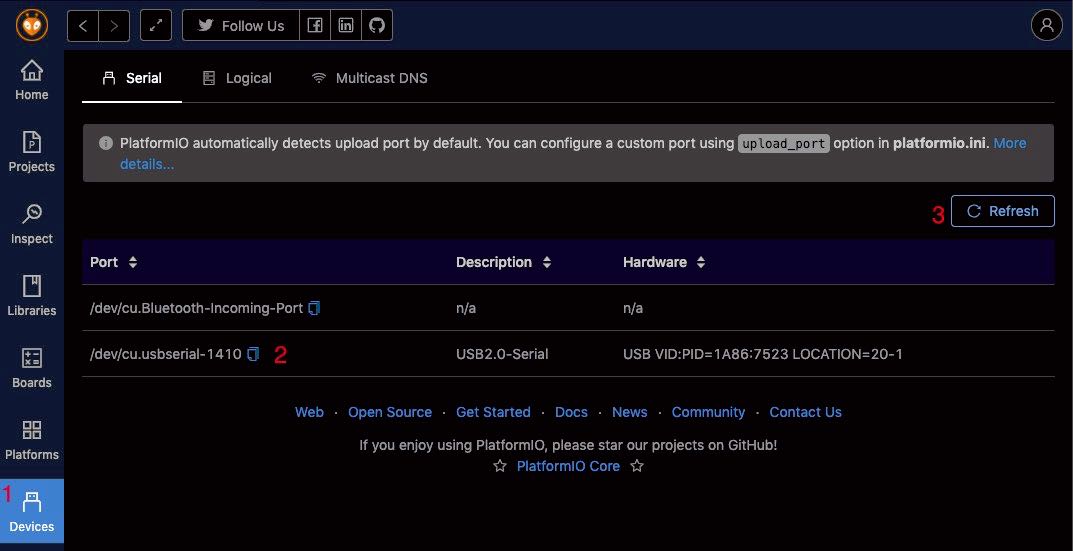
Reminder, if you are difficult to upload the program to the board, you can specify port and transmission speed in the configuration (see above)
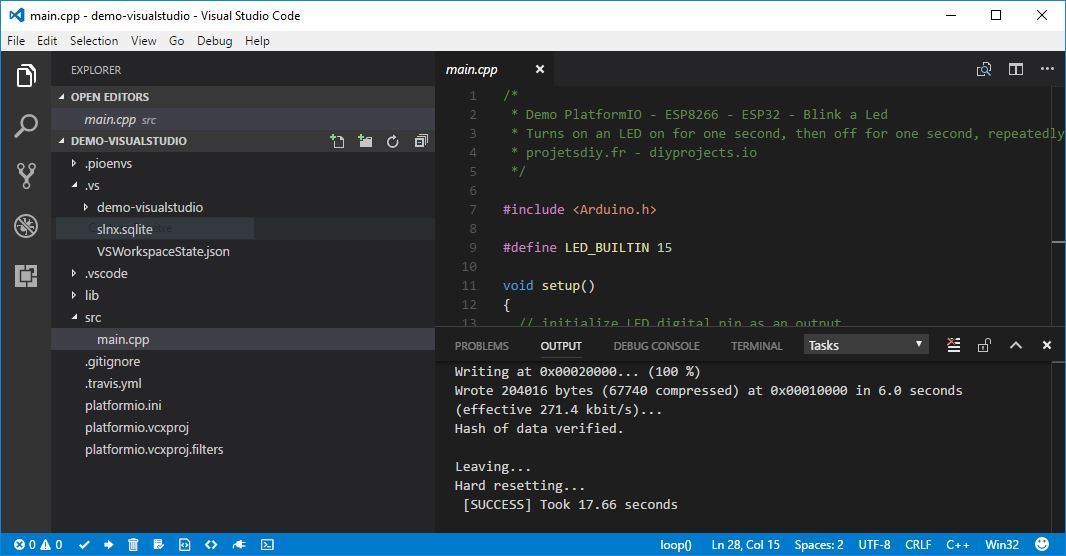
Upload the program to the development board (Arduino, ESP8266, ESP32, STM32 ...)
Everything is ready, you can upload the program to the development board. As before, you can access the UPLOAD method from the panel or PIO menu
PIO Compile Project, connect to the development board and upload binary files.
> Executing task in folder Demo ESP8266: platformio run --target upload <

Warning! Ignore unknown configuration option `upload_serial` in section [env:esp12e]
Processing esp12e (platform: espressif8266; board: esp12e; framework: arduino)
----------------------------------------------------------------------------------------------------------------------------------------------
Verbose mode can be enabled via `-v, --verbose` option
CONFIGURATION: https://docs.platformio.org/page/boards/espressif8266/esp12e.html
PLATFORM: Espressif 8266 2.5.1 > Espressif ESP8266 ESP-12E
HARDWARE: ESP8266 80MHz, 80KB RAM, 4MB Flash
PACKAGES:
- framework-arduinoespressif8266 3.20701.0 (2.7.1)
- tool-esptool 1.413.0 (4.13)
- tool-esptoolpy 1.20800.0 (2.8.0)
- tool-mkspiffs 1.200.0 (2.0)
- toolchain-xtensa 2.40802.200502 (4.8.2)
LDF: Library Dependency Finder -> http://bit.ly/configure-pio-ldf
LDF Modes: Finder ~ chain, Compatibility ~ soft
Found 30 compatible libraries
Scanning dependencies...
No dependencies
Building in release mode
Retrieving maximum program size .pio/build/esp12e/firmware.elf
Checking size .pio/build/esp12e/firmware.elf
Advanced Memory Usage is available via "PlatformIO Home > Project Inspect"
RAM: [=== ] 32.7% (used 26816 bytes from 81920 bytes)
Flash: [== ] 24.6% (used 257212 bytes from 1044464 bytes)
Configuring upload protocol...
AVAILABLE: espota, esptool
CURRENT: upload_protocol = esptool
Looking for upload port...
Auto-detected: /dev/cu.usbserial-1410
Uploading .pio/build/esp12e/firmware.bin
esptool.py v2.8
Serial port /dev/cu.usbserial-1410
Connecting....
Chip is ESP8266EX
Features: WiFi
Crystal is 26MHz
MAC: 5c:cf:7f:85:e6:20
Uploading stub...
Running stub...
Stub running...
Configuring flash size...
Auto-detected Flash size: 4MB
Compressed 261360 bytes to 192964...

Writing at 0x00000000... (8 %)
Writing at 0x00004000... (16 %)
Writing at 0x00008000... (25 %)
Writing at 0x0000c000... (33 %)
Writing at 0x00010000... (41 %)
Writing at 0x00014000... (50 %)
Writing at 0x00018000... (58 %)
Writing at 0x0001c000... (66 %)
Writing at 0x00020000... (75 %)
Writing at 0x00024000... (83 %)
Writing at 0x00028000... (91 %)
Writing at 0x0002c000... (100 %)
Wrote 261360 bytes (192964 compressed) at 0x00000000 in 18.6 seconds (effective 112.6 kbit/s)...
Hash of data verified.

Leaving...
Hard resetting via RTS pin...
================================ [SUCCESS] Took 23.11 seconds ==============================
copy
common problem
Unpredictable
Esptool.py Unable to connect to the development board (ESP32, ESP8266 ...)
Looking for upload port...
Auto-detected: /dev/cu.usbserial-1420
Uploading .pio/build/esp12e/firmware.bin
esptool.py v2.8
Serial port /dev/cu.usbserial-1420
Connecting........_____....._____....._____....._____....._____....._____....._____

A fatal error occurred: Failed to connect to ESP8266: Timed out waiting for packet header
*** [upload] Error 2
============================= [FAILED] Took 27.38 seconds ===================
Possible causes and remedies:
- This module is not in the BoolTload mode or has not received the request.
- Test method:
- reset
- Disconnect / reconnection / restart upload
- Make the same as the USB cable
- Another USB port
- Clear flash memory
- Check if the board is detected in the device
- Test with another module ... If you have passed several attempts, please consider replacing this module.
Unable to connect serial monitors
By default, the serial port on the official extension is configured to 9600 baud. Han Jun adds a parameter to set the speed. To use other speeds, open "Terminal" and run the following command Pio Device Monitor -b 115200.
You can also use the Monitor_Speed option to specify speed in the Plaformio.ini file.
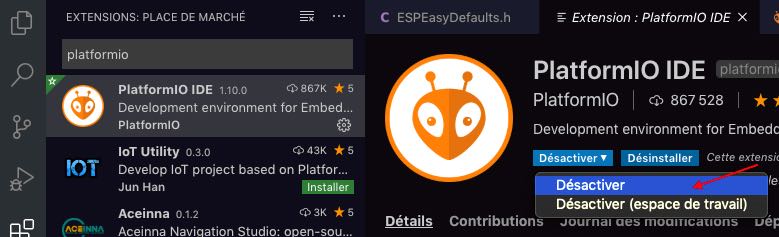
How to disable PlatformIO extensions?
PIO may slow down the boot speed of VSCode. If you use it once, you can deactivate it from the extension manager. It is necessary to activate it when the PIO function is required. Load has been completed, there is no need to restart vscode!
Visual Studio Code is a good alternative to the Atom editor. Very light, its startup speed is much faster than atom. It is also ideal for lightweight configuration or running 32-bit Linux regeneration PC. You will be less than the guidance from Atoms that are still a official development platform of PlatformIO. The documentation of the SDK is very complete, and the grip is very fast.
- Use PlatformIO development project. Problem and solution
- Platformio.ini, prompts and useful settings. Data_Dir, Monitor_Speed, Upload_port ...
- Migrate the project from Arduino IDE to PlatformIO. ESP32, ESP8266 or other
- ESP8266. Upload data folder from PlatformIO (Spiffs or Littlefs)
- Convert Arduino code to ESP Easy MEGA plugin for ESP8266 / ESP32
Migrate the project from Arduino IDE to Platformio
Original address: https://diyprojects.io/migrate-project-ARDuino-ide-platformio-esp32-esp8266-esp01#.ygak1mhfgdu
table of Contents
- Install Platformio (PIO) on vscode
- Popular an Arduino project on Platformio
- New structure of Arduino project under PIO
- Move the data folder containing Littlefs or spiffs files (optional)
- Update
- Do you have questions about this topic?
At startup, PlatformIO does not seem to be as easy as Arduino IDE, but it is a powerful code editor. We will see how to migrate (import) existing projects developed with Arduino IDE.
Since the ESP8266 SDK version 2.6.0, PlatformIO supports spiffs and littlefs. To use Littlefs, just specify using the Board_build.filesystem = Littlefs option in the PlatformIO configuration file. Read this tutorial for more information.
Also read the ESP8266. Upload data folder from PlatformIO (Spiffs or Littlefs)
Install Platformio (PIO) on vscode
Platformio (PIO) is not a code editor. It is a command line development environment (also known as toolchain), which can be used as plugins of most code editors.Atom,CLion,CodeBlocks,Eclipse,Emacs,NetBeans,Qt Creator,Sublime Text,Vim,Visual Studio,VSCode. No matter what editor is used, the function is the same.
I suggest you install the Pio plugin for Visual Studio Code (vscode) from Microsoft, which is a fast, free and cross-platform editor. you choose !
Also read the PlatformIO IDE on Vscode (Windows, Macos, Raspbian, Linux)
Popular an Arduino project on Platformio
1 Open the PIO home page from the toolbar or screen of the screen on the left side of the screen.
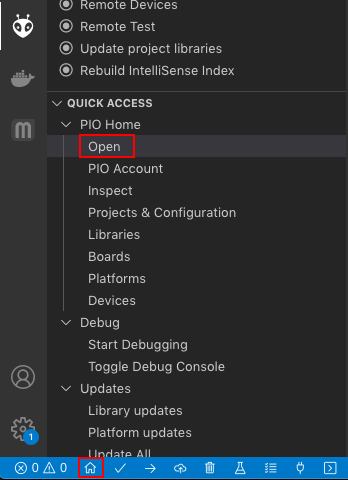
1
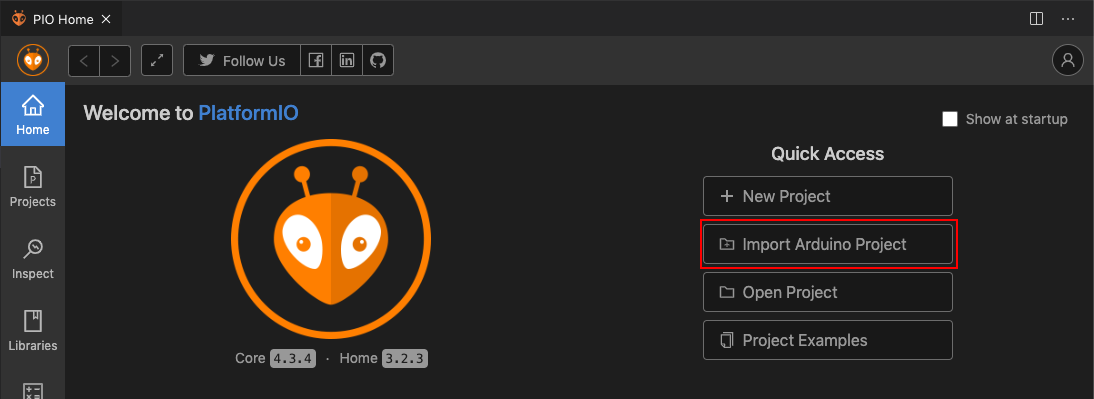
2 Click Import Arduino project to start importing an existing project.
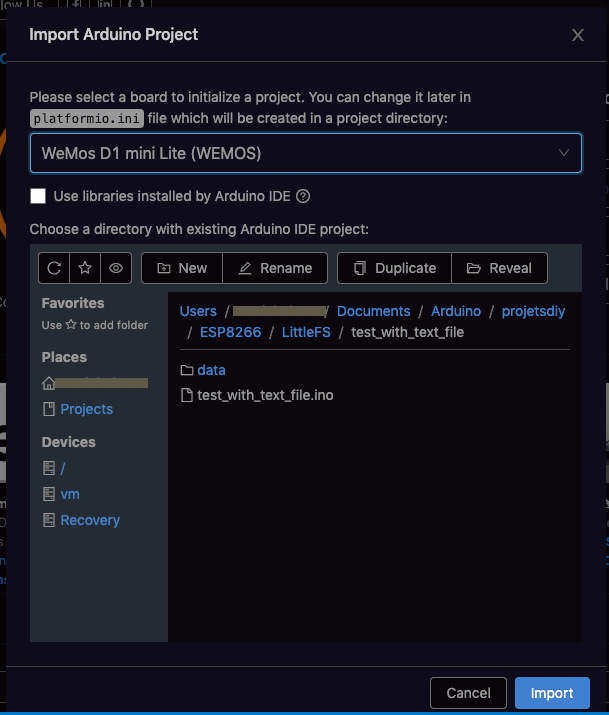
3 Select the required development board
Here, we will chooseLoLin d1 mini. PIO supports more than 800 development boards.
You can add (or modify the board) later, this is the advantage of PIO
4 Locate and select the Arduino / ESP32 / ESP8266 project folder to migrate to PIO.
3
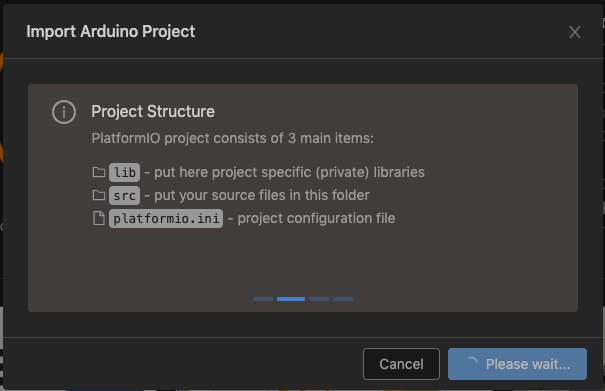
5 Introduction / migration to PIO
Create a new folder that contains the source code in the PlatformIO Work folder. By default, the work folder is located in "My Documents" on Windows, and "Documents" on MacOS or Linux.
The folder created in the Projects directory is named by the target datetime (the name of the development board) and contains the following elements:
- LIB private library has been moved to the lib folder
- SRC will contain all INO files (the source code of the Arduino project)
- Platformio.ini is a configuration file that allows you to define the environment. Each environment allows you to specify the type of development board (Arduino,ESP32,ESP8266,STM32 ...), framework for compilation andHereMany other parameters recorded.
4
After the file replication is complete, the PIO generates an item profile.
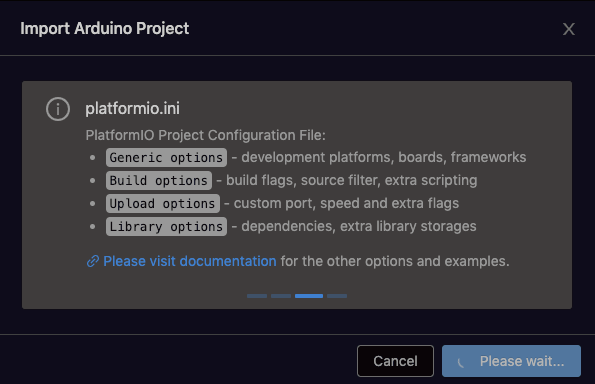
5
New structure of Arduino project under PIO
Use Arduino IDE, in the document stored in the Arduino-> Library subfolder.
Under PIO, it is recommended to manage libraries directly in the project folder. This allows you to manage library versions of each item. You can also use Arduino IDE to do this, but it is not convenient.
When migrating an existing project, the main.ino file will automatically move to the SRC folder.
When you create a new project, the PIO generates a CPP file and adds the call to the Arduino.H library.
#include <Arduino.h>
You will have to manually move the data folder (if present) to the same level as the SRC folder
| Arduino project structure | Migrated PIO project structure |
|---|---|
Project_dir ├── Data │└───File.txt ├──main.ino |
Project_dir ├── Data │ └─File.txt ├─ -LIB │ └── Review Document ├─PLATFORMIO.INI ├─SRC │ └──main.ino └─ Test └── ... |
Move the data folder containing Littlefs or spiffs files (optional)
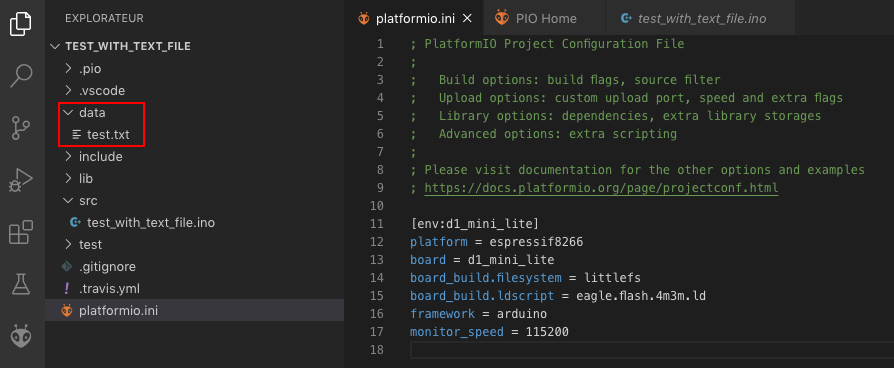
If your project is included in the data folderLittleFSorSPIFFSFile, you must move it manually to make it clipped to the SRC folder on the same level.
6
By default, PIO uses the SPIFFS file system. To activate Littlefs, you need to specify it by adding the option board_build.filesystem = littlefs to the Platformio.ini file.
To specify the size of the file system (FS), simply add option Board_build.ldscript and specify a value in the form of Eagle.flash. ***. di
All available configurationsit's here。
This is equipped with 4MB flashLoLin d1 miniExample, 3MB will be assigned to the Littlefs file system.
[env:d1_mini_lite]
platform = espressif8266
board = d1_mini_lite
board_build.filesystem = littlefs
board_build.ldscript = eagle.flash.4m3m.ld
copy
Then use the "Upload File System Image" option
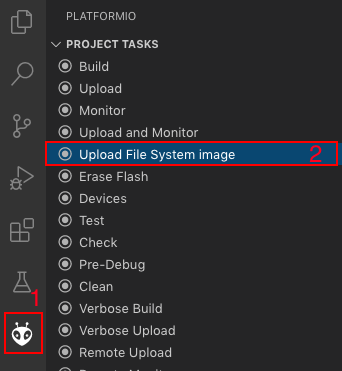
7
Platformio IDE (vscode) uses third-party libraries
Ten miles
When doing a project, in order to improve the efficiency, we will prefer to re-resemble the wheels, so the third-party library may be used, while PlatformIO is organized and provides some third-party libraries that are ready to use. Let's take a look at how to use and manage these libraries in Platformio IDE (vscode).
1 Introduction
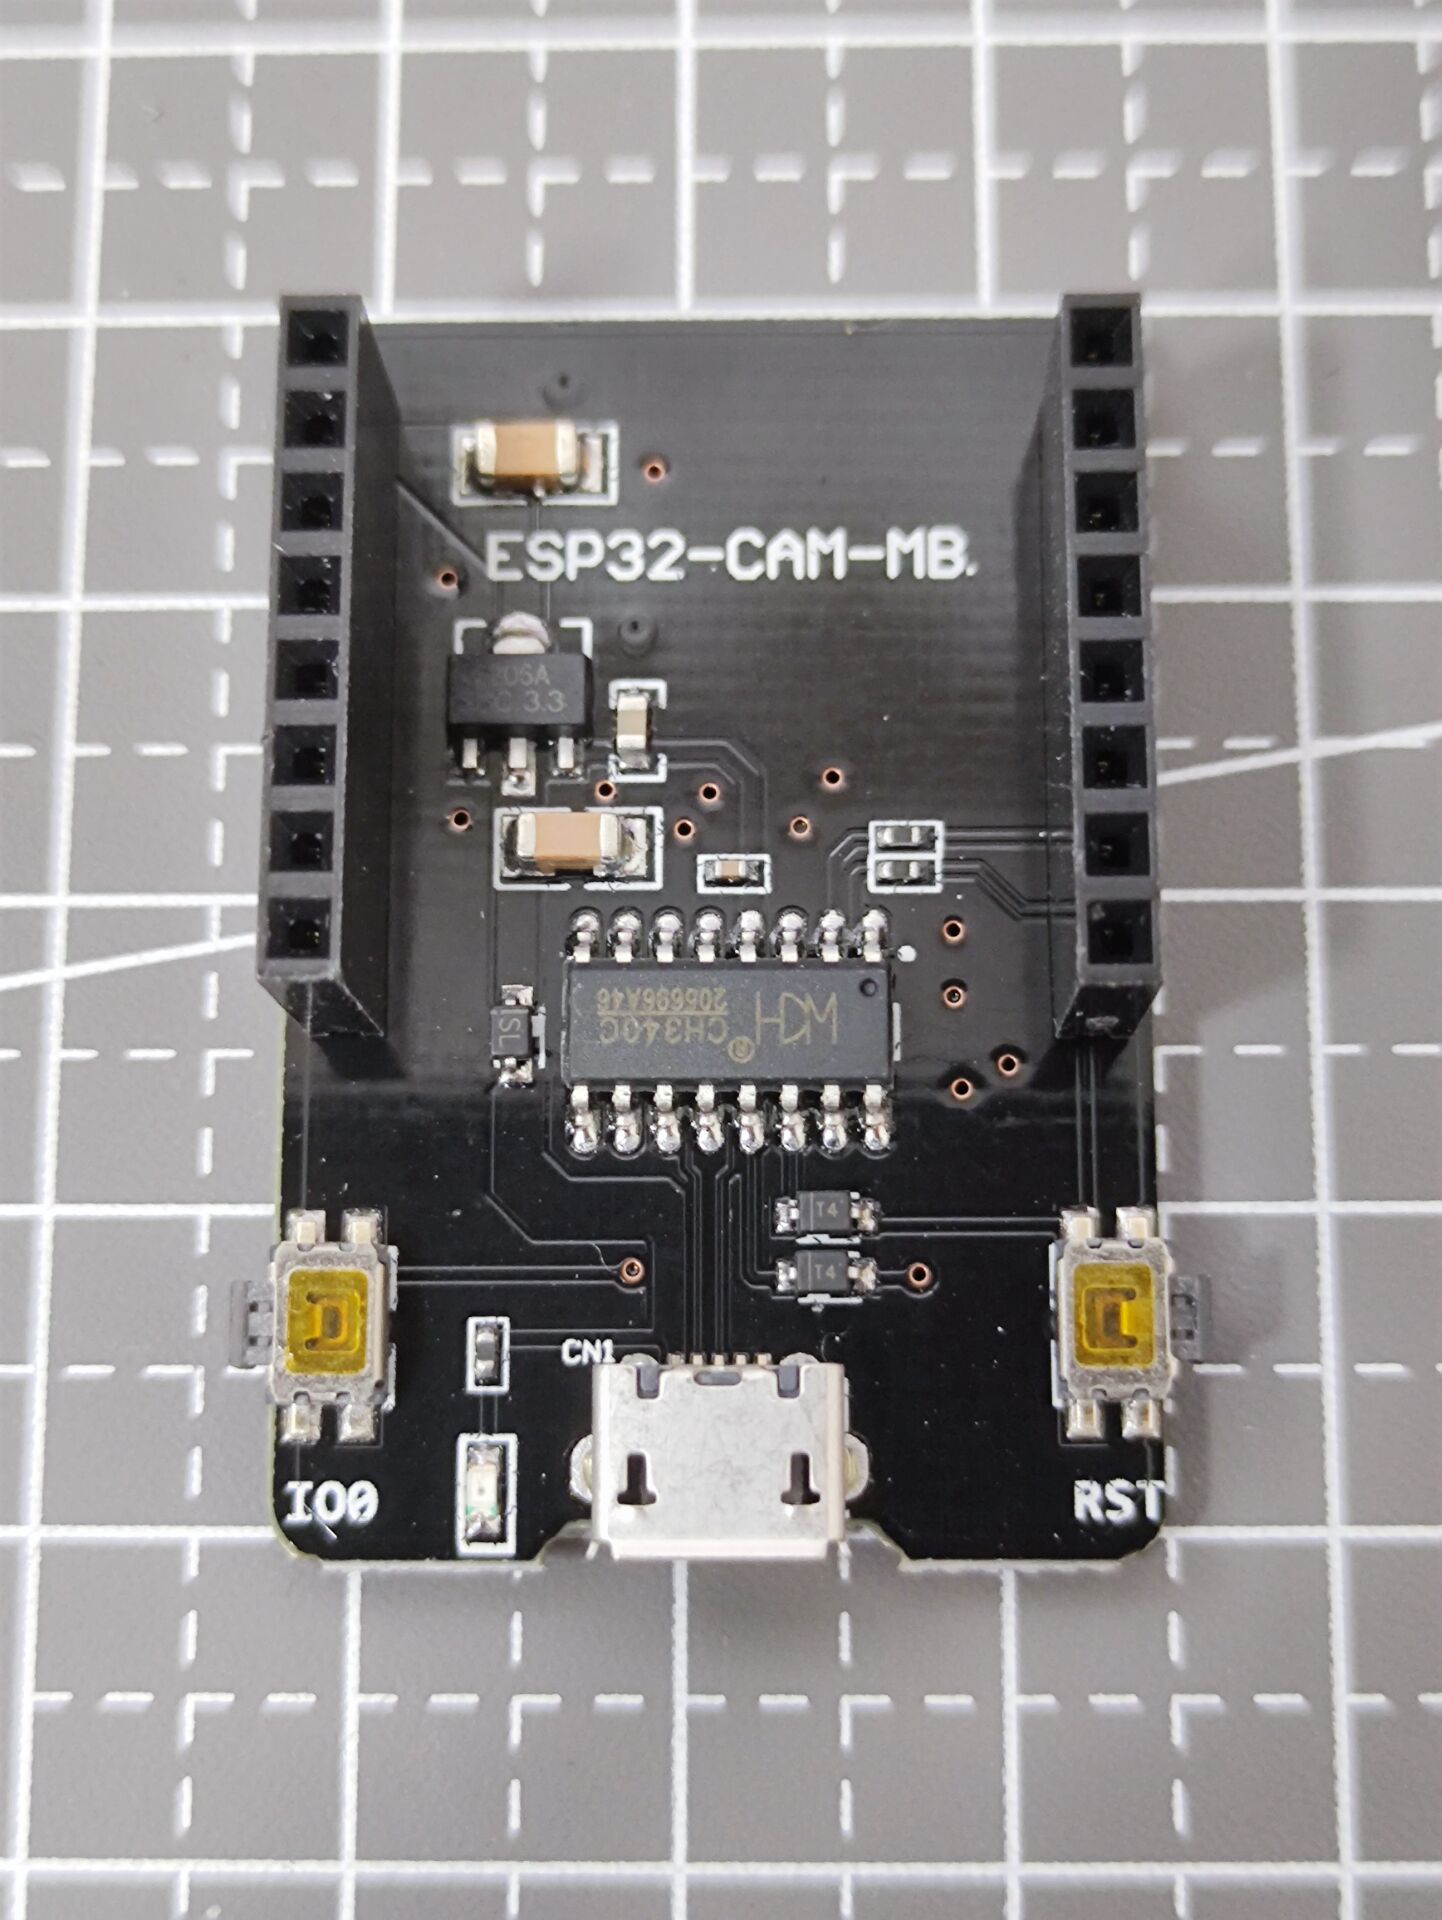
This article will use Arduino Leonardo to explain, with articlesPlatformio IDE (vscode) Basic Used - New Project The newly built-in controlled LED flicker is an example.
The control of LED in this project is blocked because it is used.delay Method, it is to die, which causes waste of operational resources. Is there a better way to control LEDs flash in cycle without blocking? The author naturally thought of using timer controlled LEDs, so this has our new demand, there is a third-party library support timer operation!
Pio provides a good way to help us find and manage third-party libraries. Let's take a look at how to find the third-party library we need together in the next section.
2. Management of third party libraries
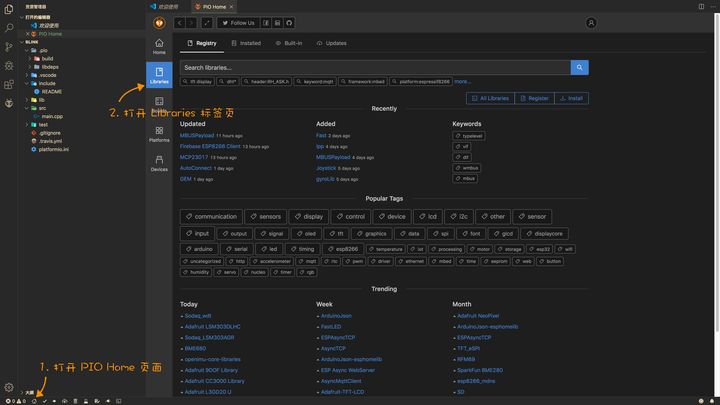
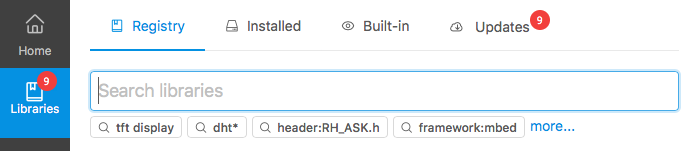
First we open the blink project, then open the Pio Home page, click on the left.Libraries Label Open the tab of the library, we will see four tabs in the label page of the library are:
- Registry: Warehouse, here we can find the third-party library we need, you can also see the keyword label sorted by the download, you can also see the download rankings of the latest library.
- Installed: Here we can see the library that has been installed and manage them
- Build-in: Here we can see the installed platform and build library in the framework
- Updates: Here we can see the library that needs to be updated
2.1 Find
According to the needs mentioned above, we areRegistry Library in the tab, we search for the timer in English in the search boxTimer:
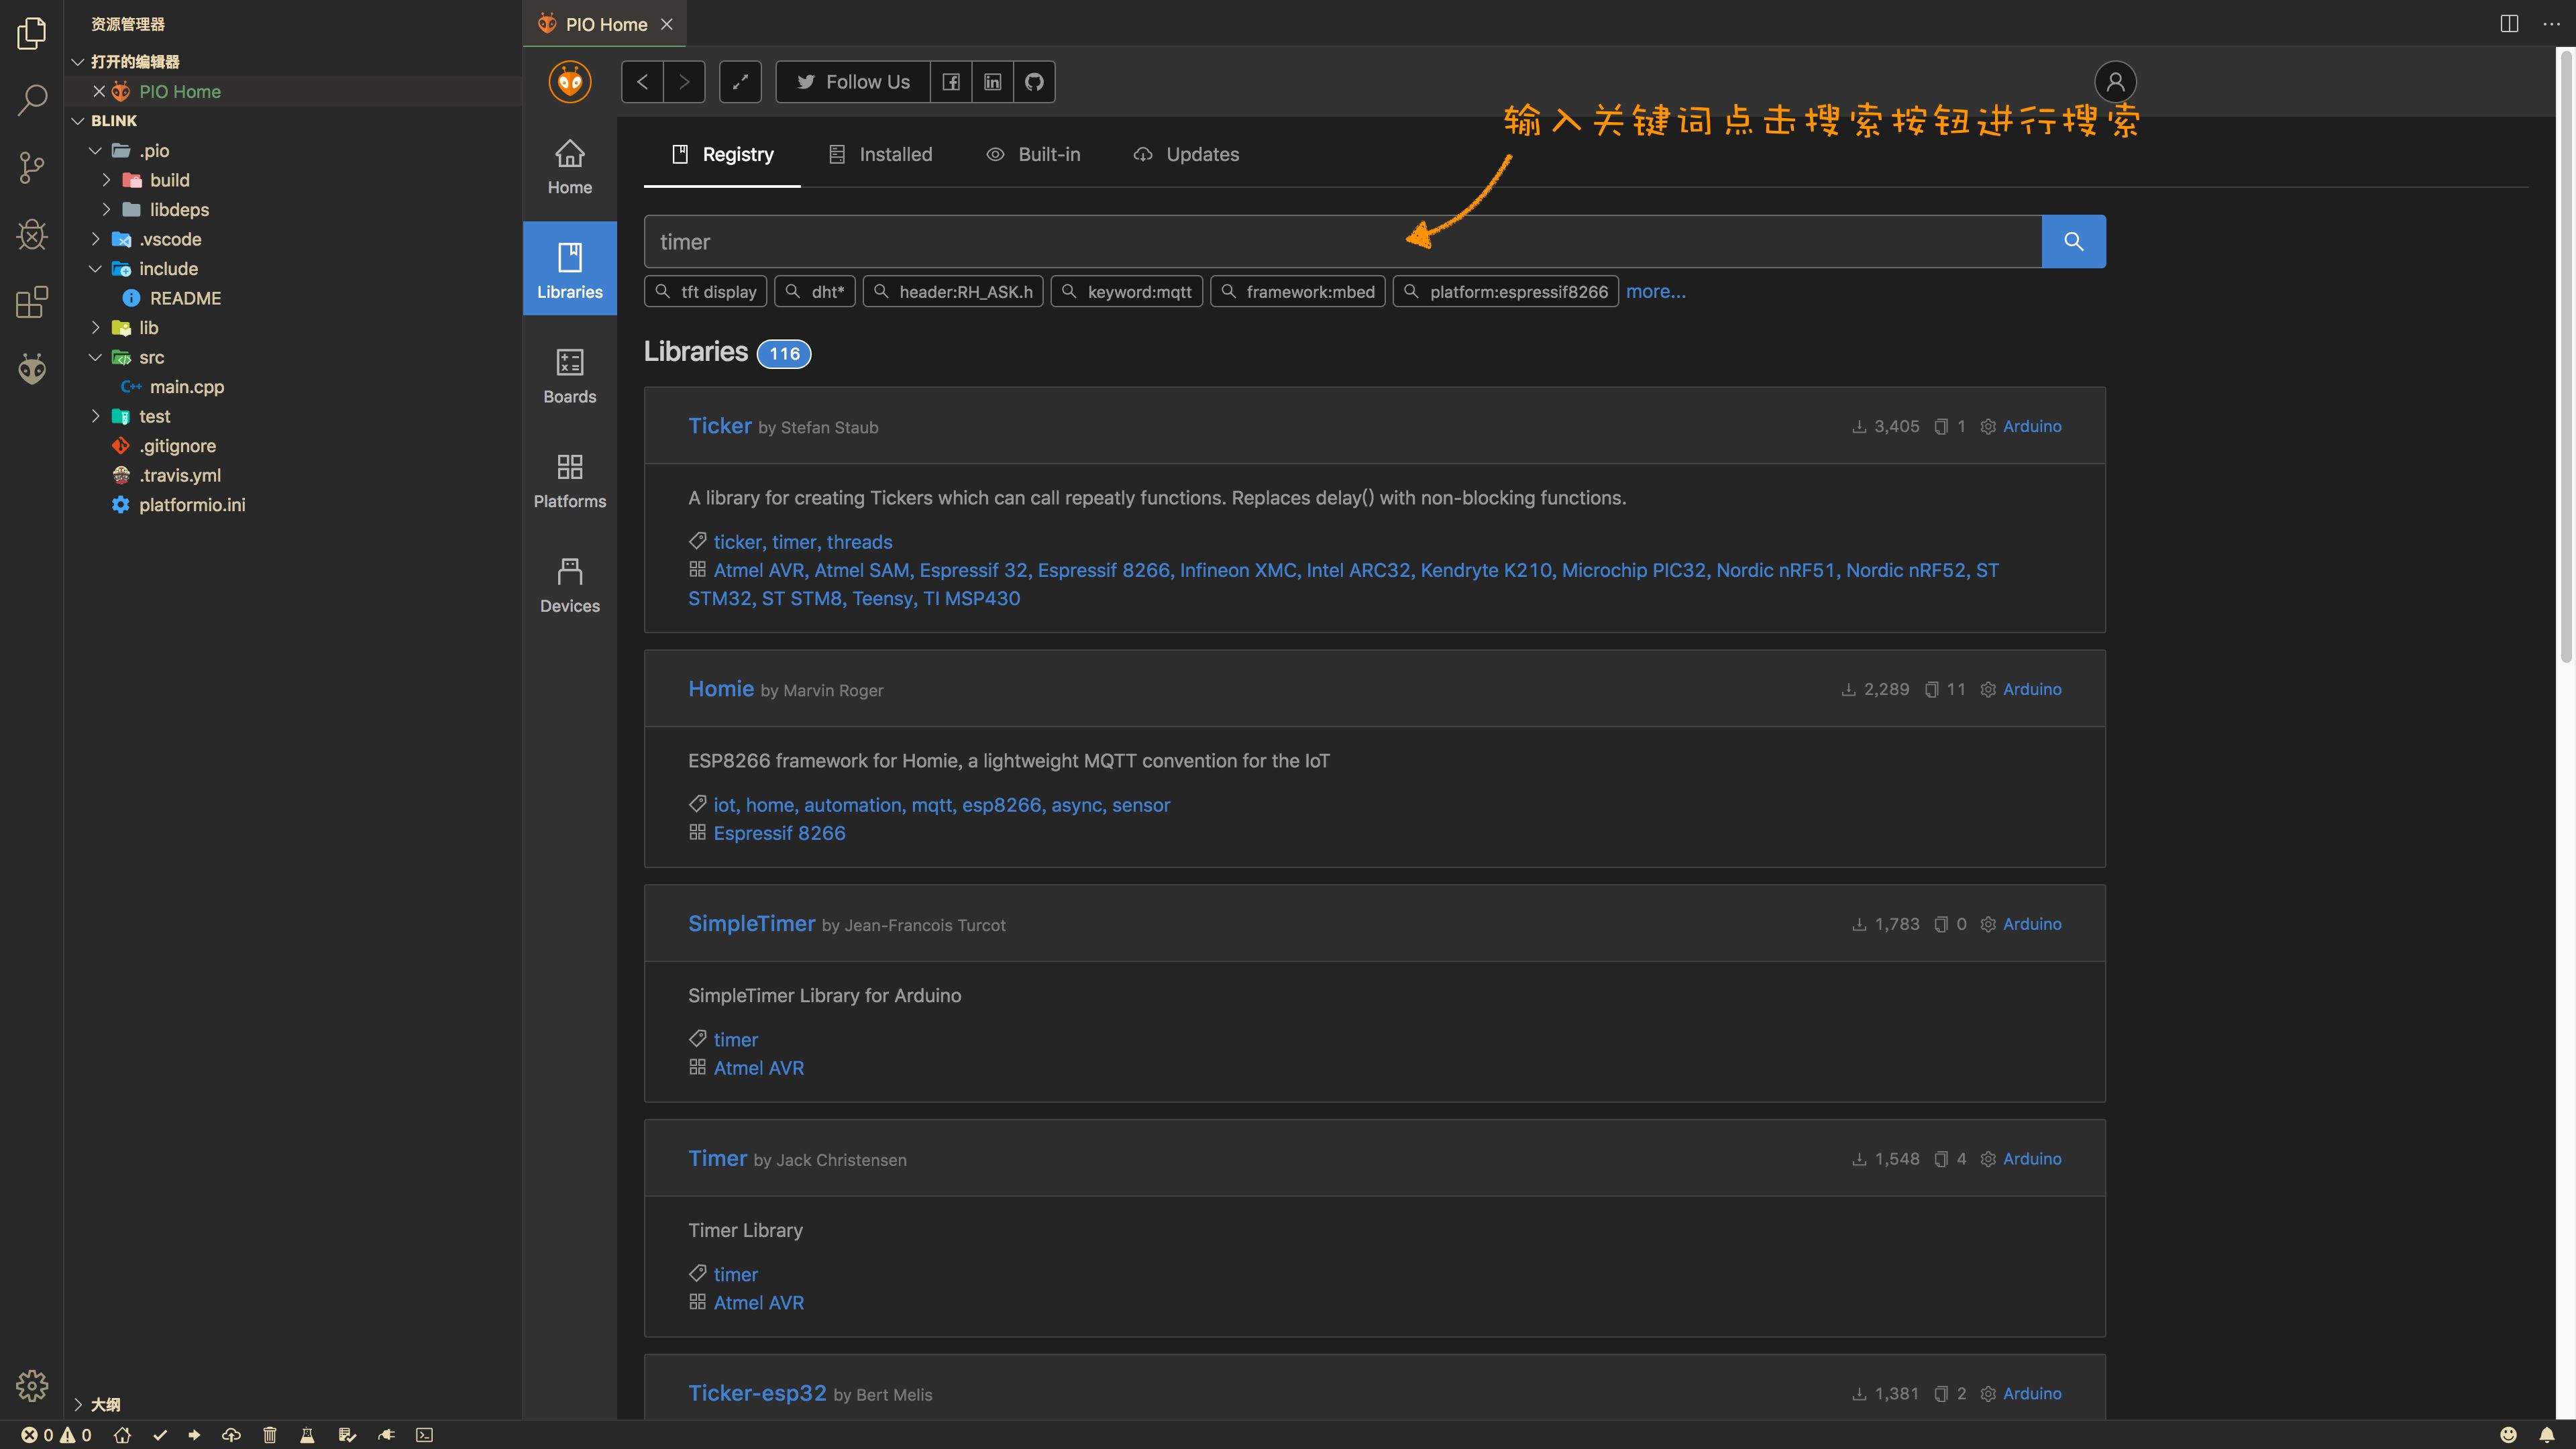
You can see the results listed, search priority will be searched by the framework, let's take a look at the specific entry, such as the first library.TickerThe information included in each entry is as follows:
- Name and function description
- Applicable frame
- Applicable platform
- Keyword label
- Others: Downloads, number of routines

According to the first description, it is in line with our needs. We click on the page to enter the library:
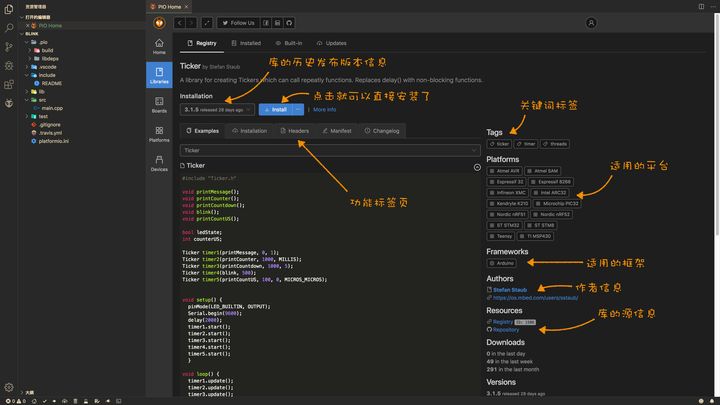
You can see five tabs, here is briefly explained:
- Examples: The routines contained in the library, some contain multiple, you can click the drop-down list to select different routines to view the code
- Installtion: Show how to use libraries in project engineering,
platformio.iniHow to configure in the file - Headers: The header included in the library
- Manifest: This generally doesn't care, showing this library in the PIO warehouse configuration information
- Changelog: Update the log
2.2 Installation of the library
The installation library is generally two forms, one is global installation, other project projects can also be used, the other is to install only to the designated project project.
ClickInstall Will be installed in the default, so other projects can be used without repeated installation.
Also, you can also click on the INSTALL button.... The button completes the installation of the specified location:
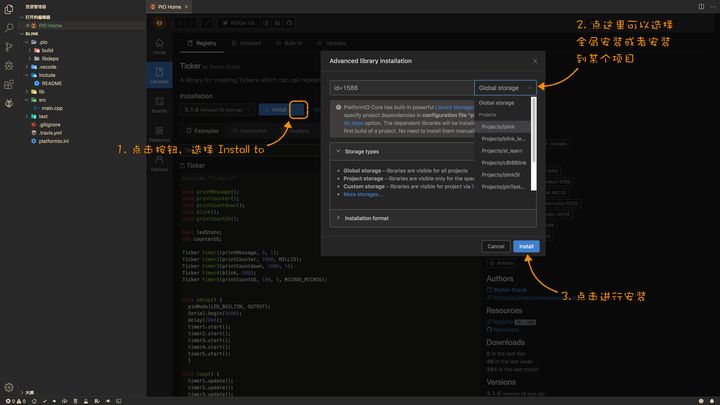
Here we use global installation, clickInstall The button can, and there will be pop-up prompts after the library is complete.
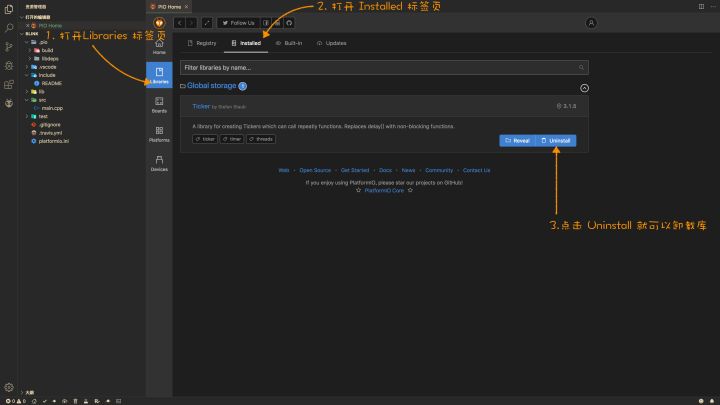
2.3 Uninstall
Sometimes some libraries may not be used, if you want to uninstall? Find the librairies's Installed tab, you will see we have just installed.Ticker Library, you can seeUninstall Button, click on it to follow the prompt operation to complete the uninstallation, clickReveal The button will open the directory of the installation library:
2.4 Update of the library
If the Pio Home is started, the library will be detected. If the library has a new version release, you will be updated in the libraries - Updates page, clickUpdate The button can be updated!
3. Use of library
3.1 configuration
Use the third party library in the page of the libraryInstalltion Label page show, such asTicker Library:
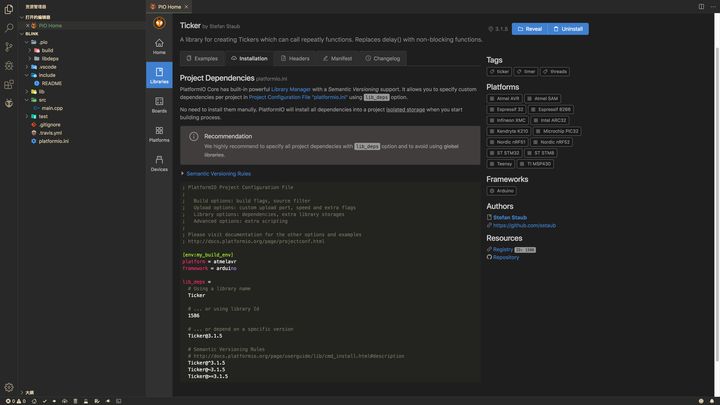
Neededpaltformio.ini Addlib_deps Item, specified library, there are three ways:
lib_deps =
# Use the name of the library
    Ticker

 # ... or use the library ID
    1586

 # ... or use the specified version of the library
    [email protected]

# Semantic Versioning Rules
# http://docs.platformio.org/page/userguide/lib/cmd_install.html#description
# Ticker@^3.1.5
# Ticker@~3.1.5
# Ticker@>=3.1.5
We use the first way here, eventuallyblink The project platformio.ini The content is as follows:
[env:leonardo]
platform = atmelavr
board = leonardo
framework = arduino
lib_deps =
  # Using a library name
  Ticker
It should be noted here that a project engineering is very likely to use multiple libraries, which is two grammar configurations:
; one line definition (comma + space)
[env:myenv]
lib_deps = LIBRARY_1, LIBRARY_2, LIBRARY_N

; multi-line definition
[env:myenv2]
lib_deps =
  LIBRARY_1
  LIBRARY_2
  LIBRARY_N
3.2 Use the library
This way we can include the header file of the library in the source code in the project and then use the library.
For example, it is still a flashing of 1s to switch the LED status implementation. It only needs to write the corresponding processing function, define the new Ticker specified processing function and time parameters, the code is as follows:
#include <Arduino.h>
#include <Ticker.h>

void blink() {
  static uint32_t state = 0;
  state ^= 1;
  digitalWrite(LED_BUILTIN, state);
}

Ticker timer(blink, 1000, 0, MILLIS);

void setup() {
  pinMode(LED_BUILTIN, OUTPUT);
  timer.start();
}

void loop() {
  timer.update();
  // Place another processing operation
}
Compiling uploading procedures, the LED's second flash is also achieved.
4. Another way (not recommended)
If you are using the Flatformiozhong unregistered library, you can choose other ways, such as library ABC:
- Download repository
- Decompression
- Place it in the directory in the lib project
5 Conclusion
This article simply says that the basic common operation of library management and use can meet the basic needs, if you need to know more, you can refer to:
Library Manager - PlatformIO 4.0.1rc2 documentationdocs.platformio.org
Intelligent Recommendation

PlatformIO development: use Arduino code framework to develop STM32
Introduction: PlatformIO can provide cross-platform code construction, integrated development environment, and can support 600+ kinds of embedded development boards. The following mainly talks about t...

How to use Arduino library files in PlatformIO IDE on VSCode
1. Find the "lib" folder under the project folder, and click to enter Here the blogger has moved the corresponding library files into the "lib" file directory in advance 2. Open th...

Arduino / VScode + Platformio builds an ESP32 / ESP8266 compilation environment (one is enough)
Arduino / VScode + Platformio builds an ESP32 / ESP8266 development environment (a feet) Preface: Getting-start open source hardware development, when building a compilation environment, I deliberatel...

Vscode + PlatformIO debugging the DS18B20 temperature module based on ESP32S2 with Arduino framework
Article catalog VSCode + PlatformIO + Arduino + ESP32S2 DS18B20 Temperature Module First, DS18B20 temperature module Second, prepare work Third, PlatformIO writing program Example program 2.debug 3. C...
VSCode + PlatformIO + Arduino ESP32-CAM camera remote control car
Article catalog Foreword First, ESP32-CAM 1 Introduction 2. Pin definition Second, the required components 1. Expanding the master or TTL to USB 2. Motor drive module 3. Car assembly Third, program se...
More Recommendation
Vscode + Platformio + ESP8266 + Arduino Development Environment Construction and Stepping Notes Set
VSCode + Platformio + ESP8266 Development Environment Construction and Tote Precautions Set Installation 1.1 Install VSCode 1.2 Search PlatformIO in the VSCode extension, then select the installation....

Develop stm32f103c8t6 minimum system under windows vscode+platformio
Recently I want to write a small project to update the firmware of a model airplane receiver, and transplant part of the code of the opentx project to my minimal system board. Inadvertently discovered...

Use VSCode+Platformio+HAL+Cubemx+Zhengdian atomic library to develop STM32F407ZGT6
Articles directory Preparation Download vSCode Install Chinese plug -in Install Platformio plug -in Download Cubemx Creation project Install the STM32 platform Create a new project-Platformio Create a...
PlatformIO Development Arduino
1, install Platformio plugin in vs code 2, click on PlatformIO icon → Open, open the PIO HOME homepage 3. Click New Project in the PIO HOME home page to create a new project 4, fill in the projec...
Develop arduino compiler slow solution in vscode
Every time in the vscode, the time it takes to compile the Arduino is so long, and so on. Look carefully every time there is a warning on the Arduino output console. [Warning] Output path is not speci...