Install and run AIX 5.1 using QEMU
Foreword
This article is only used to record the process of my attempt to virtualize Power5 CPU through Linux on QEMU, install and run AIX5.1. The Ubuntu and AIX 5.1 installation procedures involved are only applicable to this procedure.
Reference to neozeed (https://virtuallyfun.com/wordpress/2019/04/22/installing-aix-on-qemu) And astr0baby (https://astr0baby.wordpress.com/2019/04/26/running-aix-5-1-on-qemu-system-ppc/) Article.
Copyright and trademark
copyright
The q40pofw-serial.rom firmware and QEMU source code used are downloaded from the github site of Artyem Trasenko (https://github.com/artyom-tarasenko/), the right to interpret copyright belongs to the author.
The AIX operating system is a closed-source commercial operating system owned by IBM and is not free software. Please delete it within 24 hours after the installation is complete.
trademark
QEMU is a registered trademark of Fabrice Bellard in the United States and/or other countries.
Linux is a registered trademark of Linus Torvalds in the United States and/or other countries.
Ubuntu is a registered trademark of Canonical Ltd. in the United States and/or other countries.
IBM, ibm.com, AIX, Lotus, Power5 are trademarks of IBM Corporation in the United States and/or other countries.
Microsoft, Internet Explorer, Windows and the Windows logo are trademarks of Microsoft Corporation in the United States and/or other countries.
Intel is a trademark or registered trademark of Intel Corporation or its subsidiaries in the United States and other countries or regions.
Oracle, JavaScript and Java are registered trademarks of Oracle and/or its affiliates.
1 Experimental environment
1.1 Hardware
DELL M3800 ( Intel(R) Core(TM)i7-4712HQ )
1.2 Software
Microsoft Windows 10 Professional Edition 1903 [Version 10.0.18362.267]
Ubuntu 18.04.3 LTS (Linux sv-ub-01 4.15.0-55-generic #60-Ubuntu SMP Tue Jul 2 18:22:20 UTC 2019 x86_64 x86_64 x86_64 GNU/Linux )
2 Preparation
2.1 Download
Download the Ubuntu Server 18.04.3 LTS CD file image ubuntu-18.04.3-live-server-amd64.iso (https://ubuntu.com/download/server)
Download the installation file for AIX 5.1 (https://winworldpc.com/product/aix/51). Download at least CD1, CD2, CD3, CD4.
Download putty (https://www.chiark.greenend.org.uk/~sgtatham/putty/latest.html) Used to connect Ubuntu and AIX, you can also use other terminals.
Download Xming (https://sourceforge.net/projects/xming/files/Xming-mesa/) X11 GUI for connecting to AIX. If you do not need a graphical interface, you may not install it.
2.2 Settings
Enable Hyper-V in Windows 10
Run Windows PowerShell with administrator rights to create a virtual switch with a static address:
PS C:\Windows\system32> New-VMSwitch -SwitchName "NAT" -SwitchType Internal -VerboseDetails: New-VMSwitch will create a new virtual switch "NAT".
Name SwitchType NetAdapterInterfaceDescription
---- ---------- ------------------------------
NAT Internal
PS C:\Windows\system32> Get-NetAdapterIn order to view the ifIndex number of vEthernet (NAT)
Name InterfaceDescription ifIndex Status MacAddress LinkSpeed
---- -------------------- ------- ------ ---------- ---------
WLAN Dell Wireless 1560 802.11ac 24 Up XX-XX--XX-XX-XX-XX 135 Mbps
vEthernet (Ext Switch) Hyper-V Virtual Ethernet Adapter #2 19 Up XX-XX--XX-XX-XX-XX 135 Mbps
Bridges Microsoft Network Adapter Multiplexo... 18 Up XX-XX--XX-XX-XX-XX 135 Mbps
Bluetooth network connection Bluetooth Device (Personal Area Netw... 13 DisconnectedXX-XX--XX-XX-XX-XX 3 Mbps
vEthernet (Default Swi... Hyper-V Virtual Ethernet Adapter 30 Up XX-XX--XX-XX-XX-XX 10 Gbps
vEthernet (NAT) Hyper-V Virtual Ethernet Adapter #3 37 Up XX-XX--XX-XX-XX-XX 10 Gbps
PS C:\Windows\system32> New-NetIPAddress -IPAddress 192.168.204.1 -PrefixLength 24 -InterfaceIndex 37 -Verbose
Details: Performing operation "New" on Target "NetIPAddress -IPv4Address 192.168.204.1 -InterfaceIndex 37 -Store
Active"
Details: Performing operation "New" on Target "NetIPAddress -IPv4Address 192.168.204.1 -InterfaceIndex 37 -Store
Persistent"
IPAddress : 192.168.204.1
InterfaceIndex : 37
InterfaceAlias : vEthernet (NAT)
AddressFamily : IPv4
Type : Unicast
PrefixLength : 24
PrefixOrigin : Manual
SuffixOrigin : Manual
AddressState : Tentative
ValidLifetime : Infinite ([TimeSpan]::MaxValue)
PreferredLifetime : Infinite ([TimeSpan]::MaxValue)
SkipAsSource : False
PolicyStore : ActiveStoreIPAddress : 192.168.204.1
InterfaceIndex : 37
InterfaceAlias : vEthernet (NAT)
AddressFamily : IPv4
Type : Unicast
PrefixLength : 24
PrefixOrigin : Manual
SuffixOrigin : Manual
AddressState : Invalid
ValidLifetime : Infinite ([TimeSpan]::MaxValue)
PreferredLifetime : Infinite ([TimeSpan]::MaxValue)
SkipAsSource : False
PolicyStore : PersistentStore
PS C:\Windows\system32> New-NetNat -Name NATNetwork -InternalIPInterfaceAddressPrefix 192.168.204.0/24 -Verbose
The reason for this is that the default virtual switch always changes the DHCP network segment randomly. If you use a static IP, you have to change it every time to connect to the network, which adds unnecessary trouble. This step is optional.
3 Install Linux
3.1 Install Ubuntu using Hyper-V Manager
3.1.1 Hyper-V settings:
Hardware compatibility: first generation
Memory: 4096MB
CPU:4
Network adapter: NAT
3.1.2 Ubuntu installation process
Install Ubuntu Server
Language: English
Network Configuration:

File system:

Install OpenSSH Server
Do not select Featured Server Snaps
Restart after installation.
Note: If the Ubuntu logical volume space is insufficient, you can expand the corresponding logical volume
$ sudo lvdisplay
$ sudo lvextend -L +10G /dev/ubuntu-vg/ubuntu-lv
$ sudo resize2fs /dev/ubuntu-vg/ubuntu-lv
3.2 Compile and install QEMU
3.2.1 Install QEMU dependent packages
Connect to ubuntu via ssh
$ sudo apt  update
$ sudo apt  upgrade
$ sudo apt  install build-essential pkg-config libz-dev libglib2.0-dev libpixman-1-dev libfdt-dev
$ sudo apt install python2.7
3.2.2 Obtain and compile QEMU source code
$ git clone --branch 40p-20190406-aix-boots --single-branch https://github.com/artyom-tarasenko/qemu.git
$ ./configure --target-list=ppc-softmmu --disable-sdl --disable-vnc --disable-gtk --python=python2.7
Because the QEMU host server does not require a sound card, edit the config-host.mak file before compiling
delete
CONFIG_AUDIO_DRIVERS=oss
CONFIG_AUDIO_OSS=m
Compile and install
$ make -j4
$ make && make install
3.3 Set up a bridge network for the QEMU virtual machine on Ubuntu
3.3.1 Install dependent toolkit
$ sudo apt install uml-utilities
$ sudo apt install bridge-utils
3.3.2 Set up a bridge network
$ su –

#Setup tap and bridge use root
tunctl -t tap0 -u user01
ifconfig tap0 up
brctl addbr br0
brctl setfd br0 0
ifconfig br0 10.0.2.2 netmask 255.255.255.0 broadcast 10.0.2.255 up
brctl addif br0 tap0
ifconfig tap0 0.0.0.0
sysctl net.ipv4.ip_forward=1
Note: user01 in the above command is the user name of the current user, root is not recommended.
3.3.3 Network firewall settings
$ sudo iptables --table nat -A POSTROUTING --out-interface wlan0 -j MASQUERADENot required, if using iptables firewall.
3.3.4 Modify QEMU network startup script /etc/qemu-ifup
#! /bin/sh
# Script to bring a network (tap) device for qemu up.
# The idea is to add the tap device to the same bridge
# as we have default routing to.

# in order to be able to find brctl
PATH=$PATH:/sbin:/usr/sbin
ip=$(which ip)

if [ -n "$ip" ]; then
ip link set "$1" up
else
brctl=$(which brctl)
if [ ! "$ip" -o ! "$brctl" ]; then
echo "W: $0: not doing any bridge processing: neither ip nor brctl utility not found" >&2
exit 0
fi
ifconfig "$1" 0.0.0.0 up
fi

switch=$(ip route ls |
awk '/^default / {
for(i=0;i<NF;i++) { if ($i == "dev") { print $(i+1); next; } }
}'
)

switch=br0

# only add the interface to default-route bridge if we
# have such interface (with default route) and if that
# interface is actually a bridge.
# It is possible to have several default routes too
for br in $switch; do
if [ -d /sys/class/net/$br/bridge/. ]; then
if [ -n "$ip" ]; then
ip link set "$1" master "$br"
else
brctl addif $br "$1"
fi
exit # exit with status of the previous command
fi
done

echo "W: $0: no bridge for guest interface found" >&2
3.3.5 Obtain the firmware that can start AIX
$ wget https://github.com/artyom-tarasenko/openfirmware/releases/download/40p-20190413/q40pofw-serial.rom3.3.6 Upload AIX installation CD image to Ubuntu
4 Install AIX 5.1
4.1 Create Virtual Hard Disk File
$ qemu-img create -f qcow2 aix5-hdd.qcow2 16G4.2 Start QEMU virtual machine
In order to avoid installation errors, start with a method that does not include a network connection.
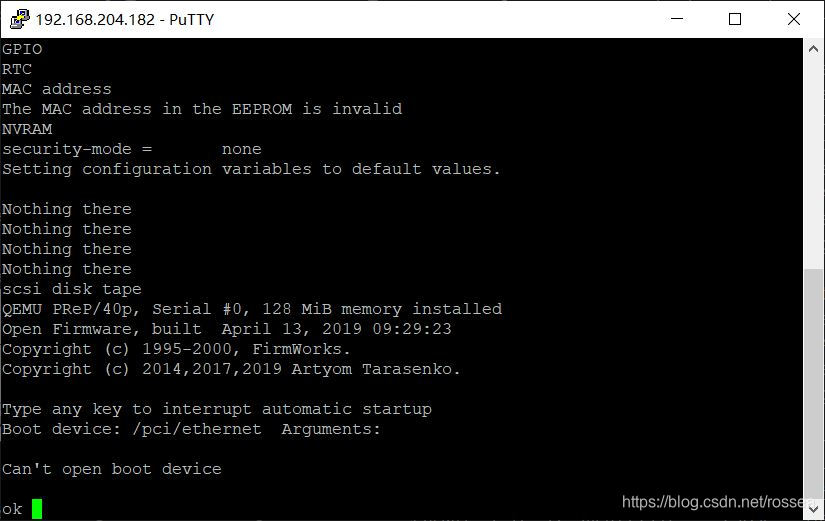
$ qemu-system-ppc -m 128 -M 40p -bios q40pofw-serial.rom -serial telnet::4441,server -hda aix5-hdd.qcow2 -vga none -nographic -net none -cdrom VOLUME1.iso4.3 Install AIX 5.1
Telnet to port 4441 of 192.168.204.182 to start the installation.
Mount cdrom
.partitions cdrom
Be sure to boot from cdrom:2
boot cdrom:2
Although there is no echo, type 1 and wait a few seconds, it still passes.


Generally use vt100


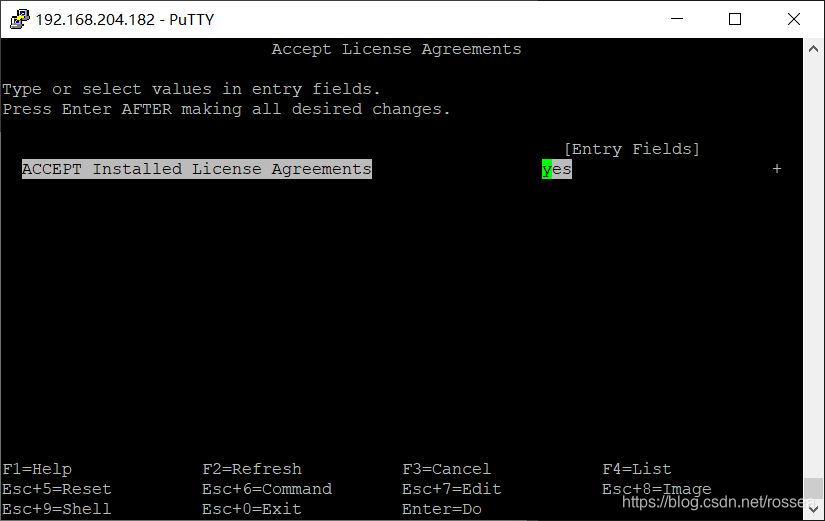

Select the last item Task Completed-Exit to Login. After the installation is completed, it will restart.

When restarting, select disk to start
boot disk

After logging in as root, select the terminal type
# export TERM=vt100
Confirm that shutdown -Fh can shut down normally, and display...Halt completed...
4.4 Mount the virtual network card
4.4.1 Start QEMU virtual machine
$ sudo qemu-system-ppc -m 192 -M 40p -bios q40pofw-serial.rom -serial telnet::4441,server -hda aix5-hdd.qcow2 -vga none -nographic -L pc-bios -net nic -net tap -cdrom VOLUME1.iso4.4.2 Use smitty to install the network card driver
# export TERM=vt100
# smitty

Note: In putty default keyboard mapping, F3 is Esc-3 key combination, F4 is Esc-4 key combination...

4.4.3 Repair network card driver problems
Run as root on AIX
# cat > lance-chg.asc
CuAt:
name = "ent0"
attribute = "busio"
value = "0x01000000"
type = "O"
generic = "D"
rep = "nr"
nls_index = 3

^D
Note: ^D is the Ctrl-D key combination in putty
# odmchange -o CuAt -q "name=ent0 and attribute=busio" lance-chg.asc
# rmdev -l ent0
# mkdev -l ent0
# ifconfig en0 10.0.2.12
4.4.4 Setting the network address


After installing the network driver, you can ping 10.0.2.12 on the Linux host
PING 10.0.2.12 (10.0.2.12) 56(84) bytes of data.
64 bytes from 10.0.2.12: icmp_seq=1 ttl=255 time=1.90 ms
64 bytes from 10.0.2.12: icmp_seq=2 ttl=255 time=0.437 ms
64 bytes from 10.0.2.12: icmp_seq=3 ttl=255 time=0.359 ms
^C
--- 10.0.2.12 ping statistics ---
3 packets transmitted, 3 received, 0% packet loss, time 2021ms
rtt min/avg/max/mdev = 0.359/0.901/1.909/0.713 ms
From the Linux host telnet 10.0.2.12, you can log in as root.
4.5 Install CDE and other software
4.5.1 Installing CDE using smitty
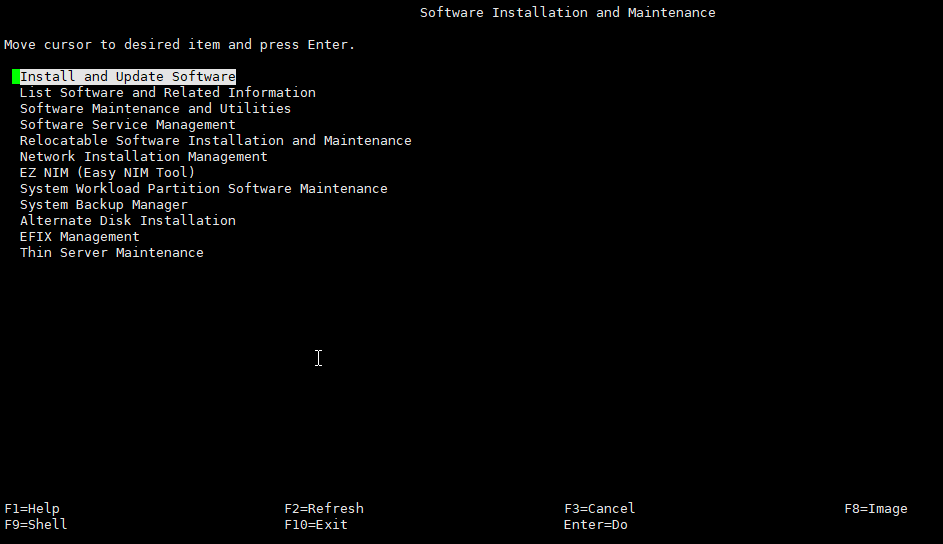
Software Installation and Maintenance -- Install and Update Software -- Install Software Bundle --
Select INPUT device / directory for software, [/dev/cd0]
Choose CDE
4.5.2 Installing topas using smitty
Software Installation and Maintenance -- Install and Update Software -- Install Software --
SOFTWARE to install [bos.adt*, bos.dosutil*, bos.data*, bos.net*, bos.perf*, perfagent.tools*]
4.5.3 Connect to CDE on Ubuntu
Install and start Xming on windows.
Install xephyr on Ubuntu:
$ sudo apt install xserver-xephyr
$ Xephyr -screen 1024x768 -ac -query 10.0.2.12 :3

4.5.4 Other open source software
From Michael Perzl's legendary AIX Open Source Packages repo (http://www.perzl.org/aix/ ), you can find other open source software packages, which are installed under /opt by default.
Note: Before installing third-party open source software, pay attention to allocate /opt capacity, for example: chfs -a size=+1024000G /opt
Intelligent Recommendation
Using Composer to install TP5.1, zsh: no matches found: 5.1.*
Using Composer to install TP5.1, zsh: no matches found: 5.1.* Blog description The information involved in the article comes from the Internet and personal summary, which is intended to summarize pers...
Run Linux for ARMv8 on qemu
Run Linux for ARMv8 on qemu For many Geekers who love ARM Linux, if you turn on your computer anytime, anywhere, you can quickly build an ARM Linux development environment and perform various hacks, w...
run LK in Qemu
Install ARM GCC Install QEMU Download LK Run Qemu from the lk directory Help View Command List: ...
Qemu (1) --- run CK860 QEMU under ubuntu
Today, a QEMU of the C-Sky platform was built on Ubuntu. Let's start. 1. Download QEMU OpenPingtou Ge CommunityTo enter the community, you need to register a username, and everyone register as needed....
【QEMU】 QEMU Run the Linux kernel summary
【The effect goes a wave】 【Equipment Platform】 operating system:ubuntu system version:lts 18.4 Architecture:x86_64 1. The installation of QEMU Enter the following commands under ubuntu terminal for ins...
More Recommendation

Install jdk in IBM's aix system
I will be very free recently, so I have the opportunity to share my knowledge accumulation over the past year. Mainly linux, aix, weblogic, cluster, server management, code specification checks and ot...
Install software and patches in AIX system
1. Preliminary preparation 1. To install system software and dependent packages, insert the CD into the CD-ROM drive 2. To install other software and software packages, you need to download the RPM pa...
Install QEMU on ubuntu
Learn THU's operating system open class, install QEMU for experimentation, and use it as an ARM development board. 1. Download and compile QEMU 3.0.0 version In progress./configureThere are two errors...
Ubuntu install qemu
1. Download Source qemu Download qemu:https://www.qemu.org/download/ 2. decompression qemu 3. Enter the file qemu 4. Compile Source qemu ./configure Error: Solution: apt-get install python Error: Solu...
ubuntu compile and install qemu
1. Download qemu Can be downloaded from the official website:https://www.qemu.org/ You can also download on github:https://github.com/qemu/qemu 2. compile and install Reproduced in: http...